New wreath tutorial with supplies from Trendy Tree. The supplies for this wreath are available in a kit, while supplies last. But even after the kits sell out, we'll leave the tutorial up since the basic instructions can be followed and just different products used.
Supplies:MD0229 - Pink pig pieces
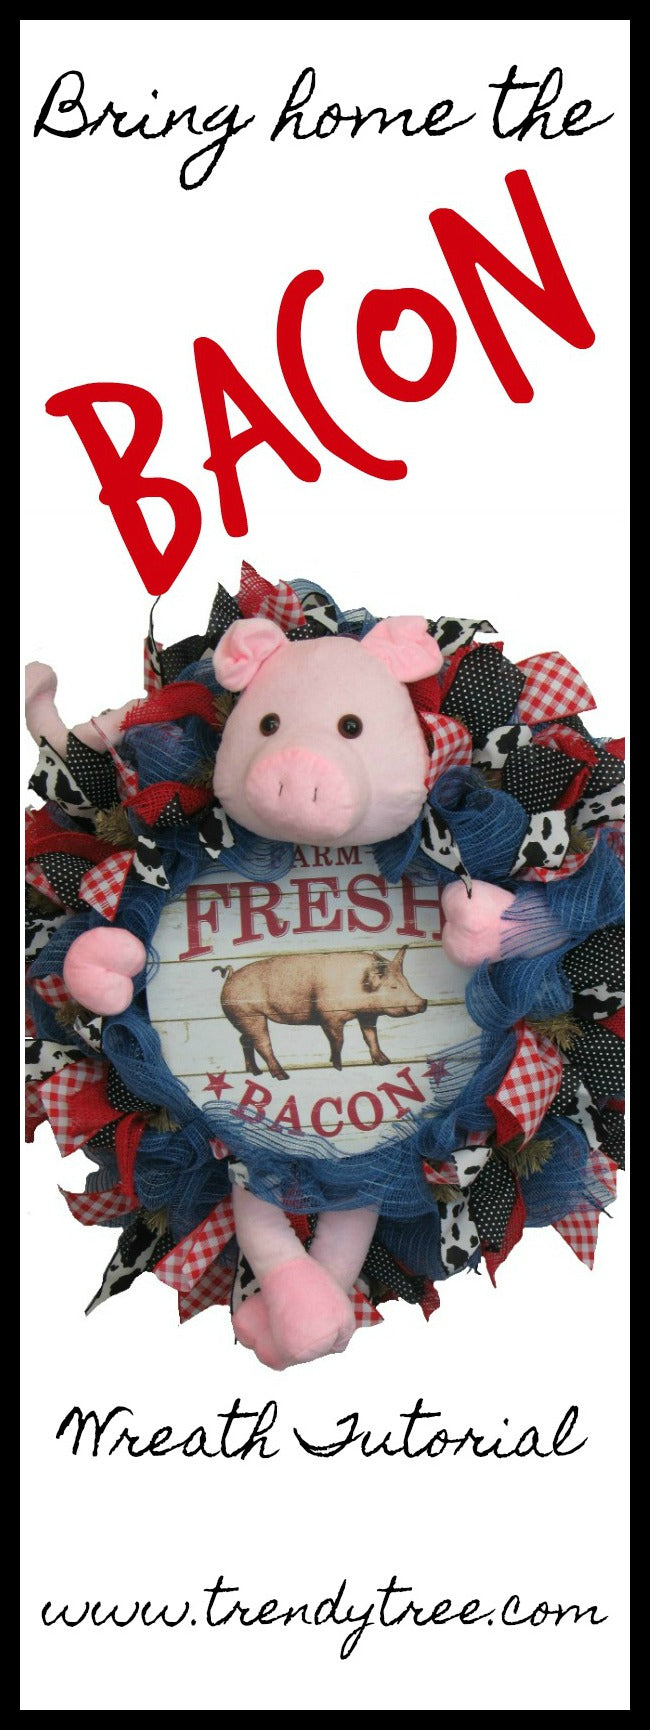
MD0371 - Bacon Sign - 1
XB94510-27 - 10" Denim Mesh - 2 Rolls
RA131824 - 1.5" Red Burlap - 1
RG0165202 - 2.5" Black Swiss Dots - 1
RG179624 - 2.5" Red White Gingham - 1
RG1689NY - 1.5" Cow Print - 1
XX7488W4 - 24" Burlap Work Wreath -
Purchase Kit: 2018 Farmhouse Pig Wreath KitSummary:
24" Burlap Work Wreath: We chose a 24" wreath for this project, it is the most common size. Our 24" wreaths measure 15" across the largest wire ring and with the addition of mesh, ribbons, etc you finish with a wreath that measures 24" or larger. Another color or a 24" Pencil wreath would work just as well with this wreath.
Mesh: We chose a denim color mesh, 10" in width and 10 yards in length. It takes two rolls. It doesn't take completely all the two rolls, but one is not enough.
The mesh was cut into 15" length to do the ruffle technique. We cut 36 pieces of mesh. There is usually about 18 twist on a wreath and we put two 15" ruffles in each twist.
To make the ruffle, just take the 15" piece of mesh, and scrunch up through the center, hold it pinched and secure in one of the twist. We started on the outside and only gave the twist a couple of turns just to hold the ruffle in place. You can do two ruffles at a time, just stack them crossways a bit so they are not stacked right on top of each other. Put two ruffles in each twist and continue to work around the outer ring.
In the past, we had done the ruffle technique with three pieces of 10" x 10" ruffles and we saw Lori with Hard Working Mom do ruffles with 30" pieces of mesh. This works well and you do have less raveling. So you have options on doing your ruffles, just pick your preference.
When the outer ring is completed, move to the inner ring and continue with two ruffles in each twist.
To cut our mesh we use a couple of tools that you just really can't do without)) One is an Omnigrid Self-Healing Cutting Mat
and a 60mm Fiskars Stick Cutter. We don't sell these tools on Trendy Tree right now, but we have included our Amazon links.
Ribbon Strips: We chose four ribbons for this project. Two were 2.5" in width and two were 1.5" in width. 18 Pieces of each style of ribbon was cut into 12" lengths. We made a ribbon cluster by taking one each of the four styles of ribbon and pinching it in the center. Secure this cluster of ribbon right on top of the ruffles by opening up the twist, lay the ribbon cluster down and then re-secure the twist this time with 3-4 turns. Make sure ribbon is laying face size up. Separate the ribbons gently to fluff out. You'll have to do this more than once since as you work with the wreath you will flatten some of them.
We used wire edge ribbon because it's can be shaped. There will be ribbon left over, enough for some bows if you wish. Ribbon can be added in a number of ways. You can make several large bows if you prefer. You can also do a combination of loops and strips.
Metal Sign: The metal sign has a hole at the top and bottom. If you want to secure it in more than those two places, you can punch a hole in the sides with a metal hole punch. We added a chenille stem to the sign and secured it to the wreath form. Position the sign where you can secure to the wreath form at post area, this will help keep the sign centered.
Don't push the sign too far down in the wreath or the ruffles and ribbons will cover up the writing. Let the sign lay more on top of the wreath rather down in the middle.
You may want to hang the wreath on a wall or door to get your position. Just keep adjusting until it's centered like you want.
You will have to gently pull the ruffles and ribbon strips out from around the sign so they aren't squashed down by the sign. If you cover up the wording too much, you can tuck some of the ruffles and ribbons out of the way.
Pig: The pig pieces (head, feet, tail) all have wires for attaching. Just hang the wreath on the wall so you can decide where you want to place the pieces. The wires on the pieces will get hung in the mesh easily so don't attach them until you are pretty sure where you want the placed.
We placed the head on the top, sort of right on top of the mesh and ribbons. Hold the head in place and work the wires through the mesh and ribbon until you can reach it from the back. Attach the wires to the work wreath frame. If this pulls the head back too far, just try attaching to some of the twists. Do the same for the other pieces.
Finish: Check your wreath from the back to make sure you don't have any sharp objects that might scratch your door or wall. Clip your strings. All mesh ravels and the more cuts you have in it, the more raveling. Clipping strings rather than pulling seems to help.
Don't you just love bacon))))