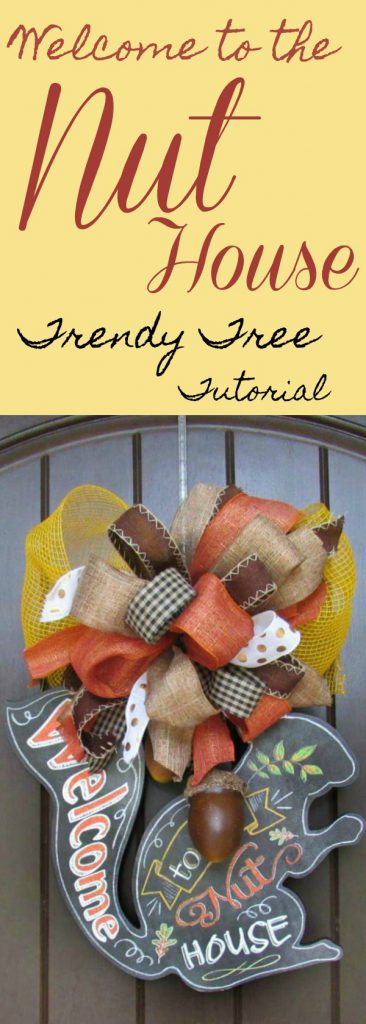
Welcome to the Nut House! Well....that's what the sign says)))) This is was just made for Carrie's front door)))
We had intended to use this sign on a wreath tutorial, but decided it was cute enough just to use alone with a big bow on top, and we added a couple of nuts too))
Supplies:
2354350 Squirrel Door Hanger (sold out, no more will be available)XB97910-49 10" Sunflower Fabric Mesh
RG0101352 2.5" Copper Metallic Ribbon (sold out, no more will be available)
X711509-38 1.5" Chocolate Canvas Ribbon (sold out, no more will be available)
RG01013H7 2.5" Brown - no longer available, but you could substitute ZXP-TT01 1.5" Faux Burlap Ribbon
Q717609-01 1.5" Ivory Gold Dot Ribbon (sold out, no more will be available)RG01320W2 1.5" Navy Tan Check
260372 Acorn Spray
Summary: We made our bow from scrap ribbon, so that's why in the supply list you see one ribbon that is no longer in stock. My bad. I meant to use all ribbons that were still available, but that's the nice thing about making a bow like this....it's a great way to use up your ribbon remnants!
Squirrel Sign: This cute squirrel shaped sign is made of wood and measures about 16" It has wording "Welcome to the Nut House."
The writing is in several different colors, so most any fall color ribbon would work. It has a small ribbon hanger attached.
The door hanger is only $10.25 too which is reasonably priced for a hanger this size.
Fabric Mesh: We chose the Sunflower Fabric Mesh since this is a new color for this year and we haven't had a chance to make anything out of it yet. We just wanted to use a piece as a base for the bow for this project.
The Sunflower color is new and the fabric mesh is a combination product made up of 76% Polyester and 24% Polypropylene. So you can see it's more fabric than it is plastic which gives it great texture and body. The Sunflower yellow color is perfect for fall and for this project. It is also available in a 21" width.
We made a simple loop bow with a piece of the 10" mesh (leaving tails about 6-8"). You can see in the video I started with a little over a yard maybe and that was too short, so I wound up not cutting the mesh until after I had made my loops for my bow. The tails don't need to be too long on the bow because otherwise they would hang down and cover up the wording on the sign. I used a piece of floral wire to hold the bow, while Carrie made a "scrap" bow using the Bowdabra.
Ribbons: The ribbons we used are all listed above but they were scraps from our craft table, so there wasn't any particular number of strips of a pattern ect. For instance, we only had enough ribbon for two strips of the checked ribbon, so that's what we used. This is a great way to use up your scraps! You can also make a bow like this as full as you like. If you haven't made one one like this before, you might want to keep the number of strips to a minimum of five or six until you get the hang of it.
Strips were cut in 30" pieces. It is not necessary to use the Bowdabra, but it does come in handy to hold the ribbon strips. The Bowdabra is just the plastic piece that you see on the board we were using. My husband drilled four small holes into the base of the Bowdabra and secured it to the wooden board. We added some measurements with a permanent marker to make it easy to keep the loops the same size.
Take a ribbon strip, and make a loop of about 6". You can leave the tails even, or stagger them a little if you wish, but do keep the loops even. If you're holding the pinched ribbon in your hand (if you don't have a Bowdabra), just pick up another piece of ribbon, contrasting size and/or pattern, and make a 6" loop and keep holding your pinched ribbon together.
Carrie used the Bowdabra and just placed the looped ribbon in the Bowdabra, adding ribbon strip after ribbon strip right on top of the last strip (all in the same direction). Before she placed the first strip, we doubled a long piece of floral wire and placed it lengthwise down the center of the Bowdabra.
After all the ribbon strips had been placed, we pulled up the floral wire and made a slip knot, carefully securing the loop cluster, and eased it out of the Bowdabra. The floral wire was twisted a few times to hold the loops securely. At this point, the loops sort of look like an Octopus!
So, if you're holding the pinched ribbons in your hand, just secure the loops with a chenille stem, floral wire or zip tie. If you use a zip tie to hold your loops, slip a chenille stem or piece of floral wire under the zip tie before you pull it tight. The zip tie will hold your loops fine, but you need something in there to attach your bow to your project. We have other tutorials if you need to review.
Next step is to locate the "front and back" of each ribbon strip. You want to make sure you have one tail of each ribbon going toward the back and one going toward the front (face sides up). Once you have your back facing tails, take your floral wire and bring under your back tails and give the wire a couple of twists. This will help keep your back tails spread out.
We secured the ribbon bow to the fabric mesh bow with the wire, and then attached the bow to the squirrel hanger.
We used to sell the Bowdabra on Trendy Tree, but competition with Amazon is just too great for some things, so here's our Amazon affiliate link if you are interested. It's really a handy little device)) - BowdabraAcorn Spray: The Acorn Spray is something new in stock for this season and the acorns are pretty large on the spray. Each spray has two acorns which was plenty for this project. The length of the spray is about 25" and the acorns are probably 4-5" We cut the acorns off and wired them together with one hanging slightly lower than the other. A trick that Rachel showed me the other day was to take a piece of floral wire, and wrap it with floral tape. The floral tape is a bit sticky and if you wrap your wire first, you will get a better hold on items that you are wiring together. No slipping and sliding.
Once the acorns were wired together, we secured them to the back of the bow.
Well, that was it! Pretty easy for a cute door hanger))) Just another tip, if you worried about a wooden door hanger banging against your door every time it's opened and closed, you can take a couple of pieces of flat foam and hot glue to the back of your sign. They make wall protectors that you can buy in the frame department, but you could also use an old mouse pad, thin sponge, or even a piece of pool noodle! It's not going to show and as long as you keep it thin enough)) It's amazing the things you can do with a pool noodle! I sliced off a horizontal piece the other day to use as Styrofoam in the bottom of a vase. It was soft enough to go right in the round vase and held the stems okay too.....we get thrifty in our old age!
Happy Fall Y'all!
Save