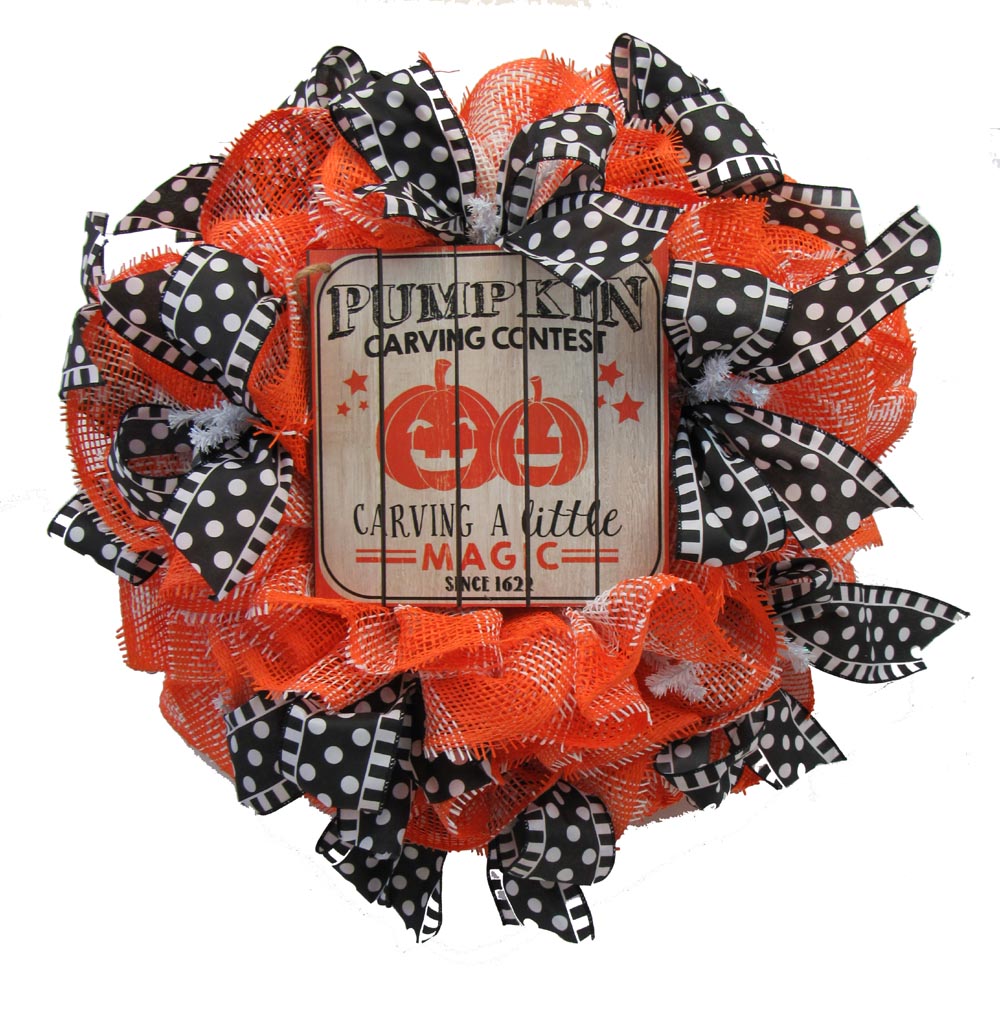
Quick easy Halloween wreath! This wreath was made using the ruffle technique and assorted Halloween signs.
The products we used for this tutorial will be in a kit - while supplies last. Some of the products may also be on the website for individual sale. After the kits sell out and even the exact products we used for this tutorial, we will leave the tutorial up since the basic instructions can still be followed and different products chosen for a similar wreath.
Supplies:3716261 Wooden Halloween Sign Assorted (
XX167950 10" White Iridescent Pencil Wreath
RR800241 10" Orange White Paper Mesh
RG01371X6 2.5" Black White Stripe Polka Dot Ribbon
10/29/17 Update: Kits containing all the supplies have sold out, but some of the individual supplies may still be available.Summary:Pencil Wreath: We chose a 10" pencil wreath for this product and made the wreath with the thought that it would be a good decoration to use inside as a wall decoration or on a table top easel especially since paper mesh was used. The 10" pencil wreath actually measures 10" across the widest part but with the addition of other products, the finished wreath usually measures around 20"
You could use other colors of pencil wreaths for this project - orange, plain white etc.
Paper Mesh: The paper mesh we chose was an orange and white check product. It measures 10" in width and 10 yards in length. It is made of paper. The paper mesh does have a coating on it to help resist moisture, but it is still made of paper. I have used paper mesh on my back porch many times and it has held up okay, but it's really in a well protected area. This wreath would be a nice size to use on a table top easel or on an interior wall, countertop etc.
Paper mesh is also known for raveling quite a bit and there isn't much you can do about it, but a technique that we learned from Lori "Hard Working Mom" has helped. We watched her do a video where she cut her ruffle pieces in 30" lengths. Typically in the past we had cut pieces in 10" lengths and made a cluster of three ruffles in each twist. You actually get about the same effect if you just cut one piece 30" in length and make one ruffle. It's a little bulky to handle, but still there is less raveling.
We have also experimented with spraying finished ruffles with Elmer's Craft Bond Spray Adhesive. This has helped with fraying but is sort of messy to use. If you decide to try it, experiment with it first. When we did a test project, we sprayed the ruffles after they had been secured to the wreath. The ruffles will be become sticky and you have to gently lift out and separate them a bit. But once it dried, it did help the raveling. We're not doing this for our tutorial today. But that's an option you might want to try.
We cut the pieces of paper mesh 30" in length. To cut our mesh, we used a Fiskars 60mm Stick Cutter on an Omnigrid Self-Healing Cutting Mat. These two tools are very helpful when wreath making. We no longer sell them on Trendy Tree, but we have included our Amazon links in case you are interested. You can also purchase replacement blades for the stick cutter.
One roll of 10 yard mesh should yield 12 30" pieces for the ruffles. If your roll comes up a bit short, it won't show. Sometimes there is a little more than 10 yards on a roll and sometimes you might get one a little shorter.
Let the the paper roll up naturally on the table, smooth it out a bit and starting at the center of the cut edge (selvage edges to the sides) scrunch up through the middle gathering up the ruffle. It will be quite bulky, hold it pinched in your hand and secure it in a twist. You can start on the outer ring, but it really doesn't matter. Just place a ruffle in each twist around the pencil wreath. There is usually about 12 twist on the wreath form.
Sign: The wooden Halloween sign measures about 7.5" c 7.5" so it's a great size to fit in the center of the wreath. It's made of MDF and comes in three styles. If you purchase the supply kit, one of the assorted signs will be included, just whichever one is available.
You can position the sign in the center of the wreath, or you might prefer off to the side. The sign was secured to the wreath using the twist, but then for more security, we stapled a couple of chenille stems to the back of the sign and secured to the wreath frame using the chenille stems. How you attach your sign all depends on the size and weight. If it's light enough to stay on front just using the twist, that is fine. Heavier objects will need more security to keep them from drooping down.
Ribbon: Ribbon can be placed in your wreath in many different ways. A simple way is just to cut ribbon strips and attach to each twist, but for this wreath we chose to make small shoestring bows and just position the around the wreath.
Ribbon was cut in one yard pieces and we made a simple loop bow. We started out placing them around in about every other twist, then went back and filled in with a few more bows. When you try to place a bow in every other twist, it doesn't work out evenly. There are about 5 twist on the inner ring and seven on the outer ring. But you have enough ribbon from this one roll to add in extra bows were needed.
You could also add ribbon strips instead of bows if you had rather. If I were going to add ribbon strips instead of bows, I would plan on adding strips to each twist. If you're using only one ribbon, you might make a cluster of two strips. Just do a test strip to see what length ribbon strip you need before cutting up your ribbon. You can add as much ribbon as you like or even more than one or two styles of ribbon. We wanted to keep this wreath quick and easy to do.
Once you're all done, be sure to fluff your ribbons and clip your strings. You can make a hanger for your wreath by using a chenille stem, zip tie or floral wire. Check the back for any sharp edges that might need covering up.
Happy Halloween!