2017 Sunflower with Black Ball Center Wreath Tutorial
New 2017 Sunflower Wreath tutorial. This tutorial is similar to previous flower wreaths that we have made, and we will create a supply kit with products used. We may have to vary some of the products depending on supplies in stock, but we'll let you know what the changes are at the time. We may use different color and size of pencil ball ties and wreath forms, styles and colors may change.
Supplies:
XX7488W4 24” Burlap Work Wreath – 1
XX1678W4 10” Burlap Pencil Wreath – 1
XB97910-49 10” Sunflower Fabric Mesh Roll – 1
RE134106 10” Emerald Wide Foil Deco Poly Mesh – 1
XX085502 Black Pencil Ball Ties - 5
Purchase Supply Kit:2017 Sunflower with Black Ball Center Wreath KitSummary:
Work Wreath: We started with the 24" burlap work wreath. Our 24" wreaths measure 15" across the widest metal ring, but with the addition of mesh, ribbons, etc, you wind up with a wreath that measures 24" or greater. This project can be created with different colors of wreaths since they really don't show. Also you could use a Work Wreath or Pencil Wreath, it wouldn't make any difference
Mesh: We chose a new product this time for making the sunflower wreath. Previously we have made one out of paper mesh and poly mesh. This new fabric mesh is a combination product made of Polyester and Polypropylene.
The polyester really gives it a nice, soft fabric feel versus pure Polypropylene which is more plastic.
The leaves are made out of 10" Emerald Green Wide Foil Deco Poly Mesh. We wanted to put two "petals" in each twist around the 24" work wreath. An average 24" work wreath has 18 twist, so we needed 36 pieces.
We cut the mesh in 10" lengths, so we were able to get 36 pieces from one roll of emerald green mesh. However, if you roll doesn't allow you to cut quite that many, don't fret, have only one petal in a couple of twists will never show!
We cut our fabric mesh using an Omnigrid Self-Healing Cutting Mat and a Fiskars 60mm Stick Cutter. These are not tools that we sell on Trendy Tree, but they are extremely helpful and we have included our Amazon affiliate links to make them easy for you to find. You can also get replaceable blades for the stick cutter.
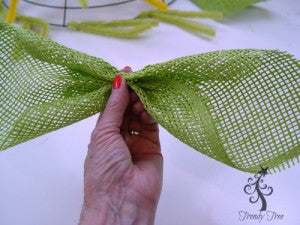
To make your petal, just let the mesh roll up in it's natural state, pull one corner to the center and the opposing corner to the center, they can overlap a bit. Then pinch it together making a sort of "petal" Open up one of the twist on the outer ring of the green wreath and secure the petal with a twist. Gently push the petals toward the outside in a "V" fashion.
Make a second petal, the same way, open up the twist and lay the second petal down. Now you can re-secure the twist with three or four turns and push both petals toward the outside. You can tuck the tips of the twist to the inner part of the wreath to get them out of site. You can also add both petals at the same time, by holding one finished petal in your hand, or with a clothespin or chip clip while you make your second petal. Here's some images of the steps for the petal. The image is of a different product, but the technique is the same:
Let the mesh lay on it’s “back”
Pull to corners to the middle, overlap a bit.
Pinch in the center.
Flip it over so the “cut” edges are on the underneath side.
Secure in a twist.
Push to the outside in a “V”
Continue working around the 24" wreath placing two petals in each twist. Be sure to open up the twist before laying down the second petal unless you’re putting two in at the same time. Tuck the twists to the inside of the wreath, out of the way.
After the outer ring is finished, move to the inner ring of the 24" wreath and add to petals to each twist in the same fashion.
The petals won't be quite as crisp as they are with paper mesh, but the fabric mesh still works very nicely. It will ravel also as does all woven mesh products. It helps to clip strings versus pulling. You may have to clip some along the way if they get tangled up and then clip again when you're finished.
Next you're ready to add your second wreath. We stacked the 10" burlap wreath right on top of the 24" burlap wreath. It fits nicely in the center.
We attached the wreath using four large zip ties. Secure the zip ties around both wreaths but don't pull tightly yet. After you get all four attached, tighten up one a little, then another and so forth so your wreath will stay centered and not be off to one side.
The 10" pencil wreath actually measures 10" across the widest ring. Doing the "stacked" method for this project makes for a larger wreath and the leaves show more.
Once the 10" wreath is secured, just snip off the end of the zip ties using wire cutters, not your scissors.
Before you start adding your yellow petals, you need to place a couple of chenille stems across the center of the 10" wreath to provide a place to add in some extra petals once you've gone around the outer and inner rings on the 10" wreath.
Just make a "crossbar" by attaching two chenille stems.
You could also use zip ties or a few strands of floral wire or heavier wire for this step too.
Next you're ready to make your yellow petals out of the sunflower fabric mesh. We cut the entire roll up into 10 pieces. This is a versatile style of project in that you can combine different types of mesh. You could use another color or a combination of colors of mesh for your leaves and you could also pick out something different for the flower petals. Just stay within a 10" width of products.
The yellow petals are made the same way as the green. Just place two petals in each twist, starting on the outer ring of the 10" pencil wreath.
After the outer ring is complete, move to the inner ring and add two petals to each twist. Be sure to continue to push them toward the outside in a "V" and tuck the tips of the twists to the inside of the wreath.
After the outer and inner rings are complete, we still have a fairly large size opening to fill. This is another reason for using the stacked method of wreaths. The 10" pencil wreath has a smaller opening in the center than a 24" wreath.
To fill up this center more, now we are going to make "picks" out of two petals. Make the yellow petals in the same fashion, but this time hold the two pinched petals in your hand. Take half of a chenille stem (same color if you have it) and place the chenille stem over the pinched area, twist from the back under the petals making a "pick."
Spread the chenille stem over one of the four crossbar stems and secure the "petal pick" from the underneath side.
Make three more petal picks and attach them the same way, placing one over each of your crossbars.
Now with the addition of the four extra picks (8 more petals total), we have filled in the center a little more. If you still need more filler here and there, you can make single picks with any remaining mesh. We added about three more single petal picks to this project.
You can flip the wreath to the back and work on making the twist neater on the back if you like by wrapping the ends around the metal wreath frame.
Personally, all I worry about when looking at the back is to make sure there aren't any sharp edges exposed that might scratch your door or wall. Now if you need to put a wreath on a glass door...you have to cover the back with something.
Ball Ties: The pencil ball ties are so handy! They are a great tool for making garlands, securing things to your tree or wreath and much more. The balls on these pencil ties measure about 1.5 to 2" If you have seen some of our previous flower tutorials, the balls may have been a little larger and we may have used less pencil ties that we are today. But for this wreath, we put three in and then decided to add two more.
You can just experiment with the fullness you want in the center of your wreath, you might not want to use them all. Five ball ties will be in the kits though. (Some of the kits may contain larger size balls than these in the video, and in that case, the kit may only include three ball ties.)
As we make up supply kits, at times we may have to add copper or green balls, but the product page will contain the color that each kit contains.
To add the ball ties, place the ball up through the middle of your cross-section from the back. Put one ball in one quadrant and the other in the opposite quadrant. Insert another ball tie the same way. Gently twist the balls together, being careful not to pull the ball tie off it's stem. Just keep adding the ball ties from the underneath side until you get the center as full as you like. Again, be careful not to twist them so tight it pulls the balls off the tie. If this does happen, use a little hot glue to re-secure.
When you are looking at the wreath close up, you may see some gaps around the balls to where you can see through to the back of the wreath. This really isn't noticeable when you hang your wreath, but you can always position the petals a bit to fill in gaps, even place a ot of hot glue here and there if you see a space that just has to be covered up. You could also use a bit of floral wire from the back side to achieve this. We didn't add anything to our wreath and as you can see, when it's hung on the door, it isn't noticeable.
This pretty much finishes your wreath! Just check the back for anything sharp and clip your string. You can make a hanger for the back of your wreath using a chenille stem or zip tie.
Folks have asked if we spray our wreaths with anything when we finish and we don't. Course we're not in the wreath making business, we're only doing tutorials to show you how products can look. We have experimented with Craft Bond Spray Adhesive on paper mesh, but we have not tried that on this fabric mesh which is all together different.
I would just say, experiment with a scrap and see what you think. I do know that when we sprayed petals or ruffles with the spray adhesive it does become VERY sticky and you have to gently spray each petal individually and lift each one out a bit so they don't stick together. You can't just spray around the whole wreath or you would have a sure enough sticky mess. Again, experiment. Everyone's home climate is different and what might work for me, might be a disaster for you.
The wreath measured about 28" on completion. We hope you enjoyed the tutorial and remember, you can make this in a variety of colors, wreath colors, mesh types etc. And just for future reference, this spring we'll have a new "flower center" to fill in the hole! Can't wait until they come in)))
Be sure to follow us on Facebook where we do some Live videos. We might be having another giveaway real soon or a special coupon that you wouldn't otherwise find on the website....hint hint)))
SaveSaveSaveSaveSaveSaveSaveSave