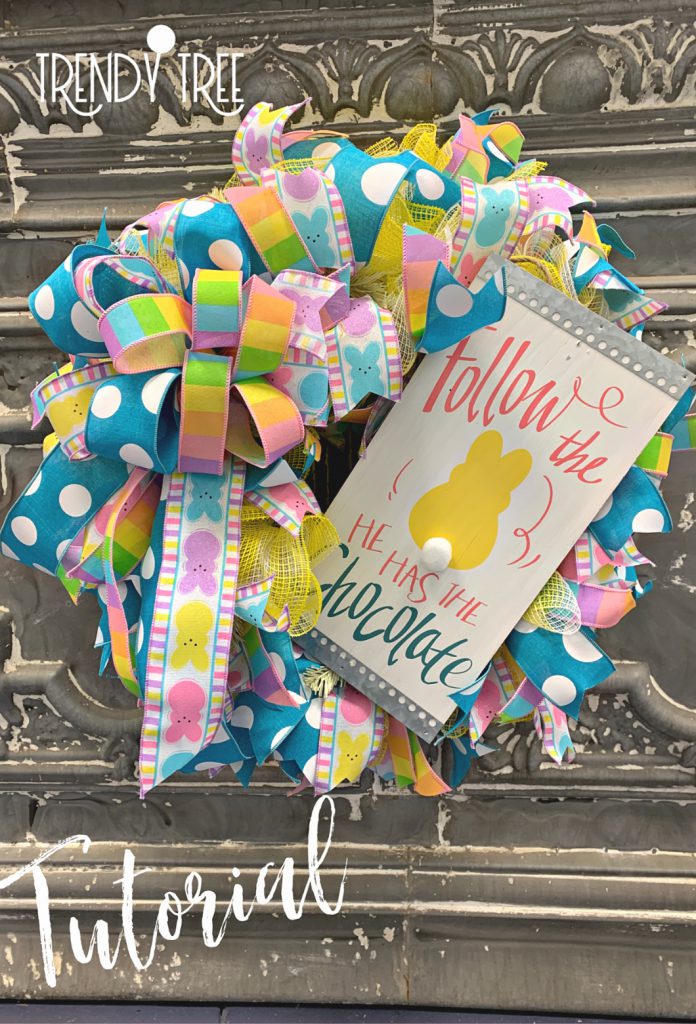
Easter wreath tutorial using fabric mesh, ribbons, and an adorable Easter sign. Products used in this tutorial are available in a kit, while supplies last. But, even if the exact items we used are sold out, you can still follow the tutorial and pick out other styles of mesh, ribbons or signs.
Supplies
Wreath kit: 2020 Easter Wreath Supply Kit (sold out)
Individual Supplies:
Sign - Sold out on website - Here are some suggestions for alternatives:
MD0450 Welcome Bunnies
HE6155 Flat Foam Eggs
HE6154 Flat Foam Eggs
AP8731 Happy Easter
62197EAS Pink Truck Happy Easter
1920132 Happy Easter
XX748839 24" Cream Work Wreath
XB99010-22 10" Yellow White Fabric Mesh - 2 Rolls
Work Wreaths at Trendy Tree measure 15" across the widest ring. When you add mesh, ribbons and other embellishments, you finished wreaths measures around 24" or greater. The Easter wreath when finished, measured about 26-27"
You could use either a cream, white or yellow Work Wreath or Pencil Wreath for this project.
Mesh
The Easter wreath was made with yellow and white plaid fabric mesh. Fabric mesh is made of Polypropylene, but also has a Polyester thread which gives it more density and texture.
Cut mesh unto 30" lengths. It will not take all of the two rolls, but one roll isn't enough. There were about 2-3 yards left on one roll.
We cut two layers of mesh at one time for the Easter wreath. It's not shown in the image for this tutorial, but we typically use a mesh holder/roller when cutting mesh. Using the mesh holder really helps keep your mesh neat when you are cutting it. The holder we use will hold two rolls at a time of 10" or 21" mesh. A link was placed in the tools section.
You can get the Ultimate Collapsible Mesh Holder from Susie's Wreath Shop on Etsy.
Ruffle
Scrunch up through the 30" piece of mesh and pinch in a ruffle.
Secure the ruffle in one of the twists. We started on the outer ring first. Twist the ties just a couple of turns since you will be adding more products later to the Easter wreath.
Work all the way around the outer ring and then move to the inner ring and continue the same ruffle technique. The ruffle technique is especially good for beginners. The pieces are all cut the same size and result in even ruffles. The ruffle technique gives you a nice even base for your wreath.
Ribbon
We choose three styles of ribbon for the Easter wreath. You can add ribbon in several different ways. One of the easiest ways to add ribbon is simple ribbon stripes. It's always a good idea to measure your ribbon strip before cutting all your ribbon since you can shorten strips that are too long. But, if they are too short, to begin with, they will be buried in the mesh. If you prefer, you can make large bows for the wreath, loops, and tails or any combination you like.
We cut the ribbon strips 14" in length using a ribbon cutting board that really speeds up cutting. The cutting boards are listed in the tools section.
Make ribbon clusters using each style of ribbon. Dove tail the 2.5" ribbon strips and cut the 1.5" at an angle. Open the twist, making sure the mesh stays in place and lay the ribbon cluster down on top of the ruffle. Re-secure the twists with three or four turns. You don't have to open the twist to secure the ribbon cluster, but it's what I prefer myself.
Place a ribbon cluster in each twist on the Easter wreath.
Sign
Secure chenille stems to the back of the sign using a stapler. Be careful that your staples don't go all the way through. There are also stick-on pieces that you can buy that have a hook to secure your chenille stem too. Leave the chenille stems full length because you don't want to sink your sign down in the mesh too far. Attach the sign to the Work Wreath frame by reaching your fingers through the back and secure the chenille stems to the metal frame.
Bow
We made a free-handed bow with the remainder of the ribbon and secured to the Easter wreath with a chenille stem. The bow measured about 12" in diameter and tails were about 16" in length
Summary
Check the back of the Easter wreath for anything sharp that might scratch your door. Fluff your ribbons and clips any stray strings.
Make a hanger for the wreath with chenille stems, floral wire or zip ties.
Looking for more Easter ideas? Check out these posts:
Vintage Easter Bucket DecorationEaster Basket CenterpieceSmall Lantern Easter Decoration
*Disclosure: (Jeannie Pence)
The Trendy Tree blog and social media post may generate some income (Jeannie Pence) through affiliate links, sponsored post or general advertising. Trendy Tree only works with companies we trust and personally use. Affiliate links may result in a small commission based on a click-through or referral fee paid by the seller. It is a form of advertising.