
Witch Hat with Legs Tutorial
Supplies:
XX759940 Work Creations Chocolate Straight Pencil Ribbon Rail - 2
RE134102 10" Black Wide Foil Deco Poly Mesh®
RE134150 10" Lime Green Wide Foil Deco Poly Mesh®
RE134111 10" Hot Pink Wide Foil Deco Poly Mesh®
MTH11467 26" Purple Black Striped Witch Legs
RD106102 Black Wired Jute Roping
RD105389 Apple Green Cotton Candy Wired Roping
H3409378 RAZ 11" Halloween Bobble Owl
RS2073X3 Deluxe Metallic Stripe Lime Hot Pink Black Deco Poly Mesh® Ribbon
Prepare Ribbon Rail Form:
We used two Chocolate Straight Pencil Ribbon Rails for this project, but you can use most any color.
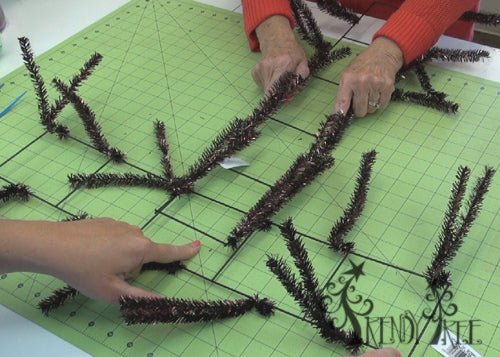
Chocolate Straight Pencil Ribbon Rails
Lay the ribbon rails with one horizontal and one vertical. Find the center are of the horizontal rail and center the vertical rail on top of it, overlapping the rails by about half the width of the rail.
Secure the rails together using zip ties. Try to attaching crossing corners when possible to keep the rail from sliding up and down. We attached in four places.

After the rails are attached, snip off the end of the zip ties with wire cutters.

Now you're ready to start the next step. Your frame will look like an upside down "T"
Attach Mesh:
We used a 10" Black Wide Foil Mesh for this project, but you could use any color mesh and you could also use a 21" size for the top part of the witch hat.
To start the mesh attachment, we had to add a "twist" to the very top center of our form. The twists on Pencil Ribbon Rails are staggered around the rails. There wasn't one in the very center, so we added a chenille stem for a twist.

The twists on the vertical portion of the frame are not going to be used, so they were just pushed to the center out of the way. We could have cut off one of those twists and used it to make our center top twist, but many times we reuse our Work Wreaths and rails for other projects, so that's why we used a chenille stem to add the twist to the top.
Unroll the mesh and make a fold of about 12" or so, gather up in your hand and secure in the top center twist you created with the chenille stem.
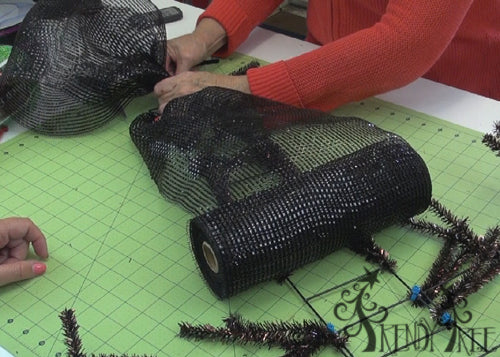
This way you have a folded loop at the top of your hat, with no raw edges to have to deal with later. Secure the mesh giving it a twist or two.
Pull the mesh down toward the lower rail and secure in the second twist from the end of the rail. The horizontal rail will form the brim of the hat.

Pull the mesh slightly, not too tight, but not really making a "pouf" either. Just let the mesh fit the length of the vertical rail. Secure in the twist on the horizontal rail with a couple of turns. Do not cut the mesh.
This tutorial is a little different from our previous witch hat. This time, the upper portion of the hat will be done in one continuous piece of mesh.
Once you have attached the mesh in the twist on the horizontal rail, turn your roll and head back to the top again to the same center twist on the top.

Re-open the top center twist and secure the mesh. Once secured, turn the mesh and head back down to the bottom rail again attaching in the next twist.

Don't worry about those gaps you see where the mesh is attached to the horizontal rail, these will be covered up later when the ruffles are attached.
Continue this up and down method of attaching the mesh, ending on the horizontal rail in the next to the last twist from the end.

Cut the mesh and leave a tail of about 3-4" This raw edge will be covered up when the ruffles are applied.
Cut Ruffles:
For this project we used three layers of ruffles placed in each twist on the horizontal rail. There were 11 twists on the rail, so we cut 11 pieces of each mesh color - black, hot pink and lime green. The ruffles were cut in 10" lengths.

To make a ruffle, just scrunch up or gather through the center of the mesh (selvages edges to the sides).
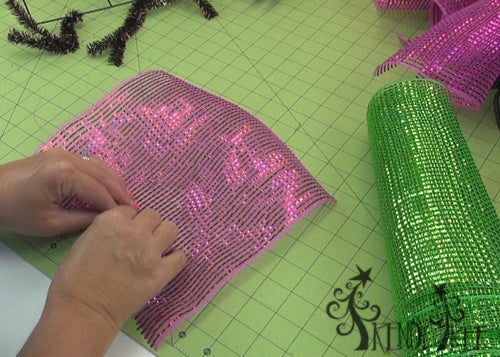
We just alternated the colors, making a stack of three ruffles at a time. You can attach all three at one time, or if you're working alone you may want to attach one layer of ruffles at a time. If your bottom rail needs another twist added to make it look more even, just add one with a chenille stem.

When you come to a twist that has the black mesh already in it from the top portion of your hat, just un-do that twist, making sure the black mesh stays in place, and lay your ruffle down on to of the black mesh and secure the twist again with a couple of turns.

If you have a gap anywhere that needs an extra ruffle, just add on with a chenille stem. You can tuck the tips of the twists toward the inside if you don't want them to show. On this hat, since our Ribbon Rail was chocolate, we tucked them to the inside.
Attach Ribbon Loops
We used a 4" Deluxe Metallic Stripe ribbon in lime, hot pink and black. You could add any sort of ribbon strips or leave the hat with just the ruffles.

We cut strips 20" in length.

You can make just straight ribbon strips and chevron the ends, or make half loops.....we made a full loop or "bow" and just brought the two ends of the ribbon to the center and pinched it together. This foil is the same on both sides but we attached the loops to the wreath with the folded side face down in the twist.
To attach the loops, re-open your twist, making sure your ruffles stay in place and lay the loop or bow down on top and re-secure. This time since this was our last layer, we gave the twist 3-4 turns. We placed a loop or bow in just about every twist, but not all. It's strictly a choice, after we thought we were done, we added a couple more, so we probably came close to adding them to each twist.
Top of Hat
Next you're ready to work on the top of the hat.
Just smooth that tail of mesh and roll it in from side to side, start your Black Jute Roping on the back side. Turn the end of your jute roping upward about two inches on the back, then start wrapping the roping around your mesh, covering up that raw end of your jute roping and continue wrapping until you get to the end of your mesh. Just let the free end dangle and leave it in curls. We didn't measure the piece of roping that we used, but it was around 40" or so, more than a yard. To make the curl on the end, just wrap around a cardboard tube, then slip it off the tube and your curls will be nice and even.
You can put a bow or anything at the top of the hat or also use something else to hang off the end. We have some bat sprays that we meant to use....forgot about them!
We added some Apple Green Cotton Candy Roping for a little more color and texture. The Cotton Candy Roping is fuzzy, knotty and wired. It's messy, but adds some different texture to the project.
 Witch Legs
Next you're ready to attach your Witch Legs. We have several styles in stock, any style could be used.
The Witch Legs are made on sticks. They were wedged up in the vertical rail and each leg was secure with a zip tie. The legs should be secure in a couple of places to the ribbon rail. You just have to position the length of the legs to where the tops of the sticks don't show.
RAZ Owl
The last thing we did other than snipping loose strings and checking the back for sharp edges, was to attach a little glittered Halloween Owl from RAZ. The way you attach any object to your project just depends on the item. Most anything you attach, especially if it has any weight to it at all, needs to be attached to the metal frame.
We attached the owl by placing a chenille stem around the spring inside the owl (it's a bobble head) and then secure it to the rail frame.


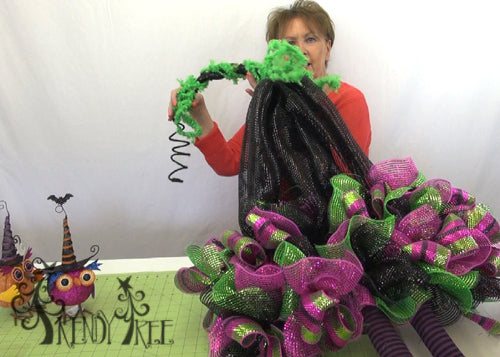
Subscribe to our Videos!
Our Witch Hat with Legs is finished! The overall ht of the hat and legs was about 50" and the width around 30" or so.
