 Easy ribbon flower tutorial using Fatigue Camo Ribbon 1 1/2" width. Candle wrappers can add a nice touch to a plain or inexpensive pillar candle whether you place it directly on the candle on around a clear vase holding the candle. This is a 5-6 pillar candle and the burlap look ribbon is a 4" Poly Burlap in a brown color. Please keep in mind that the ribbon is flammable of course and materials should always be kept away from the candle flame. The safest candles to use are the battery powered flickering candles that come in all sizes and shapes. But, sometimes you just want the look and smell of the real thing, just be cautious)))

This
Fatigue Camo Ribbon is very nice and sheer, it measure 1.5" in width and there is 25 yards on this roll. It has wired edges which is a must for this tutorial. You can use wider ribbon also. The Camo Ribbon at Trendy Tree is also available in pink shades.
If you have an avid hunter in the house.....you know....there are MANY different styles of camo. But for our tutorial and this ribbon....we just call it camo))
Start with a length of about 36" or so for the first flower. This isn't an exact science of course and the more flowers you make, you'll find that practically no two turn out exactly the same. The longer piece of ribbon you use, the larger your flower will be as long as you keep your gathers about the same. The tighter you pull you gathering, the smaller the flower...

The ribbon edges are wired with thin, but strong tiny wire.

First you pull the ribbon back exposing one of the wires. You just work from one side of the ribbon.

Be careful when you are exposing the wire on one end of the ribbon, not to loose the wire on the other end. So pull the ribbon back from the wire on the other end and make a good mess of the wire on the end you are not pulling on, so that it won't retract back up into the ribbon. If it does....you'll just have to cut that piece of ribbon off. It's practically impossible to thread the wire back through the ribbon.

Start gathering the ribbon by pulling on the wire and pushing the ribbon away from the wire.....just like gathering material on a thread to make ruffles. We all did that in Home Ec.......well....maybe some of you didn't have Home Economics in school....I date myself here)))) We had to cut, sew, learn how to preserve fruits and vegetables and bake in Home Ec.

Once you' have gathered the ribbon sufficiently, you're ready to start the flower. Do not cut the piece of wire you have hanging out of the ribbon.....you'll need this later.

To start the flower, fold the raw edge to the inside. You want to roll the flower with the right side of the ribbon facing you, always rolling the right side of the ribbon onto itself.

Continue to roll using the wired side that you gathered, starting the roll fairly tightly at first. Here we are rolling the right edge of the ribbon.


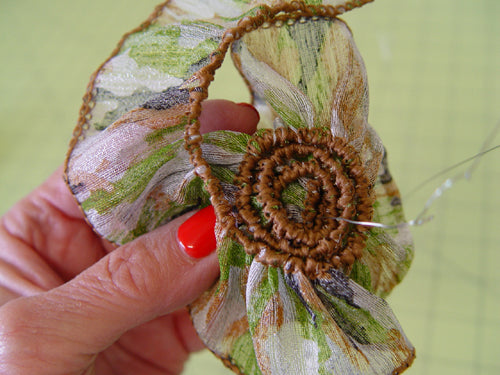
It helps to keep the ribbon (wire edge) straight if you put your finger in the center and slowly roll the ribbon, keeping the outer edge straight. Let the free end of the wire just hang loose and out of the way for now.

Just continue, holding the ribbon in your left hand, with your finger in the center of the flower, and wrapping the ribbon with the right hand.
Continue until you have used all the ribbon. You see two pieces of wire.....one is long and the other was the piece of wire from the opposite side that you folded down. Don't worry about that extra piece of wire.....just keep the long one free.

Once you get to the end of your ribbon, fold that raw edge to the inside.

Holding the flower firmly, take the long piece of wire and start wrapping around the bottom of the flower, pulling it snugly.

Continue wrapping that long length of wire until you have it used up. The other piece you see sticking out can also be wrapped around that end. Since we will be using hot glue to attach these flowers, we won't need the wires for anything else. If you were going to wire them into something.....you could just wrap the two pieces together and leave a length free to use to attach the flower.
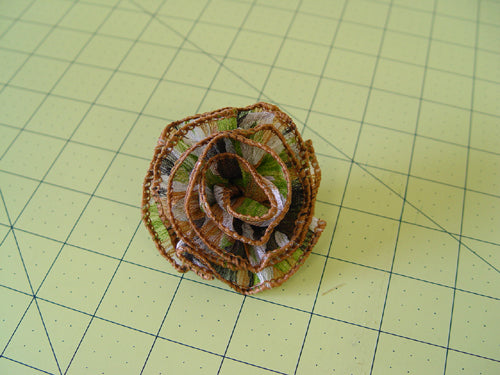
Your flower is almost finished! You may need to fluff it out a bit, sometimes put a little crimp in the outer edge, even it out a bit here and there.

Make a few more using shorter or longer length of ribbon. And don't worry if you have to start over a few times to get the knack of it. That's the good thing about this project. As long as you don't pull the wire out of the ribbon....you can just undo the flower and start over. The hardest part at first to me was keeping the rolled edges straight and snug until you can get the bottom of the flower wrapped with the wire.
We used hot glue to attach the flowers to a strip of
Poly Burlap in brown that is 4" in width.Used a length that would wrap around our candle.
Then we wrapped the burlap around the candle once the glue had cooled completely. You could probably get your flowers attached easier if you secured the Poly Burlap on to the candle first....but we're using our candle for several projects and didn't want to secure anything permanently.
But, here's a mistake that we made and we'll share with you so it won't happen to you too!

We hot glued the flowers on to the Poly Burlap, but when we wrapped the Poly Burlap around the vase....the flowers were not spaced close enough together.

So....don't do this. Snug your flowers up real close to each other!

The second time around yielded a much better result.

Simple project and you can make several flowers from one roll of this particular ribbon. Love turning plain candles into interesting ones)))

Camo flowers and burlap make a great combination. Just the burlap wrapped around the candle by itself is nice....and you could always tie it with a little ribbon.....burlap twine.....even lace. The new rage is lace and burlap and we have several styles and sizes of burlap in stock and lace on the way for all your decorating needs.
Save
