RAZ Bunny Pick Wreath Tutorial
Supplies: Click here for wreath kit containing supplies: SOLD OUTXX1678W4 10" Burlap Pencil Wreath
XB97410-18 10" x 10 Yards Ivory Burlap Mesh
E3506618 RAZ Moss Bunny Pick Set of 2 (available only in kit)
RG01351E9 1.5" Wide Stripe Beige/Lime Green (available only in kit)
RG146820 1.5" Orange Plants Ribbon (available only in kit)
RG181114 2.5" Light Blue Denim Ribbon
Summary:
A burlap 10" Pencil Wreath was chosen for this project and an ivory burlap mesh. The ivory burlap mesh is a combination product of jute and polypropylene. The mesh measured 10" in width and 10 yards in length. We used one roll for this project, using the curly technique.
Make Curls: Cut the mesh into 10" lengths. We do not recommend using a 21" product and splitting down the middle to make 10" x 10" squares. The more cuts in your mesh, the more raveling. All mesh ravels, just plan on clipping strings at the end.
We use a 24" x 36" self healing Omnigrid Cutting Mat and a 45mm Omnigrid Rotary Cutter (these are available at Amazon and we have included our affiliate links.)
To make a curl, take the 10" x 10" piece of mes hand let us roll up naturally on the table. Roll the curl up a little tighter. The diameter of the curls on the end should be around 1.5" to 2". Pinch the curl in the center and hold it. Create three curls and hold them all in your hand. You can sort of hold them side to side or crossways in your hand. Try to hold them with the cut edge down.
Open up a twist o the pencil wreath. You can start on the inside or out. We started on the inside on this tutorials, but it might be easier to start on the outside. Secure the cluster of three curls with a couple turns of the twist. No need to secure more than this right now, since you will be added more items to the twist.
Continue around the wreath placing three curls in each twist. The 10" pencil wreath as 12 twists so you should need 36 pieces of mesh. You should get 36 pieces off a 10 yard roll, but sometimes it may work out to where you only get 34-35. It will not matter, being short a couple of curls will not show in your finished wreath.
Once the curls have been completed, you are ready to do ribbon strips.
Ribbon Strips: It's always a good idea to take a scrap ribbon and do a test strip of your ribbon before you start cutting up the ribbon. At first we did a 12" ribbon strip and then decided to go with 10". It will vary from project to project. We cut 12 pieces from each ribbon.
The ends of the ribbons can be finished off with an angled cut. Take the piece of ribbon and pinch in the center. Take a ribbon strip from each style and make a cluster of all three ribbons. Pinch the ribbons in the center and hold them in your hand. You can hold them side by side or crossways. Attach the ribbon cluster to the wreath by opening up a twist, make sure your curls stay in place and lay the ribbon cluster down on top of the curls. Re-secure the twist this time with 3-4 turns. If you don't want the ends of your twists to show, just tuck them to the inside of the wreath.
Continue around the wreath, adding a ribbon cluster to each twist.
Attach RAZ Moss Bunny Pick: The RAZ Moss Bunny picks come as a set of two. You can bend them at a right angle and shorten the ends if your need to. Hang your wreath on a wall to decided on where you want to place the picks. You could put two on one side or one on each side as we did. One you have your placement, secure the picks to the work wreath frame using zip ties or chenille stems. I like zip ties better, items like picks don't seem to slide around as much as they do when using chenille stems. You made need to secure the picks in more than one place to keep them sitting straight up.
Make a Bow: After the picks were secured, we took some of the remaining ribbon and made a bow. We used the two 1.5" style ribbons, but you could use all three, or just use one style. We cut three pieces from the orange and three pieces from the green. Strips were cut 24" in length.
Pick up a strip of ribbon and make a 6" loop. You can keep the tails even, or not, just whichever you prefer. But do keeps the loops even. Pick up an alternating color and just keep picking up loops. You should have three of each color. Place a chenille stem around the neck of the loops and twist the bow a couple of times. Spread the chenille stem out in the back. You should have six loops and twelve tails. You want to bring 6 tails to the front and 6 tails to the back (right side up). Once you have your tails separated, bring the chenille stem under the back tails and twist the bow again. Now you can use the chenille stem to attach the bow to the work wreath frame. We positioned the bow sort of between the mossy picks.
Finishing Up: Once you've finished your wreath, you can make a hanger out of a chenille stem or zip tie. Always check the back of the wreath for any sharp edges that might scratch your wall. You can cover the up with tape if needed.
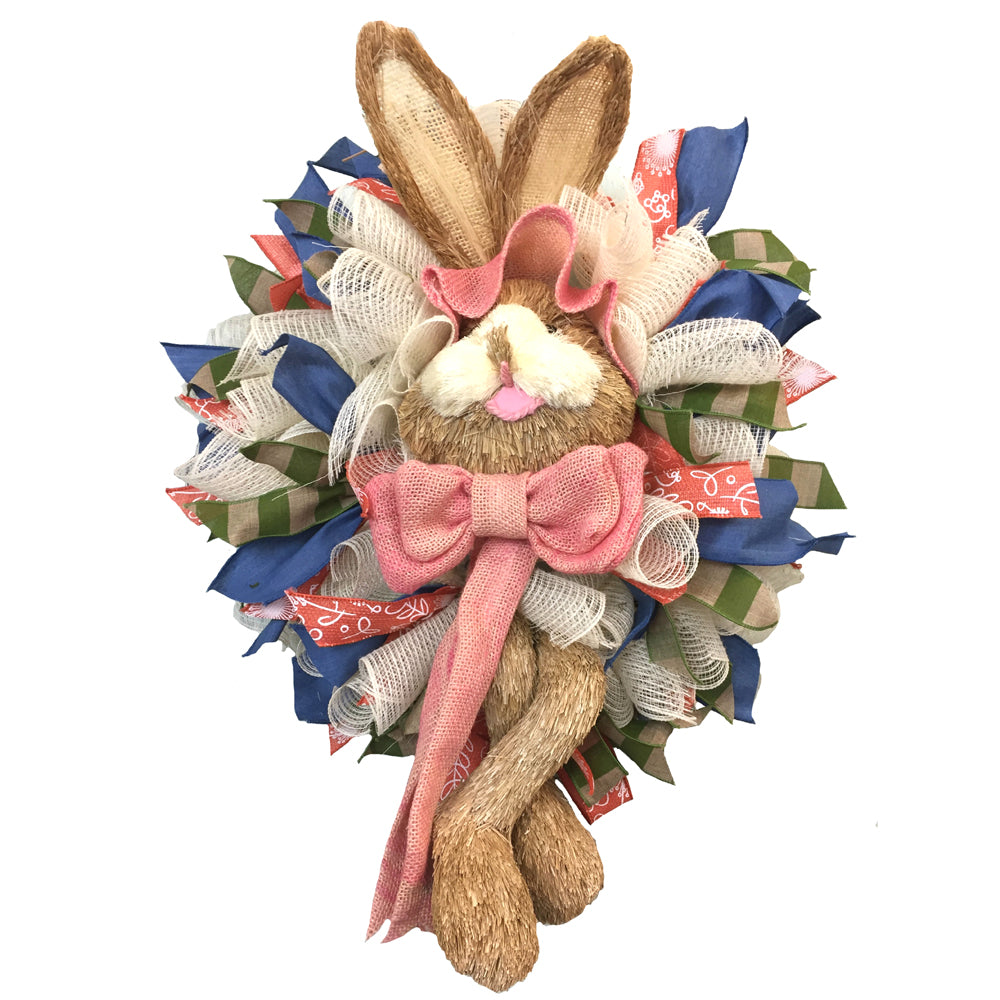
Here's another idea for this wreath too! We removed the RAZ Moss Picks and bow and added this 25" Bunny Head and Legs. This gives you a good idea of the size of the bunny head and legs on a 10" wreath. The SKU number is: 9724402-9730349
Be sure to subscribe to our YouTube channel so you won't miss our next video coming out soon! And we're also doing some Facebook Live, so follow us on Facebook and put a check on receive notifications so you'll get a reminder when we go live))
SaveSaveSaveSaveSaveSaveSaveSave