 Supplies
Plastic Panel (Purchased at local Hardware Store, available at Lowe's, Home Depot, etc)
Clear Plastic Edge Protector (Lowe's, Home Depot)
RE1363JC 10" Wide Foil Mesh Gold & Silver
X00001-09025-B015 Gold Glittered Honeycomb Ribbon
497140 LED Cool White Twinkle Lights 96 Light Strand
Cut Plastic Panel
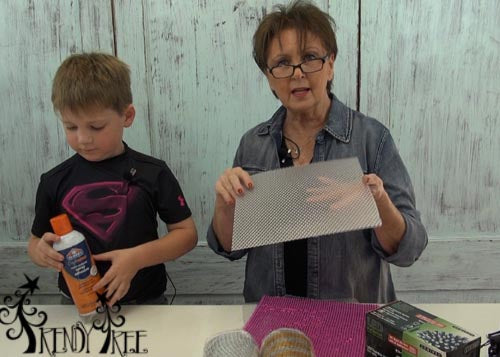
The first thing we did was to cut the plastic panel into 5 pieces 10" x 10" We chose 10" x 10" since our mesh was 10" in width. You may can find some better than the plastic panel we found, you just need something stiff enough to hold it's shape and translucent enough to let the light shine through.

This plastic panel was smooth on one size and diamond patterned on the other size. We also bought a scoring tool to cut the panel with.
It helps also to have a hubby that will jump in and cut your panels for you when he watches you mess the first piece up)))

Using a straight edge he scored the plastic panel by running the scoring tool down the plastic several times.

Then brought the scored line over to the edge of the table, pressed down with the straight edge and snapped off the piece of panel. He cut 5 pieces from this one panel with some left over. We needed 4 sides and a top. The bottom was to be left open so we could just set our decorated box over the battery lights.
Apply Mesh
We chose the 10" Wide Foil Deco Poly Mesh because of the wider strips of foil in the mesh that provides better coverage than just metallic foil mesh. You could use any color on this project and decorate your box for Christmas, birthdays, baby showers, anniversaries....

We cut the mesh in 10" lengths which gave us a piece 10" x 10" The mesh wasn't exactly square, nor were the panels but we were able to work around that for the most part.
We sprayed a light coat of the adhesive to the smooth size of the plastic panel. Then positioned the square of mesh on top and smoothed it out.


The edges were trimmed where there was overhang of the mesh.

We placed two layers of mesh on each panel. The spray adhesive didn't give a permanent bond, you could still peel the mesh off fairly easy, but we thought it would hold sufficiently for this project. The panel above, shows hot pink mesh, this was our practice piece. You can see the difference in it by using just one layer of mesh, or using two. We opted for two layers.
After the first layer of mesh had dried, we lightly sprayed it and placed another layer in the opposite direction and trimmed any excess along the edges after it had dried.
Assemble the Box

Apply hot glue to the edges and put the panels together.

Pieces of the clear plastic corner protector were cut about 4" and placed on each corner of the box just to give a little more support. Ideally, it would have probable been better to have had enough to cover the entire length of the side panels and the top, but we had to improvise with the materials we had on hand, just we just used 4 pieces around the sides of the box.
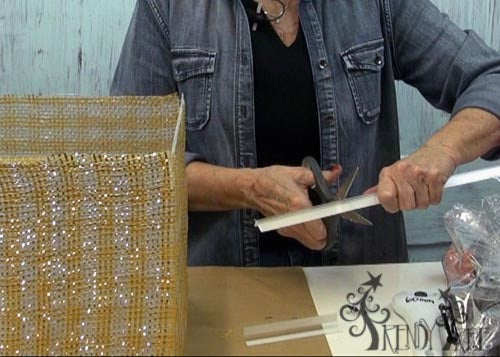
The clear plastic corner protector is self adhesive, you just peel off the paper and you can cut the protector with scissors.

Before the top was placed on the box, we went over the seams again from the inside with hot glue.

Next the top was added but going around all the sides with hot glue.
 LED Battery Lights
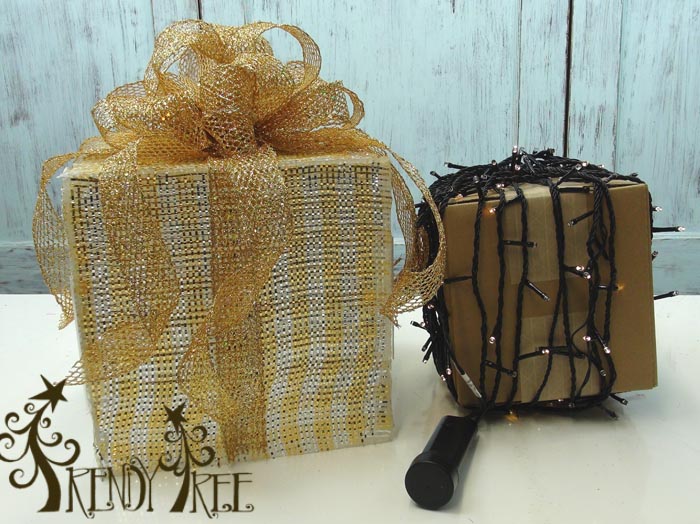
A string of 96 Cool White LED Battery lights was wrapped around a smaller box. The LED Battery Lights are a new product this year at Trendy Tree. These lights are made for indoor or outdoor and are very durable. The battery box is made of a sturdy plastic and has a seal to keep moisture out. The lights are on timers that automatically set to burn for 6 hours, shut off for 18 and come back on. Battery lights are the perfect solution to decorating in areas where you don't have outlets or don't want to see cords running to outlets.

49714 LED Cool White Twinkle Lights 96 Bulb Strand
We left the bottom of the box open so it would just set down over our box wrapped in lights. This way it will be easy to take our lights out of the Christmas present when the holidays are over and put the lights to use on another project.
Add a Bow
We made a simple loop bow with some wired gold glitter 1.5" ribbon. Pieces of ribbon were hot glued to the sides of the package and the bow was hot glued to the top.

X00001-09025-B015 Gold Glittered Honeycomb Ribbon
You can make this project using all sorts of different color mesh and ribbon combinations. We chose this one because of the glitter.

Here's our Lighted Christmas Present after it was all finished. You could make it any size and you might be able to find some clear, square plastic containers that would work perfect and just skip the step of putting the panels together. Where is a good square piece of clear Tupperware when you need it!

Here's our box with the lights on....it wasn't very dark in the shop yet so that made a difference. I think it will look great underneath the Christmas tree.....with a few more with it))) Or, you could use it in the center of your table with other decorations around it. The best thing is, you can place it in areas where you don't have to worry about hiding an unsightly cord. Can you tell.....we're loving battery lights))