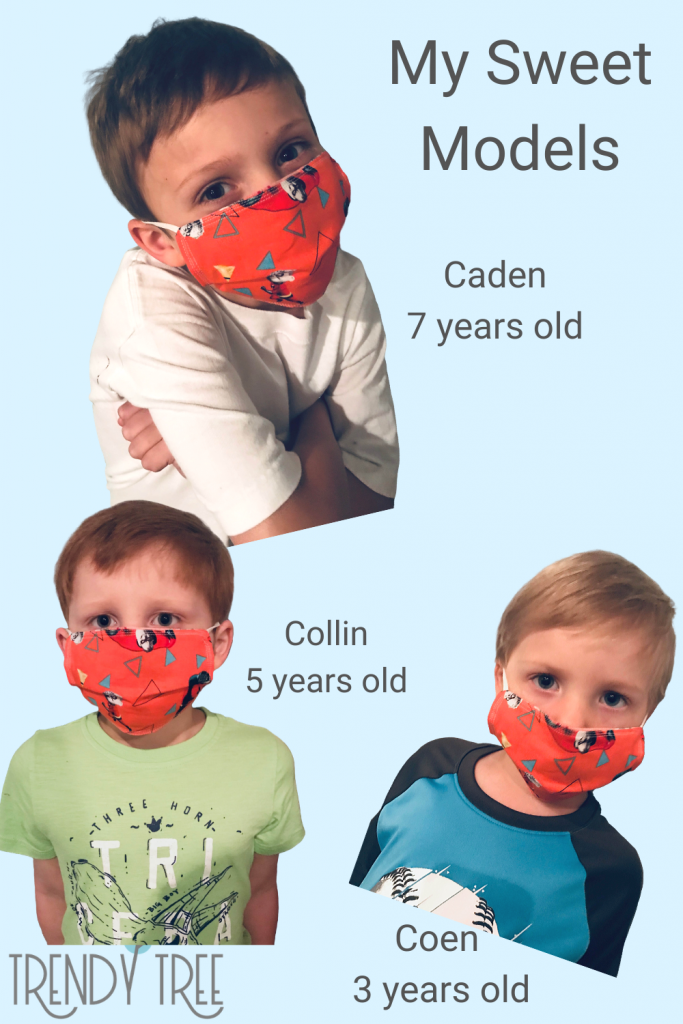
This post shows you how to make a face mask for kids. It's not a one size fits all, but depending on the child's size, you can always make adjustments in the length of the elastic. The mask above fit my great-nephews fairly well. They are 3, 5, and 7 years old. The elastic could have been a bit smaller, so just experiment with the size you need. The elastic in this tutorial was 6" so you might need to use anything from 5 1/2" to 6"
Disclaimer:
Please be aware that a cloth face mask will not protect from viruses. Only a professional N95 will do that. A fabric face mask will help reduce droplet spread when someone sneezes, coughs or speaks. Please don't let a face mask give you a false sense of security. You still need to keep your hands off your face, maintain your distance, and wash your hands frequently. Wash a cloth face mask before you wear it and wash it when you remove it. Stay safe.
Supplies
100% Cotton Fabric - 2 Pieces 7" x 5"
1/8" Elastic or Smaller - 1 Pieces 6" ( adjust size as needed)
Fabric Pieces
It's a good idea to wash the fabric before you start sewing. I don't usually, but the fabric will shrink a bit, so that's always an option.
Sew the two fabric pieces together with the wrong side facing the right side. That way when you turn it, you will have a right and wrong side. Begin making the face mask for kids by sewing on the 7" side. Start about midway down. You will be stitching all the way around the mask, but you will need to leave an opening of about 1 1/2" so that you can turn the mask. Make your stitch about 1/4" from the edge.
Elastic Pieces
Stitch almost to the corner and insert the end of the elastic piece.
Continue stitching to within 1/4" of the edge. Turn and stitch down the 5" side of the child-size face mask. When you get to the next corner, pull the other end of the elastic into the corner. Make sure you don't have it twisted and stitch to within 1/4" of the edge. Backstitch over the elastic if you feel it isn't caught well.
Continue stitching along the 7" side and when you get to the next corner, insert the second piece of elastic the same way as the first. When you turn the last corner, don't forget to leave an opening of about 1 1/2" so that you can turn the face mask.
Turn the face mask and tug on the elastic pieces to make sure they are caught well. The length of the elastic will depend on the size of the child. The 6" is just an estimate. It worked okay for my great-nephews. They are all wearing the same mask, but ideally, it could have been adjusted a bit and maybe have been a bit smaller.
Aren't they adorable! They are brothers and so precious)))
Tuck or Pleat
Smooth out the face mask for kids and make the corner crisp as you can. You can press the mask if you like. Pressing always makes topstitching go easier. Make a tuck or pleat in the mask. If you want to make two small tucks you can, I just made one tuck. Pin in place. Don't worry about pinholes in the fabric.
And remember, a fabric face mask is not going to prevent viruses from getting through, they are microscopic in size and smaller than any holes in your woven material. But hopefully, the face mask will catch moisture coming from the mouth and that will help reduce germ spread.
Topstitch around the face mask about 1/4" from the edge. Make sure that the edges of your opening area are tucked to the inside so that you catch them well when you topstitch.
Topstitch twice at 1/4" and then again very close to the edge. Stitching very close to the edge will also ensure that you have closed the opening well that you used to turn the mask.
Summary
Just make adjustments in the size of the cloth or elastic to get a good fit. Sometimes it's just trial and error until you hit on the right size for your child. The 7" x 5" is a good starting point along with the 6" elastic pieces. The more narrow the elastic, the more comfortable the mask will be. Elastic is in short supply! It's really hard to find right now, and the elastic I used was actually a piece that I split. You can't do that with all elastic but some will lend itself well to cutting without unraveling.
I would stay away from putting ties on a face mask just as a safety factor. Thank you for visiting our blog, I hope this tutorial is helpful if you are looking to make a face mask for kids.
Who would have ever thought that we needed face mask for kids, other than for superhero parties, Halloween or dress up. But this is the day we're living in right now. Hopefully, the Coronovirus will soon die out and we can all go back to normal. Until then, stay safe!