This curly wreath was made using decorative poly mesh, a work wreath and a few embellishments. It was easy to make and the curly rolls give it a little different look.
The photos aren't the best in the world, my work space is a real work space and not a setting for photography)) But, I'll show you the steps I took in making the wreath.

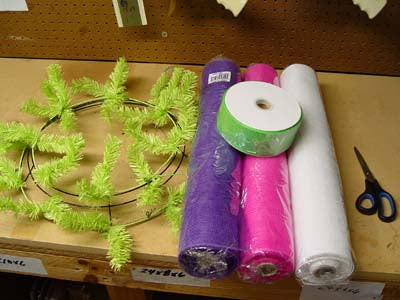
Supplies used were three rolls of poly mesh in assorted colors, 21" width and one roll of 2.5"
Lime Green. We used
Hot Pink, White, and
Purple in the solid deco poly mesh netting. My granddaughter chose the colors and I didn't have a lime green in the wider width, so we added some accent color with the narrow ribbon. We used a lime green 24"
Work Wreath as the base.

The first thing you do is cut the lengths of mesh in about 10-12" pieces. Use sharp scissors and handle the mesh as little as possible to decrease the raveling. The mesh curls on to itself and you can make the rolls a little tighter if you wish, but while you're cutting, just cut and lay aside.

I cut 12 rolls from each of the three colors - purple, pink, white giving me 36 rolls. There was probably half a roll left on each roll, so you likely could make another whole wreath. I did cut a few extra when I was finished just to fill a gap here and there.

Next the lime green work wreath was placed on the table and twists smoothed out. Take two of the rolls of mesh at a time (you can just play with this, trying two or more depending on how thick you want your finished wreath) and hold in the center.

I just randomly picked up the colors and didn't try to make a pattern or anything. Starting on the outside of the work wreath, twist the ties securely around the mesh.


Continue working the rolls in all around the outer edge, then start on the inside and work around. You really want to handle the mesh as little and possible because the cut edges will ravel. Loose strings can be clipped when you're finished and any rolls that need to be re-curled can.

Once you have all your rolls secured, hang it up so you can see where to fill in any gaps if necessary. At this point we added in some pieces of lime green. Just cut strips or loops and go right back into the twists to secure. Add any sort of embellishments such as ornaments, sprays, etc. For Maggie's wreath we chose some
Peace Signs,
Funky Hearts and
Flowers and some
RAZ Yellow Curly Sprays. Embellishments are secured using the same twists in the work wreath that are holding the curly rolls.


Once the sprays were inserted, I turned the wreath over to the back and secured the sprays to the work wreath with zip ties. This keeps the end of the pick or spray from showing also. The end of the zip cut was cut off after the photo so you could see it better. I also placed a zip tie on the back for a hanger.
These colors are great for girls. Maggie's room is purple and lime green and I'll post a photo once we get it hung in her room. I'm debating on weather to put a bow on the wreath and have one made, but we'll wait until we get it in her room to decide.
Wreath making using the Work Wreaths and deco poly mesh is easy and there is such a wide variety of styles, colors and embellishments to work with. Wish we had the space to create wreaths to sell, but unfortunately we don't.......maybe some day)))


