
Autumn Wreath with Pumpkin Tutorial
insert video here
Supplies:
XX748837 Lime Green 24" Work Wreath
RE100083 Cream White Two Tone Deco Poly Mesh
RF24785J 18" Striped Sheer Fabric Moss Brown Cream
RA128418 4" Natural Jute Mesh Ribbon
77283M-052-40F Light Blue Denim Ribbon
90444W-058-40F Orange Paisley Mod Ribbon
RD106120 Wired Orange Jute Roping
J6108 13" Wood Pumpkin
Click here for a quick list of supplies all on one page!

Supplies
Secure Pumpkin to Work Wreath
First step in this tutorial is to attach the 13" Wood Pumpkin go the Work Wreath Frame.

The pumpkin was placed over the inner ring of the Work Wreath and was a pretty good fit. Flip it over on it's back and secure with 4 zip ties evenly spaced around the pumpkin. Secure directly to the wire frame.
 Attach Deco Poly Mesh to Work Wreath
A two-tone cream/white Deco Poly Mesh® was used for this product. It is 21" in width and 10 yards length.
Grasp the mesh about 3-4 inches from the end of the roll and pinch together. Start on the outer ring and place the bunched up mesh into one of the twist and secure with a couple of turns.

Measure about 14" of mesh and bunch up, place in the next twist on the Work Wreath.

This makes your first "pouf."

The raw end of your beginning point can just be tucked to the inside of the wreath right now, we'll secure it to the Work Wreath frame later.
Continue measuring, pinching and securing in the next twist and just work around the outside ring. When you get to the place to make your last pouf, open the first twist where you started, making sure that first attachment stays in place and secure the last pouf right on top, re-secure with a couple of turns.

Once you have secured the last pouf, pull the mesh snuggly upward to the closest twist on the inner ring.
Then proceed to continue making poufs around the inner ring, still measuring 14" lengths.
When you get to the last pouf, open up the twist and secure the last bunch of mesh in the same twist you started with on the inner ring, re-secure the twist with a couple of turns.
Cut the mesh from the roll leaving a 3-4" tail.

We had a couple of yards left on this roll of mesh.
Tuck the raw end to the inside of the wreath.

The raw end of your beginning attachment and the ending attachment were pretty close together on this wreath. We just smoothed them together and secured to the Work Wreath frame with a zip tie.

This keeps your loose ends popping out.

Snip off the end of your zip tie. It's always good to check the back of your wreath for sharp points or rough areas that might scratch your door or wall.
Attach Contrasting Sheer Fabric
Next we chose one of the sheer fabrics to use. We used the one with a little moss green, cream and brown.

This is a sheer material and we used it to add a little contrast to the cream Deco Poly Mesh.
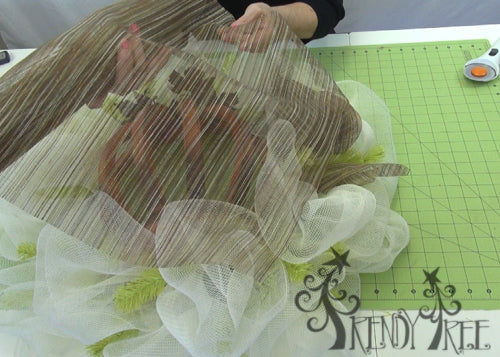
Strips 22" in length were cut. We started out with 8 pieces, but cut one more before we finished.

Slightly pull on the bias and fold or loosely roll opposing corners to the center of the piece.


Turn the piece over with the rolled edges to the underneath side. Open a twist and secure leaving a 3-4" tail. We placed the contrasting fabric in about every other set of twists. You can do more if you wish, there is plenty of material to do so.

I think we wound up putting around 4 on the center ring and 5 on the outer.
Attach Wire Jute Ribbon

Next we attached pieces of the natural colored wired jute ribbon. This ribbon is 4" in width and is completed wired, making it nice and stretchy. We cut lengths of this mesh ribbon and attached primarily in the areas that did not have the contrasting fabric. There was some overlap in places. You can use as much of this as you like, there was plenty left on the roll.
Be sure when adding additional products, to un-do the twist and place the next layer of product down on top of the last and re-secure the twist with a couple turns.

We really didn't measure the jute ribbon, but you want it long enough to have a bit of a tail sticking out of the twist and it should lay on top of the pouf without binding it down. It's better to let it stick up a little higher than the pouf than to have it too tight to where it mashes it down.
Add Ribbon Strips
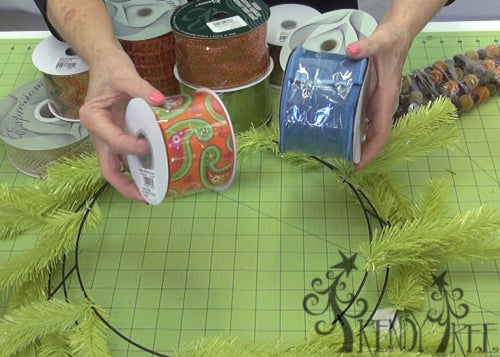
We had a wide assortment of ribbon to chose from but Carrie won me over with her suggestion of the Denim Ribbon. This is a new ribbon that just came in, we have two shades, a light blue and a regular darker denim. This is the light blue. We then chose a new Orange Paisley Mod ribbon for contrast and another glittery copper ribbon.
You could use any number of different ribbons on a wreath like this, sometimes settling on 2-3 or 4 choices is the hardest part!

We cut our ribbon strips 14" in length and did a chevron cut to the ends. After cutting the first glittery copper ribbon with a chevron cut, we decided to just cut that ribbon at a angle since it was a little softer than the other two ribbons.
The ribbons were placed at random in the twist, sometimes one single ribbon was placed, and sometimes two were combined together. You can add as much ribbon as you like. There was ribbon left over from all three rolls so we could have added more.
When adding ribbon, be sure to open your twist, add the ribbon and re-secure with a couple of turns.
Add Wire Jute Roping
We chose an Orange Wired Jute Roping to add some additional texture to the wreath.

Any sort of burlap or jute material is just perfect for fall decorating. The color of this Orange Jute Roping is a little bit of a dark orange and a perfect fall color.
We cut the roping using wire cutters at about 40" and wrapped the roping around a cardboard roll to make it curly.

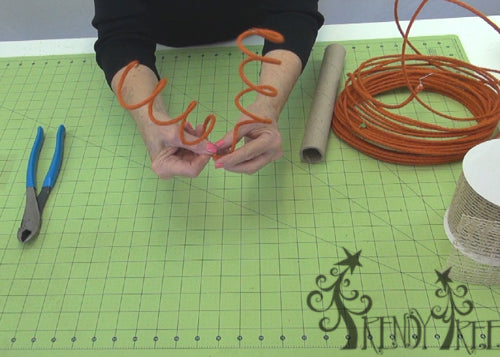
Just slip it off the cardboard roll, pinch in the center and you're ready to attach to the wreath. To finish the raw ends, you can use a bit of hot glue to keep the jute from raveling, but we usually just roll the end up a bit to cover up the raw end.
Attach the jute roping strips the same way the ribbon strips were added - open the twist and place the jute roping. At this point, this was our last product to be added to the twist, so you can give the twist 3-4 turns now to secure really well.

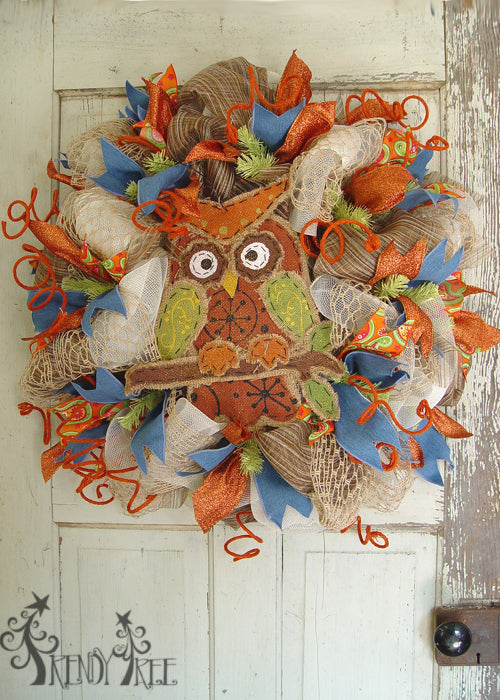
This last step finished our wreath except for hanging it up and smoothing ribbons, tucking here and there. If you see a gap you can always fill it in with a ribbon strip and if you have a hole that need another pouf, you can make one and attach to twists, or use some chenille stems to make a twist if you need it.
The overall finished width and height of this wreath was about 30" The blue zip ties that we used to secure the Wooden Pumpkin to the Work Wreath are not visible now. The tips of the green Work Wreath add some additional color, but you can tuck them to the inside if you had rather not have them show.
You could always take a strand of battery LED lights and tuck inside the center of this Wooden Pumpkin....set the timer and forget about it until time to take it down!
At the beginning of the project we showed you several other ribbons that would look equally as well on this project and we also found some other things to use to fill in the center.

J6420 Harvest Pumpkin Wall Hanging MDF

3404159 RAZ Fabric Pumpkin

J6110 Vintage Look Harvest Pumpkin MDF & Metal

719419 Thanksgiving Pilgrim Owl Metal

J6420 Harvest Pumpkin MDF

719419 Thanksgiving Pilgrim Turkey Owl Metal

3404159 RAZ Fabric Pumpkin Moss Green

Burlap Harvest Owl
J6330 Burlap Harvest Owl
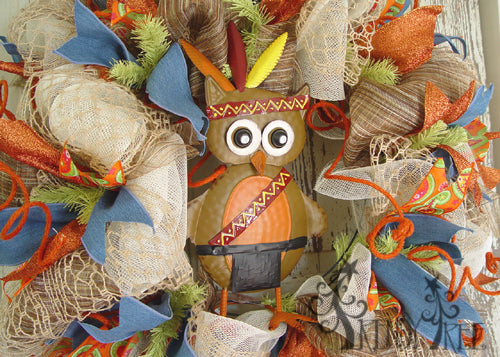
719419 Thanksgiving Indian Owl

3404159 RAZ Fabric Pumpkin Orange
Lots of choices!! This is why it takes us so long to get tutorials done.....decisions...decisions...decisions...I think this last one with the RAZ Orange Pumpkin in my favorite)))

Happy Fall Y'all!
