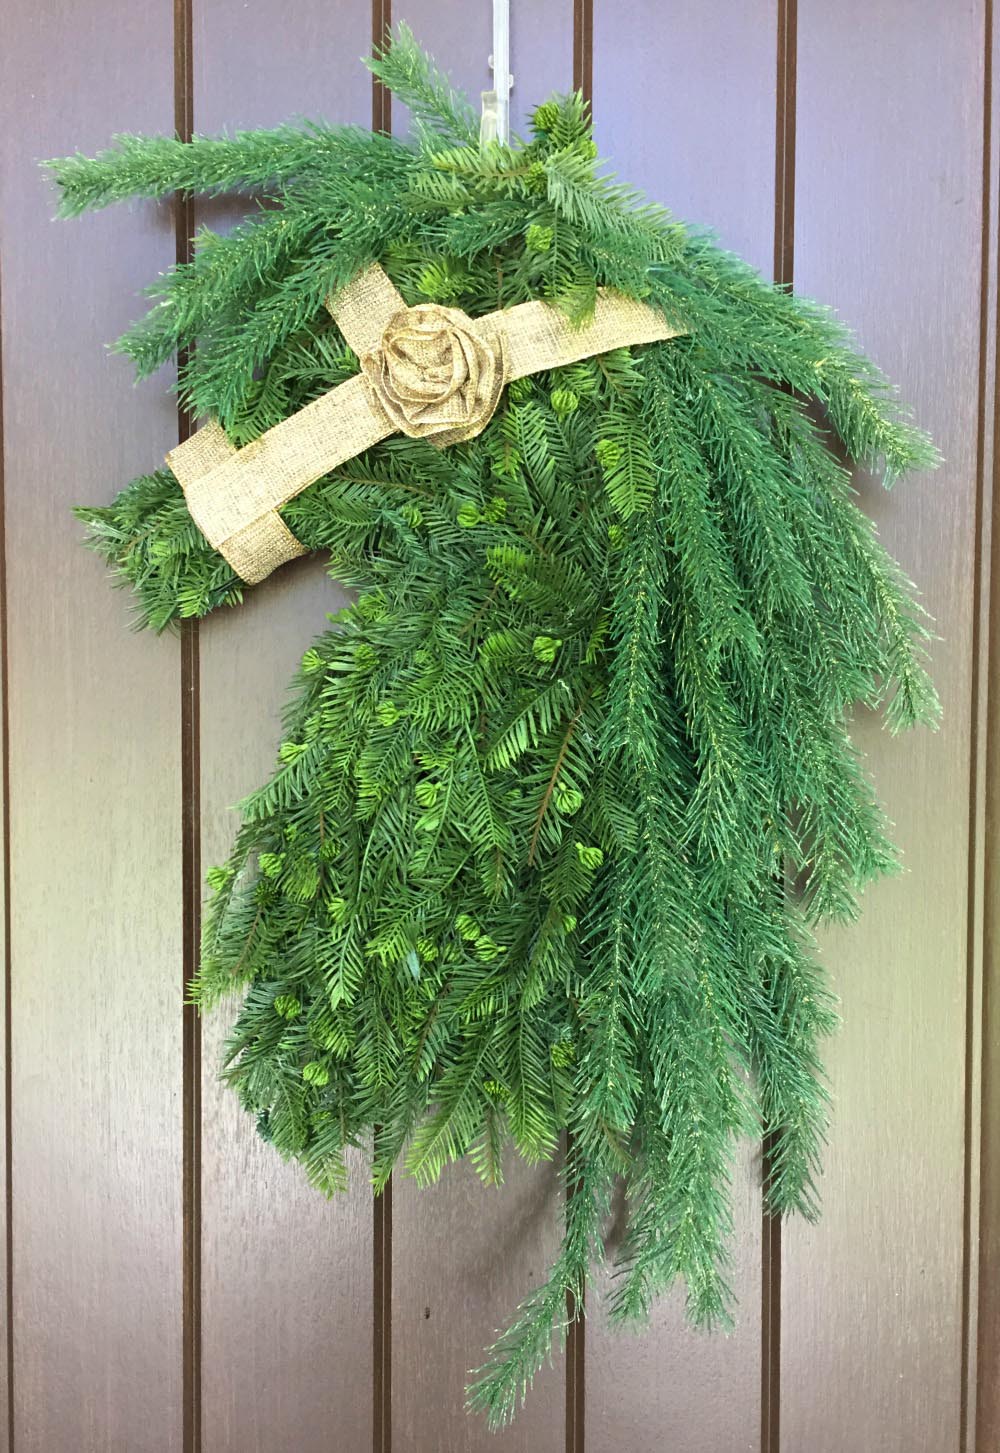
2017 Version of the Evergreen Horse Head Wreath.
SuppliesXX771709 Evergreen Horse Head Wreath Form
XV693637 Nobel Fir Spray - 12
XV7448F3 Glacier Pine Spray - 6 (not available on website, will be in kit only)
RG01084 1.5" Faux Linen Ribbon
Other Supplies Needed:
Scissors, tape measure, wire cutters, paddle wire (purchase at Walmart or craft store), hot glue, floral wire, zip ties.
11/8/17 Update: The kit containing the supplies has sold out, but some of the individual items may still be in stock. Also you can make substitutions. We do leave the tutorials up even after some or all the supplies have sold out, since you can still follow the basic instructions and choose other products.Summary:
The first thing to do is lay the wreath form out and play around with where you want to place your sprays. The Nobel Fir sprays were used to cover the form and the Glacier Pine Sprays used for the mane.
You may or may not use the twist on the horse form, just push them out of the way toward the inside of the wreath except for those along the outer neck where the mane would be attached.
Take one of the Nobel Fir sprays and snip off some small pieces of greenery. Cover the ear with a few pieces, wrapping with the paddle wire. Any sprays or pieces of sprays that you have left over, will be needed to fill in any gaps once you're done. We used 11 sprays and the 12th was used for pieces.
Starting at the nose, attach the paddle wire. Place a couple of spays to cover up the nose and start wrapping the paddle wire around the nose, working your way to cover the face area. Lay down another spray as needed. It's not necessary to clip any long ends of the spray just yet. You can place the ends toward the inside of the wreath and work on cleaning up the back later.
As you wrap the paddle wire around the nose, tuck edges of the spray around the frame toward the back to keep the shape of the nose smooth. Fill in with a couple of sprays on the face and then start down the neck. Place the sprays in a downward fashion as you move down the neck. Continue wrapping the paddle wire around the sprays and frame. Occasionally wrap your wire up under the tips of the sprays so you won't flatten the spray down entirely. Keep the twists on the frame open and out of the way along the neck edge where the mane will attach.
Look at the wreath from the back and secure any of the long ends of the sprays with zip ties directly to the wreath frame. You can snip long ends off if you wish, but just make sure the are secured well before you do.
Mane: Take the Glacier Pine sprays and snip off all the limbs. You will have three long pieces and six shorter ones. We made the mane all in one piece and then attached it to the horse head.
Take one of the long pieces of pine and attach the paddle wire. Wrap it around the end a couple of times and take another long piece and stagger the length. It's like laying the first piece down on the table, then laying down another, but move it to the left a little bit extending the length of your mane with each piece you lay down. Lay down a couple of the shorter pieces too. Just keep adding pieces and alternating the lengths working making the mane longer as you go. It's like using paddle wire when you make a fresh garland. You lay down a piece of greenery and wrap the wire, the next piece of greenery covers up where you connected the first piece and so on.
We would up with a piece that was about 30" in length. The horse needs "bangs" so we left a bit of a gap at the top of the mane and places some branches forward that would work as the bangs. These pieces were all wired together so the mane and bangs were all in one piece. Position the on the neck edge and top of the head in front of the ear area. If there are twists available there you can use them to secure, if just not use a piece of floral wire or a zip tie.
When securing the mane and bangs, just secure at the lower edge of the mane and not around the whole piece so it won't flatten down your branches. Floral wire is good for this since you can slide it over just enough of the stems to hold it securely. We used both the twists on the wreath and a few zip ties as needed.
Once the mane and bangs are secured, and the back checked, look for any gaps that need to be filled in. Cut a few short pieces of greenery to cover up the space between the mane and the bangs (in front of the ear). Check to make sure the metal edges of the wreath form are covered well and use small pieces of greenery as needed. The mane can be filled in to make it thicker by inserting more cut pieces from the Glacier Pie spray. You can attach these extra pieces with a little floral wire, or hot glue. Whichever way you prefer. Just check the back again once you're done. I had a couple of pieces that I had attached with hot glue, but once I looked at the back, they were not attached well enough and I had to place a zip tie in places. Give the horse head a really good shake when you done and fix anything that might be loose enough to fall out.
This is a long post with no pictures, but watch the video))) It should help.
Halter: Next we used the 1.5" ribbon to make a halter. You might want to experiment with some scrap ribbon for this rather than cutting ribbon pieces and having to waste it. You can attach the ribbon by just trying it around the nose and head in places, or you can hot glue which is what we did.
We started with a piece that would go around the nose. I really didn't measure these pieces because what worked on this horse might not work on yours. We did double our ribbon for extra thickness. (all the ribbon was hot glued together after we had it all in place). Put a piece around the nose. Then you need one to go up the side of the jaw area and behind the ear. The piece we used here just went up under the mane and was hot glued. Then you need a short piece that goes in front of the ear. And you may know a better way to make a halter)))
As a little extra decoration, we added a little ribbon rose to go on the mane. Here's a link that explains in more detail how to make a ribbon rose. Ribbon Rose Tutorial
If you haven't made these little ribbon roses before, start out with inexpensive, sheer ribbon. That's the easiest to work with.
We got glued our ribbon rose in place and were all done! You can make a hanger for the horse head by putting two zip ties together and secure to the wreath frame.
Again, the wreath kits do usually sell out, but we'll leave these instructions and video up, since they can be followed using other materials. You basically just need and short spray for filling in the body and something longer or different style for the mane. We have anew champagne horse version that we did a few day ago. It really has a different look!
SaveSaveSaveSaveSaveSaveSaveSaveSaveSaveSaveSave