Update: 4/28/15 Click here for an updated version of the Sunflower Wreath with Paper Burlap Center. Includes Video.

Yellow Paper Flower Tutorial
4/23/15 Update - This blog post has gone viral! Ocean 100 posted this link a couple of days ago and as of today it has about 250,000 shares and 82,000 likes....amazing! The image that was included in the link was a wreath made by
Nicole D Creations. Here is her image.

Nicole sells her creations on her
Facebook page and her
Etsy Shop. She is happy to design stunning wreaths for you. We have received many, many questions about how Nicole created the center for this wreath and she has very graciously agreed to share some instruction on this.
Many thanks to Ocean 100 who did the original post on Facebook and to
Nicole D Creations for sharing her image))
4/24/15 Update Nicole shared with us how she made the center of her wreath. She placed a round plastic mesh piece (that you get at craft stores that people use for yarn crafts) and attached it to the center of the wreath, attaching to the straight posts of the wreath form. This was the base for attaching the paper mesh in the center.

She used 10" paper mesh and scrunched it together with a chenille stem at the end (cut the stems in half). Pick a place to attach the paper mesh to the plastic mesh, thread the chenille stem through and twist from the underneath side.
Move down the piece of paper mesh 5-6" and attach another piece of chenille stem (placing the chenille stem over the paper in a staple like fashion, and attach from the underneath side.
Keep working around the center, meandering around to get the flow that you want. Finish off by cutting your mesh and securing that end with a chenille stem.
She used a little hot glue and pulled the paper mesh over the tops of the chenille stems to hide them, without losing the pouf. Also a little hot glue to make the poufs stick down here an there.
We hope to have a new video for you this weekend with this instruction. But sure to subscribe to our videos (link at the bottom of the page) so you won't miss this!
This tutorial can also be done using
10" poly mesh.
Supply List - some may be sold out - other colors can be used in all the products
PMT11555 Yellow Paper Mesh 10" x 5 yards - 2 Rolls (This product is sold out but other 10" paper mesh can be used.)
RR800129 Yellow Paper Mesh 10" x 10 yards can be used
RE130150 Lime Green Metallic Foil Deco Poly Mesh 10" x 10 Yards - 1 roll (other colors can be used)
XX167829 Yellow Pencil Wreath 10" (other colors can be used)
RE354102 Black Tinsel Flex Tubing (other colors can be used)
RD1058FF Chocolate Velvet Wired Roping (this product is sold out but other
roping can be used)
Watch the video!
Let's get started:
Prepare 10" Pencil Wreath
Most any color 10" Pencil Wreath will work for this project since the twists really don't show. A color that matches your paper mesh would be the most practical thought, so in this tutorial we recommend a
Yellow Wreath. But in the tutorial, we used a Burlap Wreath that we had on hand that had been used before. We just smoothed out the twists and used it again. You can see, that it did not show, so don't be afraid to use a white, cream, gold, etc.

A crossbar using chenille stems was placed across the center opening since we will need to fill the center in with a few more petals.

Cross Bar made from chenille stems
As you can see in the above image, our wreath has been used several times before, but still works fine for this project.
5/14/15 Update Here's a tip from Linda Matthews for the center of your 10" Wreath. Instead of using chenille stems to make that crossbar to attach more petals to, she takes the twists from the inner ring, after she has attached her petals, and pulls the tips of those twists toward the center, and secures the tips of the twists together. This makes an excellent way attach more petals to fill in the center along with what ever product you are going to use to fill the center in with. Here are her images. You can see more of Linda's great ideas and creations on her
Facebook page. Drop by and visit! Thank you so much Linda for sharing this great tip!
 Cut Paper and Poly Mesh
The Yellow Paper Mesh was cut into 10" strips. These rolls only contain 5 yards, so we had to use two rolls, but did have some left over. Please note that some paper mesh comes in 5 yard lengths and others are 10 yard. You can create this wreath with 10 yards, but you will need two of the 5-yard rolls))
We use a 24" x 36" self healing
Omnigrid Cutting Mat and a
45mm Omnigrid Rotary Cutter (these are available at Amazon and we have included our affiliate links.)

Cut Paper Mesh into 10" strips
The Lime Green Deco Poly Mesh was cut into strips measuring anywhere from 17" to 20" in length. The Lime Green was used for the outside petals and we just made them in varying lengths so they wouldn't all be exactly alike.
Create Outside Leaves
Taking a strip of the Lime Green Deco P0ly Mesh and pull gently on the diagonal from opposing corners.

Pull gently diagonally

Roll to center

Pinch in the center
Lay this roll into one of the twists on the outside of the Pencil Wreath. Push the ends of the leaf toward the outside making a "V"

The mesh won't hold very well into this position right now, but will be better as you add in more leaves. Products other than Deco Poly Mesh such as the Paper Mesh will hold this "V" better.
Continue placing your leaves around the outside ring of the wreath. We only did one layer of leaves, but you can do two if you want them to show more.
Create Yellow Petals
Place the 10" strips of Yellow Paper Mesh flat and one two corners to the center. Do not pull the paper mesh on the diagonal.

Pull corners to center
Then just pinch up the center making your petal.

Hold the petal pinched in you hand, open one of the twists holding your green mesh and lay the pinched up petal right on top of the green mesh, re-secure the twist with a couple of turns.

Continue working around the outer ring of the Pencil Wreath. We did two layers of yellow petals on the outer ring, so you can do them both at one time, or work around the wreath once, then repeat.
After you have complete the petals on the outer ring, move to the inner ring and do two layers of petals.

When you have completed two layers of petals on the inner ring, your opening will still be fairly large.
This is why we added the cross bar with chenille stems. We needed a place to be able to attach a few more petals to make the center opening smaller.
To fill in this center, just make another petal and use a chenille stem to attach it directly to the cross bar.

To attach these extra petals, place the chenille stem on top of the petal and twist a couple of times from the bottom. Then just place the tips of the chenille stems down over the cross bar and attach from underneath so your twists won't show.
Place at least 4 petals around the cross bar. You can always add more later if you have a gap or anything.

Now we've made our center opening much smaller.
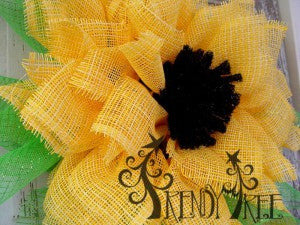
Fill the Center - You can fill the center of the wreath with different products. We have used Ball Twists, but have had difficulty keeping the black ones in stock so you might another color. It just depends on the look you want. You can bunch up mesh or make small clusters of mesh ruffles for a center, use the head of a big flower spray, use small ball ornaments, cover a piece of round cardboard with fabric or mesh.
You could also slice a 4" Styrofoam ornament ball in half and hot glue it to the center, or attach with floral wire.
For our wreath, we chose to make a pom pom out of a new product - Tinsel Flex Tubing.
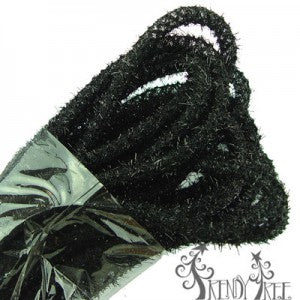
Tinsel Flex Tubing is similar to regular Deco Flex Tubing, but has a hairy like texture to it. It's available in many colors and color combinations. You could also use Jute Tubing, Faux Jute or Deco Flex Tubing.

We made a pom pom using about 5 yards of the
Black Tinsel Flex Tubing and attached it to the center of the cross bar with a chenille stem.
Attach Roping - We used
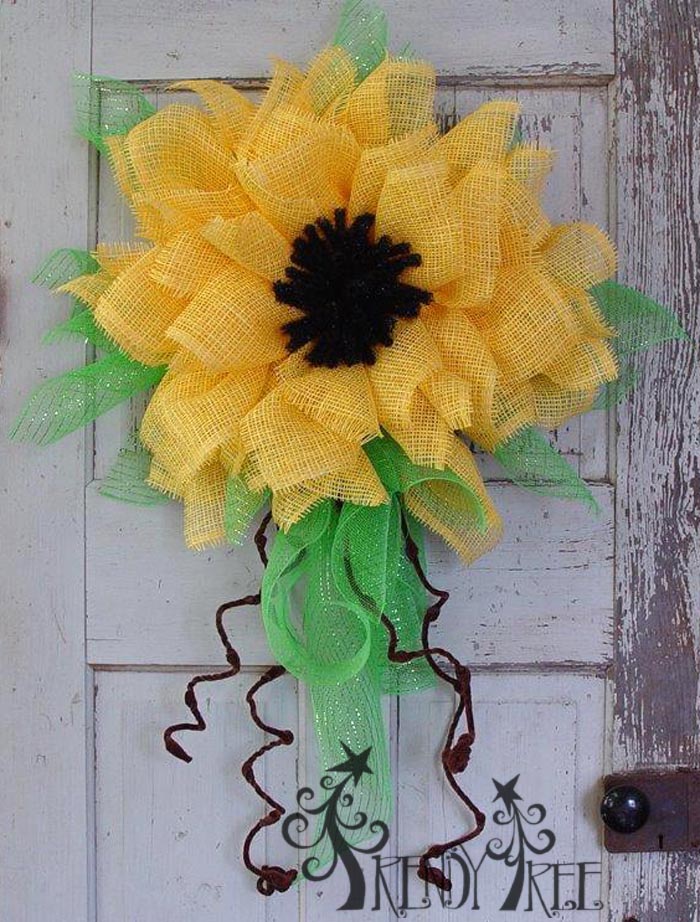
Chocolate Velvet Wired Roping to add some texture to the flower and just cut assorted lengths to make some tendrils extending from the flower. You could use the brown, black, moss or lime green in this product.
This product is sold out and no longer available, but we have a Brown Jute Roping and other colors of velvet and jute roping, just browse this roping category.
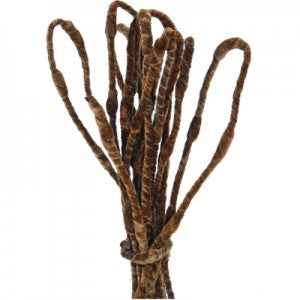
Just cut the pieces and attach directly to the Pencil Wreath frame.

To make the roping curl, we just wound it around a cardboard tube. To cover up the raw ends where you cut the roping (the velvet will slip off the wire) just coil the end up a bit until you have the raw end knotted up well.

This is our flower wreath all finished and ready to hang.......we did add a couple of strips of longer mesh as a tail. Just cut two pieces of different lengths and pinch in the center, attach to the Pencil Work Wreath frame using a zip tie. Once you hang it, you might want to make an angled cut on the strips depending on how they hang.
I like the way the center turned out using the Tinsel Flex Tubing. The tubing comes 20 yards to a bag, so you could get several centers out of each bag.
Another question we get quite frequently is can the flower be made with regular Deco Poly Mesh. Yes it can! Deco Poly Mesh is a little stiffer to work with and you may have to add an extra layer for good coverage, but it works)))


Subscribe!
Save