
This wreath tutorial is a little different since we actually "re-purposed" another wreath and gave it a whole new look. The wreaths we make in the shop are usually for demonstration only to show you new products and to do tutorials to assist you in created your own decorations.

It's very helpful sometimes to see the colors of finished products once they have been applied to a wreath form. It's not easy figuring out what a wreath will look like when you just have the roll of mesh to look at)))
It also helps to show you the size of some of the products we use as attachment. Even though dimensions are given, I know it helps me to see a sample of the product on an actual wreath, or tree, etc.

So, this tutorial starts with a wreath previously made a few weeks ago. It is a wreath made from a
Square Twig Wreath covered in
White Vertical Line Mesh with some additional embellishments. (
pictured on the right)
To see how the
White Vertical Line was applied to the
Square Twig Wreath Form just click on the
image. You can also view another tutorial showing how to apply wide foil mesh to a round Pencil Wreath (
green wreath on the left).
The technique is the same pretty much regardless of the type mesh or material you're using or the type wreath whether it be
Twig, Pencil, Regular Work Wreath, Candy Cane, Cross etc.

First thing we did was to remove the embellishment from the White Wreath and take it down to just the White Vertical Line on the
Square Twig Frame.

A
10" Poly Burlap Tan was chosen to use on this wreath. Poly Burlap just came out last year and has been widely popular. It resembles burlap, but is synthetic and has the same qualities a Deco Poly Mesh. It's heavier in weight however. Poly Burlap is in stock in several colors and widths from 2.5" 4" 10" and 21" Also this season we have some plaid and combination colors coming in.
The
Square Twig Wreaths are a little different from the regular Work Wreath or Pencil Wreaths. The 24"
Square Twig Wreaths measure 15" across on the larger square but yields a resulting wreath of 24" to 30" or more depending on the size of your poufs and the materials used.
The primary difference is the coating on the Twig Wreath. It's a crusty, earthy brown/green crust that does flake and is messy. It's also hard on your fingers....so you will either love them or hate them))) But they do result in a great look if you choose (especially on the Square Forms) to let your wreath form show a bit. And, if you don't have the color wreath that you need, you can use the Twig Wreaths (round or square) and tuck the twists to the inside after you're finished and no one can tell what color wreath you used. Twig Garlands are also in stock.

We started by untwisting one of the twists holding the White Vertical Line Mesh on the wreath. It doesn't matter where you start - inner or outer. Undo the twist and just leave the Vertical Line Mesh in place. It will stay there.
Grasp the Poly Burlap about 3-4" from the end and pinch it together in your fingers, place the pinched burlap right down on top of the Vertical Line Mesh and secure the twists back with just a couple of twists.

Now you're ready to measure your Poly Burlap and create your first pouf.

For this wreath, we measured about 14" for our poufs. This measurement varies from time to time depending on the type wreath you're making and the materials used. We really only wanted to use one roll of 10" Poly Burlap so we wanted to make sure we had enough. Measure the Poly Burlap and grasp and pinch. Open up the next twist, undo, and place the Poly Burlap on top 0f the white mesh and re-secure with a couple of twists. Now your first pouf is made.

It helps to place your hand under the Poly Burlap and fluff it out as you go. This was you can see that you are keeping your poufs symmetrical.
Continue around the wreath in the same fashion. Measure - pinch- secure.

This is the wreath with the inner ring completed. Once you've gone around the first ring, drop down to the second (or up to the inner if you started around the outside first).

Depending on how your twists are spaced, you might make a pouf when changing levels, sometimes it works out better to just come straight down without making a pouf and just securing the mesh in a twist and start out like you're making your first pouf again. Don't cut the mesh.

Both the inner and outer ring has been completed and it took every bit of our 10" x 10 yard roll of Poly Burlap.

Turn the wreath over to the back and take the tail of the Poly Burlap and weave it in and out of the frame to secure it and keep it from popping out and showing.


You can secure the tail with floral wire or a chenille stem to keep it in place.

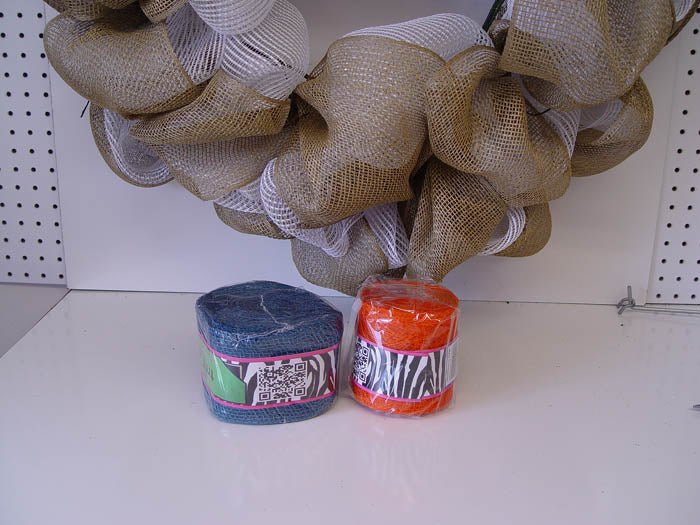
Next we chose some contrasting ribbons. For this wreath we chose a 4" Blue Jute and a 4" Orange Banana Weave ribbon. Neither of these ribbons are wired, but they are nice and stiff, colors are rich and they make excellent contrast. You might even want to use 3-4 colors or ribbons.....it just all depends.

The ribbons were cut into about 15" lengths, folded and ends cut to give a chevron style tip to the ribbon. To determine the length you need to cut your ribbon, lay your wreath down flat on the table and measure the depth of the wreath. You want your ribbon tips to stick up a little more than the poufs of your wreath so it will be visible.
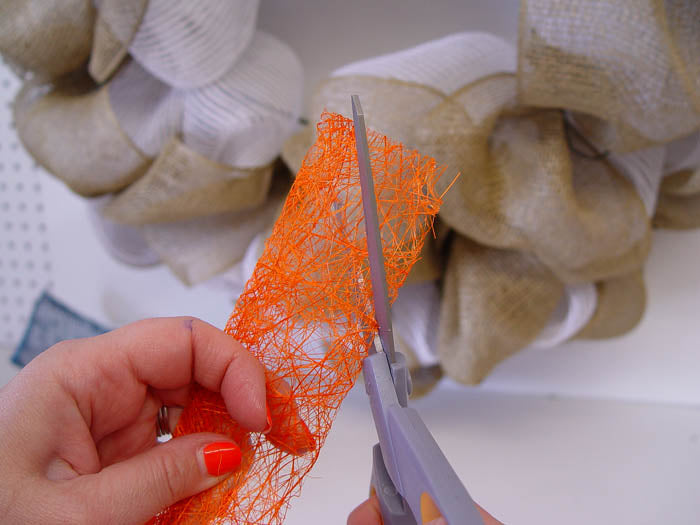
Cut the ribbon from the folded side at an angle.


Pinch the ribbon together mid way.

Choose any twist, undo it and lay the Blue Jute and Orange Banana Weave on top of the Poly Burlap and re-secure. This is our last application to the wreath so on these twists, close it with 3-4 good twist.

Sometimes we laid the blue down first with orange on top, and sometime vice versa.

This is our wreath, with the square hanging diagonally, ready for any embellishments.
It's a large wreath, measuring 30" or more and the fact that we started out with a Square Twig Wreath is actually sort of lost once it's completed.....it's not an obviously looking square....but you can hang it square or diagonal.
This is the wreath hanging squarely. The
Home Sign is a sentiment signs and comes in a set of two. One says "Home" and the other "Love."

Same, just hanging diagonally.

Close up of the "Love" sign ....great summer or fall colors too. These signs are abou8t 15" in length and 6.5" in ht. They are made of a wood product.

This is a smaller version of the signs that also come in a set of two. These signs are about 8.25" in length and 4.5" in ht.

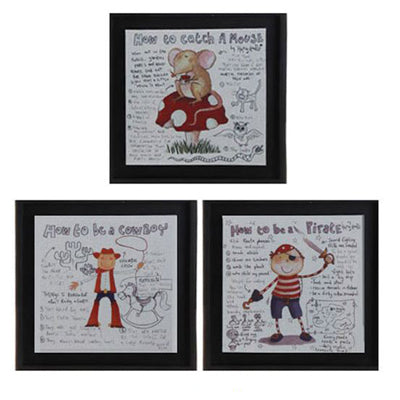
We found another print in to stock that looked really nice with this wreath too. It's a RAZ Children's Framed Print entitled "How to be a Cowboy." Some roping was added also. Regular rope would have looked great, but we used this
Brown/Green wired Moss Roping and just let it sort of naturally wind around the wreath just attaching it here and there in the twists.
Other prints in this RAZ collection include "How to Catch a Mouse" and "How to be a Pirate."
We haven't attached the prints or signs permanently to the wreath. We just secured them enough to take some photos, but to secure a sign or print, it depends on the back of the item. If it has a hanger that you can slip a chenille stem through or floral wire, do that and secure it to the frame itself. You might have to add a hanger or tiny screws so that you can attach wire. Sometimes on lightweight items you can just use clear fishing line. It all depends on how permanent you're making your wreath. If you're selling them, you certainly want your items as secure as possible.
Also once your done, turn your wreath over and take a look at the back. Check for sharp edges of twists or wires that need to be pushed to the inside. If you used sprays in your wreath, secure those to the wreath frame and clip the ends short. You can make a hanger for your wreath by attaching a zip tie, or floral wire.


