Tomato Cage Christmas Tree Tutorial
An inexpensive galvanized tomato cage or stake make a great frame for a small Christmas tree. In this tutorial we'll show you how we did this using a tomato cage and Deco Poly Mesh along with assorted embellishments.
Supplies:
36" Tomato Cage (purchase at hardware store or WalMart, Lowes, Home Depot)
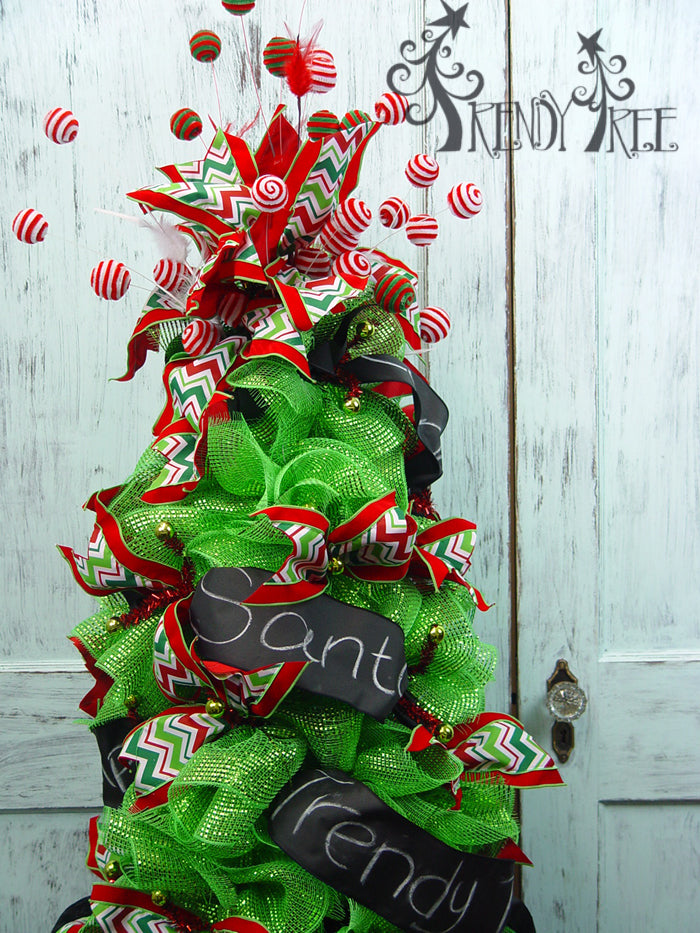
RE134150 10" Deco Poly Mesh Lime Green Wide Foil - 2 rolls
743342 Pencil Ball Garland Red with Lime Green Balls
RG158102 Black Chalkboard Ribbon 4"
RG8059 Red Flocked Chevron Ribbon 4"
Candy Ball Spray - 6
Secure Tomato Cage

Tomato Cage - Turn upside down for tree shape
The first thing we did was to place a zip tie around the pointed part of the tomato cage and pull the tips together. The zip tie was placed a couple of inches from the top. When buying the tomato cage, try to choose one that has a round bottom instead of the one that has stakes on each end. If you have to buy one that has stakes on each end, just push the stakes to the inside on the larger end instead of cutting them off. This way you'll have a smooth bottom and no raw edges to scratch surfaces.
Pencil Ball Garland
Next we took the metallic Pencil Ball Garland and attached it to the bottom of the tomato cage and just wound it around the tomato cage going all the way up to the top. Secure here and there where the twists on the garland matches up with an area on the cage. Use the twists on the garland to secure around the cage frame.
There will be some gaps, so don't worry about that right now. These areas can be filled in later with some extra pieces of wire or chenille stems.
Deco Poly Mesh
We used 10" Wide Foil Deco Poly Mesh in the lime green. You could use any color of mesh and you could use other styles of Deco Poly Mesh. We chose the wide foil because of it's density which allows for better coverage and it's very shiny and sparkly. We used the ruffle technique and cut the mesh into 10" lengths.
The Deco Poly Mesh will start to curl up automatically so each cut was flipped over and scrunched up through the middle and held pinched in the center. The selvage edges should be to the outside. Create two ruffles and then place the ruffles in one of the twist on the garland and secure with a couple of turns. We only secured with a couple of turns because we will be adding more product later.
Just work around the tree placing a cluster of two ruffles in each twist. Once you have work all the way through the twists, examine the tree for gaps or holes that need to be filled in.
To fill in these gaps, take two ruffles and place a piece of chenille stem or wire across the center of your ruffles and twist from the underneath side with a couple of turns. (We used some twists that had been cut off of twig garlands we had used in previous projects). This creates a sort of "ruffle pick" that you can place over wire on the tomato cage. Just place the pick over a wire and reach in from the inside and secure with a couple of twists.
If you have a gap that needs filling and you don't have anything to attach your ruffle pick to, just take a short piece of wire or chenille stem (we used pieces of twig garland because it's thick enough to provide good support, but flexible enough to handle easily). Attach your piece of wire to the cage, making a support that you can secure your ruffle picks to. On this cage, we added in about three additional supports.
Embellish
Your tree can be decorated in any number of ways. We used pieces of Chalkboard Ribbon which is really popular this season.

We used regular old sidewalk chalk which was all we had handy, but a higher grade dustless chalk can be purchased. We cut the strips of ribbon based on the length of random Christmas words and just did a chevron cut to the end of the ribbon, opened a twist and secure the ribbon in place. This time the twists were secured with 3-4 turns. We didn't use the entire roll of Chalkboard Ribbon.

We also used this beautiful red edge, flocked chevron ribbon. Strips were cut in about 14" and ends finished off with a chevron cut. The center of each strip was pinched and secured into a twist. There were some areas where we had added in our ruffle picks that of course didn't have a twist for us to secure ribbon in, since they were secured to the tomato cage from the inside of the cage. So we made "ribbon picks" just like we did with the ruffle picks. Pinch the ribbon strip in the center, and lay a wire or chenille stem across the center, twist a couple of times from the underneath side making a "ribbon pick." These "picks" can be secure right over the metal tomato cage wire to even out your ribbon strips.
A combination of red/white and red/green chenille ball sprays were placed in the top of the tree. These ball sprays are very lightweight and made a perfect addition to the tree. We used about six sprays on this tree and added some extra "ribbon picks" to the top of our chevron ribbon. We used the entire roll of chevron ribbon on this tree.


Another suggestion for a topper that we mentioned in the video was the
RAZ Sequin Top Hat. These hats would be perfect to top off this little tree too! They are available in Silver, Red, and Black from RAZ.

3302941 RAZ Sequin Top Hat
These hats are made out of cardboard, covered in shiny sequins. They are lightweight and have an opening on the inside that would make it perfect for perching on top of a tree.
Hope you enjoyed this tomato cage Christmas tree tutorial! We had fun making it and would offer a couple of suggestions for when we do our next one.
First....we would probably just go ahead and wrap the tomato cage with two garlands - one going around and perhaps the other in a vertical wrap. Better to have too many twists and not use them all then to fill in the gaps later. Plus, using the Pencil Ball Garlands....it would just give you a little more bling)))
Second....remember if you use a larger tomato cage....you will need more supplies....more mesh, more garlands.
Third.....I wish we had added some lights! Next time we might trying wrapping the cage in lights, after the garland goes on but we will just have to test this to make sure the lights shine through the mesh enough.
Fourth.....my goodness! I didn't know I had so many other suggestions))) Any color 10" mesh could be used of course....but we would also like to try clusters of curls instead of ruffles......I'm thinking a whimsical multicolor tree with curls of all colors......maybe even multicolor lights......what about a tree with legs......or a Santa tree! Sounds like we better get busy working on more tutorials!