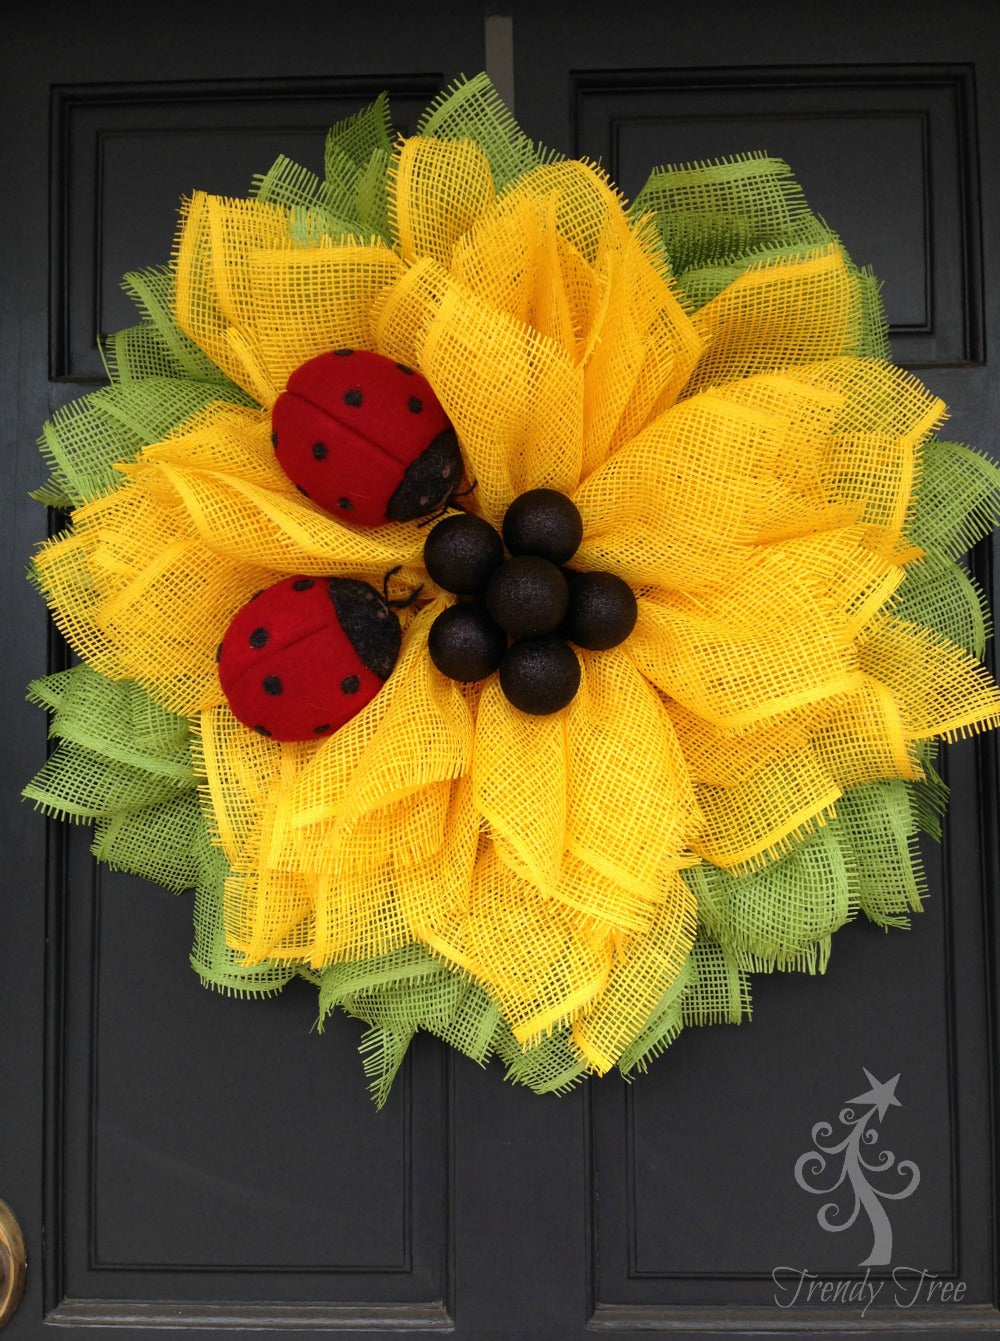
Here's our new 2016 version of the Sunflower wreath, we added ladybugs and more leaf petals to this wreath. It's an easy wreath to make. It's made out of paper mesh, and paper mesh is ...made of paper. This paper mesh does have a special coating sprayed on it, but it's still paper. It should be used in a dry area away from moisture. I've used it on my back porch which has a roof and haven't had any problem, but every climate is different and my back porch stays dry at the doors unless there is a storm, in which case, any wreath should be removed from the outside.
SuppliesXX167829 10" Yellow Pencil Wreath (yellow is sold out, but you can use other colors)
MD008102 14" Box Wire Wreath (our 10-packs are sold out but you could use a 24" pencil wreath form)
RR800129 10" Yellow Paper Mesh
RR800133 10" Lime Paper Mesh (lime paper is sold out, but you can use other green colors of mesh)
V119 Ladybug - 2 Sold out - no more coming in
MD085502 - Black Twist Balls - 3 Sold out 1/25/16 Update - All the kits are sold out, no more will be available, but some of the individual supplies are still in stock. And you can always choose other colors of products.
Please note that this project that when any of the above supplies are sold out, you can substitute wreath color, paper mesh color, etc and still make a beautiful wreath.
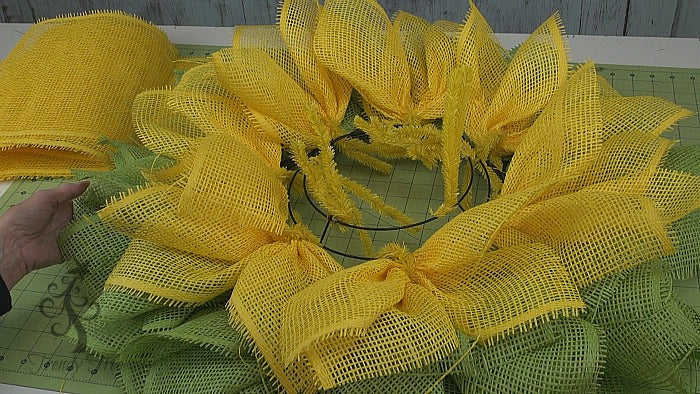
The first thing that is different about this wreath, is that we are using two wreath forms. One is a 14" box wire wreath (it has no twists) and then a 10" Yellow Pencil Wreath on top of that. Our goal in doing this is to make the green leaf petals stand out more. Typically in the past we would do a layer of green petals and then the yellow petals would go right on top of the green. This doesn't allow the green to show up as much as we would have liked, so we thought we would give this method a shot and we liked how it worked!
Using the 14" box wire wreath also makes the wreath a bit larger. The overall finished wreath measured about 28-29" in width.
The first question that comes to mind is, why use two wreaths, and not just use a 24" wreath (which measures 15" across the metal rings) in the first place. Well, here's why we didn't go that route.
The center of a 24" Work Wreath measures 12" across. That's quite a large center to fill in. You can do it that way. In fact, on our very first sunflower wreath we used a 24" wreath and filled in the center. Since that time, we have discovered that using the smaller 10" wreath works much simpler.
The 10" Pencil Wreath measures 7" across the center. Much easier to work with and you can fill that center in a variety of ways.
The 14" box wire wreath form has no ties of course, so we elected to use tiny zip ties to secure our green petals.
You can use chenille stems or floral wire. Anything that you use, will not keep the petals from slip sliding around while you are working. They will also fall to the back of the wreath when you pick it up. Don't worry about this, because once you hang it, just make sure you haven't let any petals get bent to the back side. Once it's on the wall or door, the petals will all face out flat like they should.
We cut our 10" Lime Paper Mesh into 10" lengths. Paper mesh will ravel. All mesh ravels, doesn't matter if you're working with Deco Poly Mesh, Paper Mesh, Poly Burlap, Poly Jute ...it all ravels. You can clip strings along the way, or clip them at the end. The more you work with the product, the more raveling you will have. Sometimes it seems like a never ending thing, but just keep clipping. I don't know of any magic tricks to keep products from raveling. Some have reported success with spraying edges with clear floral sealants or painting edges with modpodge but I haven't tried this so I can't report on it.
We use a 24" x 36" self healing Omnigrid Cutting Mat and a 45mm Omnigrid Rotary Cutter (these are available at Amazon and we have included our affiliate links.)
To make the green petals, notice how the paper has a natural tendency to curl under. Flip the paper over and bring two corners to the center. You can overlap them a bit.
Once you have the two corners at the center, scrunch the center together.
Turn the petal over so that the tips are curved downward.
Secure the green petal to the outer ring of the box wire wreath using a tiny zip tie. You can use chenille stems, but I think zip ties are less messy looking from the back. You could also use floral wire.
Once you have the zip tie secured, snip off the tail with wire cutters. You can snip these one by one as you go, or do them all at one time when you're finished. Push the petals toward the outside of the wreath form, making a sort of "V" shape.
Attach four green petals between each section on the box wire wreath form (between the straight posts). There are six sections on this wreath, so it will take 24 green petals. You should be able to get 36 petals from a 10 yard roll (might have one or two less or more). That leaves you 12 petals to use on another ring.
This is your wreath after attaching 4 petals to each section on the outer ring.
Next we added two green petals to each section to the second wire ring from the top. This took 12 petals and we used all our paper mesh with just a scrap left over. This gives us much more green to the wreath than we've had with previous tutorials.
Next we started cutting our yellow paper mesh. It was also cut in 10" lengths and petals created the same way as the green.
Before we started attaching our yellow petals, we secured the 10" Yellow Pencil Wreath to the 14" Box Wire Wreath with 4 zip ties. It wasn't a perfect fit, but the zip ties held it securely in place.
We started on the outer ring of the 10" Yellow Wreath form and applied two layers of petals to each twist.
One petal was secured in the twist with just a couple of turns, then another petal was created. It's very important to open the twist on the first petal, lay the second petal down on top and then re-secure the twist now with 3-4 turns. You can tuck the ends of the twist to the inside of the wreath now to get them out of the way. Continue working around the outer ring adding two petals to each twist. There are usually about 7 twists on the outer ring, so it will take 14 petals.
Then add two petals to each twist on the inner ring. There are about 5 twists so it takes 10 petals. This gives you some paper mesh left over.
Once you have completed your inner layer of petals, you can see you still have a pretty good hole in the center to fill in. You have extra paper mesh available so we made "petal picks" to add in more petals. Problem is, you don't have anything now to attach extra petals to. So, you have to create a place to attach the extra petals. You can do this a couple of ways. You can take two chenille stems and attach the across the center, making a sort of cross-hair. Or you can use the existing twists from that inner ring.
This was an idea that one of our customers came up with and shared with us. Just pull the opposing twists to the center and twist together. You won't have much to work with, but you can usually get them connected.
Once connected, the center looks much like the spokes on a wheel. We attached a small floral wire around the twists just to add extra security.
To make a "petal pick" just cut a chenille stem in half, lay it across the top of your petal and twist from the underneath side. Slip the chenille stem over the twists in the center (much like a staple going over) and secure from the underneath side. You can also use floral wire which actually showed much less than the chenille stem. We attached about 5 of the "petal picks" to the twists in the center of the wreath.
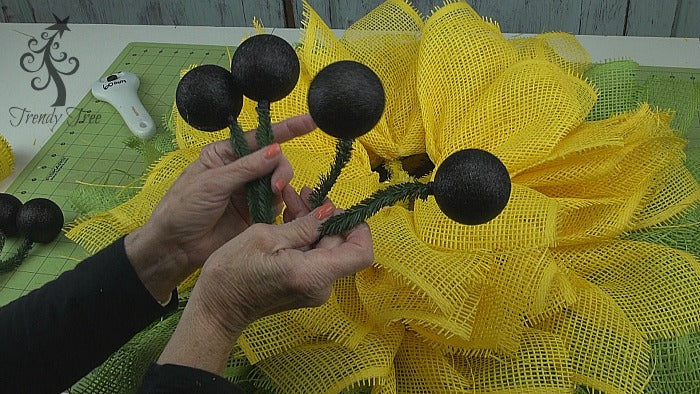
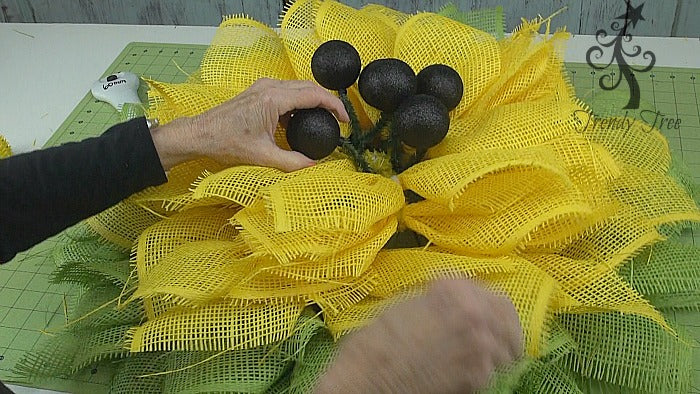
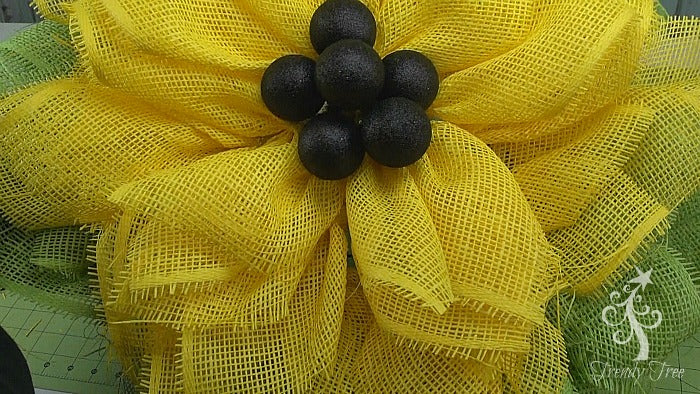
Next comes filling in the center. You can do this by several different ways, but for this wreath we chose some black twist balls. We used three sets. Each set has two balls connected by green wired tinsel. The balls were inserted from the underneath side, up through the center portion and twisted.
Next twist the balls together, gently, until you get them positioned like you want them. Take care not to twist too tightly or the balls might slip off the ends.
Flip the wreath over and check the back for sharp edges. Any ends of the zip ties that might scratch your wall can be turned to the inside. Clip strings and you can add a hanger using a couple of zip ties or chenille stems.
Next we added two wool felt ladybugs. They are made of Styrofoam and covered with a felt like material and very lightweight.
To attach the ladybugs, we slipped a piece of floral wire through the fabric portion on the back and wired them directly to the work wreath frame. You could also make a small hole in the Styrofoam from the back, insert a short wooden floral pick with some hot glue and secure that way, or even apply a liberal amount of hot glue on the bottom of the ladybug and hot glue directly to the petals. We like to create wreaths that can be broken down and changed up later, so we try not to do anything permanently that would prevent us from removing the item and using again.
Had a little help in the shop today....Matt passed judgement on the wreath and thought it was satisfactory)))
He liked the ladybugs! Course he didn't tell me I had a big string hanging off my shirt....lol
This project is easy to do, just remember it's made of paper mesh and should be protected from moisture.
Have fun wreath making! More tutorials coming up soon))
(This post contains affiliate links)
SaveSave