Scarecrow Wreath Tutorial with Sunflowers and Pumpkins
Scarecrow with Sunflowers & Pumpkins Wreath Tutorial
A limited number of kits will be available. Click here to purchase kit with Supplies: SOLD OUT
The tutorial will be left up even after some or all supplies may have sold out since the basic instructions can be followed substitute different products.
SuppliesXX748806 – 24” Emerald Green Work Wreath- 1
9728439 – Burton & Burton Scarecrow Head - 1
80101 – Scarecrow Legs – set 2
XB98510-10 – 10” x 10 yards Red/Cream Plaid Fabric Mesh Roll – 2
RG181014 1.5” Denim Ribbon - 1
RG0120024 2.5” Red/White Giant Dot Ribbon - 1
F16129 – Velvet Pumpkin Pick set of 2 – 2 sets (total of 4) - not available on website, in kit only
Q617140-09 2.5” Green Ladybug Ribbon - 1
249817 Yellow Sunflower Pick – 2
249818 Reddish Sunflower Pick - 1
A 24" Emerald Green Work wreath was chosen for this project. The scarecrow head has some green on it, and the emerald green from the work wreath will help blend those colors. You could also use another color of Work Wreath or a Pencil Wreath of the same size.
The 24" work wreath actually measures 15" across the largest metal ring, but with the addition of mesh and ribbons the overall width can measure anywhere from 28" to 30" just depending on the product added to the wreath. This project measured about 27-28" in width.
A new style of 10" Fabric Mesh Roll was chosen to add in a county look with the red and cream plaid. This product is new for this year.
The mesh has a great feel to it. It does ravel some as all mesh product do, but it was not excessive on this project. The mesh is made of up 51% Polyester; 35% Jute; 14% Polypropylene which gives it a great feel. It's available in several other plaid colors and solid colors. It's going to be a great product to use for wreath making)))
It did not take quite two rolls of mesh to finish this project, there was probably about a half roll left over. Mesh strips 10" in length were cut for ruffles. We used a rotary cutter and cut two ruffles at a time to make cutting go quicker. We use a 24" x 36" self healing Omnigrid cutting mat and a 45mm Omnigrid Rotary Cutter. (These are available at Amazon and we have included our affiliate links.)
To make the ruffle, lay the piece of mesh down to where it curls up naturally.
Flip the mesh over and start scrunching up through the center of the piece of mesh, starting on the cut edge, with the selvage or uncut edges to the sides.
Make a cluster of three ruffles and secure the cluster into one of the twists on the Work Wreath. We started on the outer ring and went all the way around it, and then applied a cluster of three ruffles to the twist on the inner ring.
You only have to give the twist a couple of turns to secure it now since we be adding more product to this same twist later on. When the last layer of product has been added you can secure the twist with 3-4 turns.
You can add the ruffles as a cluster of three ruffles all at one time, but if it is easier for you, you can add them individually just be sure to open the twist each time and lay the ruffle down on top of the last one.
Your wreath should look like this once you have added all your ruffles. The ruffle technique is very easy to do and the wreath always comes out nice and even. It's a perfect technique for the beginner wreath maker.
Next we did a test strip with a scrap of ribbon to decide what length of ribbon strips we needed. We first cut one 12" in length and then decided on 13" It's always best to do a test ribbon before you start cutting up your ribbons and only cut what you think you will need.
We did a chevron cut to the ends of the ribbon. We had chosen three different ribbons to use with this project. One was a 1.5" denim to pick up the denim from the legs of the scarecrow, a lime green ladybug 2.5" ribbon to bring in more green and additional red accent and the bold red/white p0lka dot ribbon. We wanted to give this autumn wreath a little bit more out of the box color with the addition of the red.
We started out by cutting 13" ribbon strips of all our ribbons. There are about 18 twists on the wreath, so we cut 18" strips of the denim and the green ladybug ribbons. But we only cut 9 strips of the red/white polka dot. We were afraid 18 might be too much, so it's always best to cut fewer than what you need and go back and add later if desired. Which is exactly what we did! We wound up cutting 18" pieces from each ribbon. You can add your ribbon strips anyway you like, we just pinched the ribbons in the center and clustered them together and secured to the twist. It's very important to open up the twist, make sure your ruffles stay in place, lay the ribbon cluster down on top and re-secure the twist. This time you can close it with 3-4 turns since this is the last layer.
We put a cluster of three ribbons in each twist all the way around the wreath.
Next we practiced where we though the scarecrow head and legs should be placed.
You may want to place your wreath on the wall or door hanger to decide on placement of these two items.
The scarecrow head is made of paper, and a foam like product and has a burlap string for hanging, but it looked like it might be easy to pull out or tear the paper. So we took a zip tie and slipped it under a band on the back and secure the zip to the work wreath frame with another zip tie.
We didn't pull the zip tie too tightly since the green band is glued on. You could also slip a piece of twine, fishing line or jute around the neck for additional security and secure that to the work wreath frame too. You could use chenille stems also.
The legs were secured together with a chenille stem and instead of placing them behind the wreath, we inserted them through the front of the wreath. The legs are on wood sticks, but the lower part of the legs are wired and you can shape them.
Once we had our position satisfactory, we reached from the back and secure the wooden sticks to the work wreath frame with zip ties in a couple of places.
Next we made two bundles of sprays. We used two velvet pumpkin picks and two yellow sunflowers for the right side of the wreath and for the left side two velvet pumpkin picks and one reddish sunflower.
Sometimes it's easier to cluster your picks together and form one large bundle, and just attach the bundle to the work wreath frame. The bundles were secured with zip ties and we used the remaining 1.5" denim ribbon and made a small bow around the bundle with the yellow sunflowers.
The last step in this project was to check the back of the wreath for any sharp edges and fix those if needed (bend sharp edges to the inside or cover with tape) and smooth out all your ribbons. When you are adding other items and flipping the wreath back and forth, your ribbon tips will get bent. Fluff out all your ribbons so they will show up well.
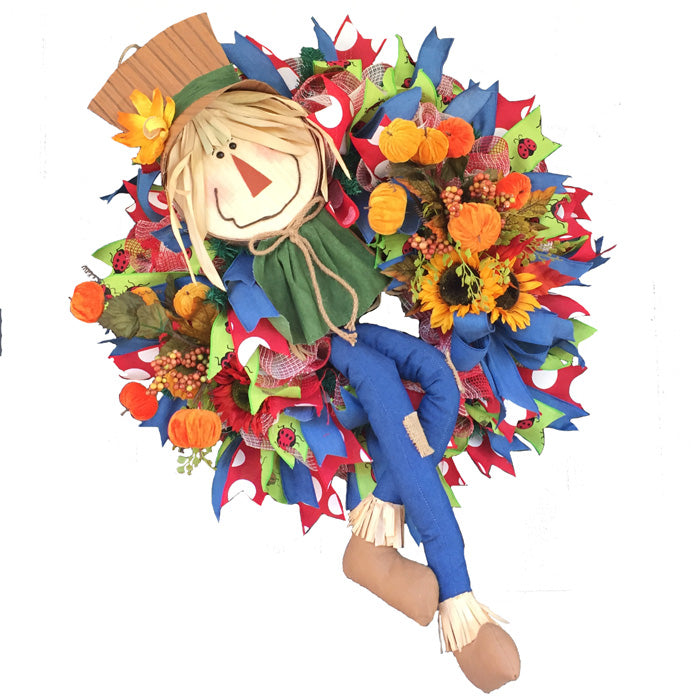
The wreath measured about 27-28" in width, and with the head and legs the wreath would be greater in length, but we didn't measure.
Love how the colors just POP when you get it on the front door. This little guy is staying at my house)))
Don't forget to subscribe to our YouTube channel so you won't miss our next video coming out soon!
(Post includes some affiliate links.)
SaveSaveSaveSaveSaveSaveSaveSaveSave