Scarecrow Centerpiece Tutorial 2016
SuppliesXX7598W4 Burlap Pencil Rail
XB97510-15 Denim/Natural Poly Jute Mesh 10" x 10 yards
HA4009 Scarecrow Wreath Enhancement Kit (this kit is sold out, no more coming for this season). Here's a possible substitute: MTH11920
X514340-49 Natural Linen Fall Scarecrows Ribbon 2.5" x 10 yds (sold out, no more coming in)RG0120020 Orange/Cream Giant Dot Ribbon 2.5" x 10 yds
RG1646W1 Bold Fall Muti Stripe Ribbon 1.5" x 10 yards ( not on website, in kit only)
X414909-21 Black Canvas Candy Corn Ribbon 1.5" x 10 yards (sold out on website, in kit only)
RG01175N7 Sunflower Ribbon 2.5" x 10 yards (sold out, no more coming in)
J6592 Wide Pumpkin (sold out on website, in kit only) 7/31/16 Update: F16089 is twig pumpkin, flat backed, that will be here soon and would be a good substitute.
Note: A limited number of kits containing supplies will be available. Once these have sold out, the tutorial will remain up since the directions can be followed and other items substituted.
Click here to purchase kit: Scarecrow Centerpiece Kit (Sorry but the kit is now sold out)Tutorial Summary
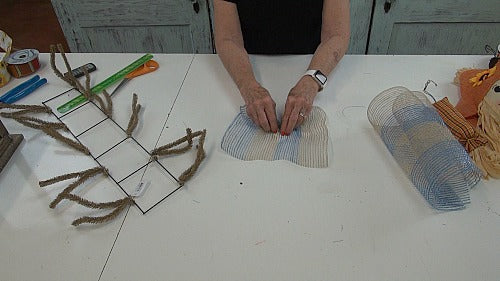
Mesh should be cut in 10" lengths and made into "ruffles." No shown in this images but we use a 24" x 36" self healing Omnigrid Cutting Mat and a 45mm Omnigrid Rotary Cutter (these are available at Amazon and we have included our affiliate links.)
Just gather each 10" piece up through the middle to make a "ruffle."
Attach three ruffles into each twist around the rail.
An optional step at this point would be to use the Elmer's Craft Bond Spray Adhesive and spray the ruffles to help reduce raveling. But this project would be used inside so once strings are clipped, you should see much raveling. If you decide to use the spray, you may want to do this outside as it is pretty messy and it does get on your fingers. Just be sure after the ruffles are sprayed, to separate them gently to keep them from sticking together.
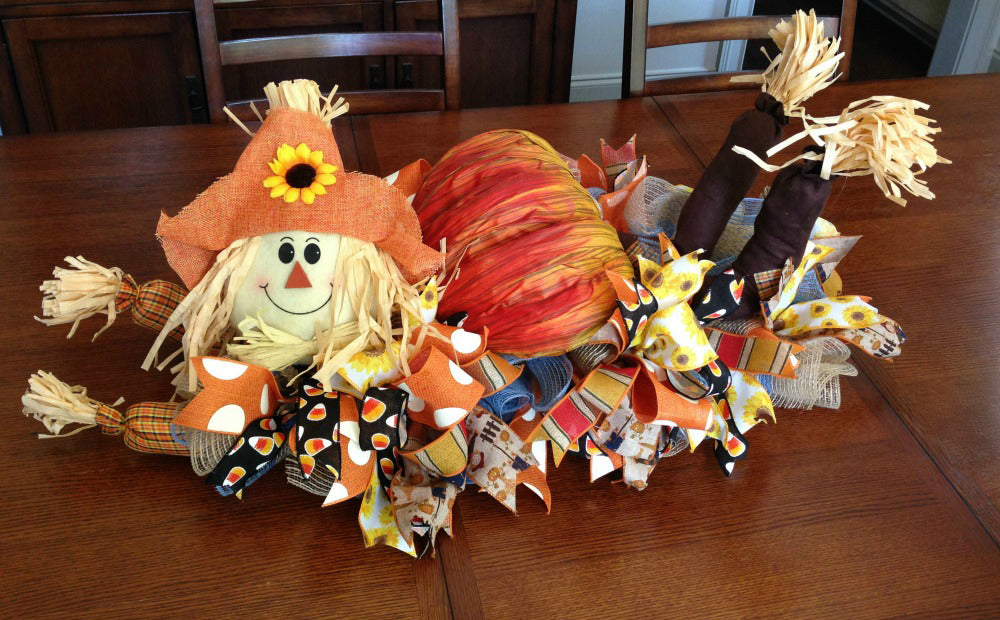
The scarecrow pieces and pumpkin were attached directly to the ribbon rail frame.
Scarecrow arms and legs are wired so you can shape them as desired.
You can position the scarecrow head straight forward, or to the side, just practice with your positioning before securing to the ribbon rail.
Instead of using a pumpkin, you could make a large orange or denim bow or use some other sort of autumn sign.
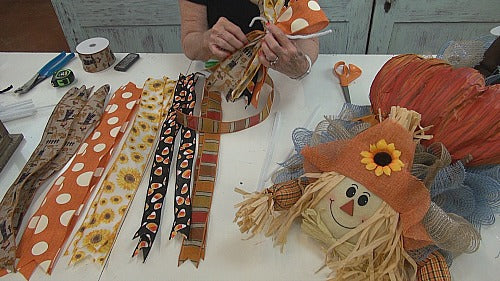
To make a loop bow, pieces of ribbons were cut 24" in length. The ribbon ends were finished with a chevron cut. We used the 5 styles of ribbon.
To make the Bow: (Bow instructions based on a funky bow made by Julie at Southern Charm Wreaths
Fold piece of ribbon in half, pinch ribbon about 4.5" to 5" from top creating a loop. While holding that loop in one hand, grasp another piece of ribbon and form the style size loop. Continue until you have 5 loops from your five different ribbons (they don't have to be one of each ribbon, you can mix them up and use your favorite ribbon etc.).
While holding the five loops in your hand, take a chenille stem and secure the loops giving the chenille stem several twists.
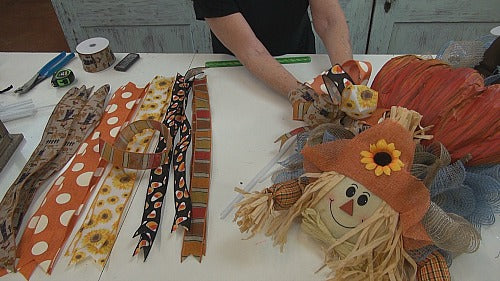
Spread the ends of the chenille stem out on the back side.
Pull up a tail (right side of ribbon facing up) toward the back, and the opposite tail (right side facing up) toward the front; until you have one tail to the back and one to the front of each ribbon.
Secure the chenille stem again under those ribbon tails to the back. Now you should have a 5 loop bow with tails in the front and back all facing up right.
Attach the bow to the ribbon rail using the chenille stem.
We made four loop bows and attached two on each side of the scarecrow.
We used some of the remaining ribbon to create ribbon strips. These pieces were cut 13" in length and a chevron cut to the ends. You can attach them individually, or cluster different ribbons together just anyway that you want. You do need to layer narrow ribbons on top of wider when stacking and also unto the twist (down to the mesh) and lay the ribbons down, then re-secure.
Ribbon strips were added to the twists all around the rail unless it was in areas were the bows were and strips were not needed.
Be sure to subscribe to our YouTube channel so you won't miss our next video coming out soon!
SaveSaveSaveSaveSaveSaveSaveSaveSaveSaveSaveSaveSaveSaveSaveSaveSave