Salmon Gerbera Daisy Wreath Tutorial 2016
Supplies (A limited number of kits will be available, but when those sell out, tutorial will be left up since instructions can be followed for similar projects with substitution of items.)
XX750460 24" Skyblue Pencil Wreath (other colors can be used)
FX181841 Potted Salmon Gerbera Daisy
XB96410-05 Denim/Ivory Stripe Poly/Jute Mesh 10" x 10 yards - 2 Rolls
Q618609-27 Denim/Navy Stripe Ribbon 1.5" x 10 yards
RG1213494 Salmon Ribbon 4" x 10 yards
RG1629J3 Dragonflies Ribbon 2.5" x 10 yards
Click here to purchase kit
First step was to cut the mesh into 10″ x 10″ pieces. The mesh is a combination product with a polypropylene base and a jute thread which gives it a little different texture than just plain poly. The rolls are 10″ in width and 10 yards in length. It takes more than one roll to do this wreath, but doesn’t take all of the second roll. This gives you a little mesh left over in case you need to fill in any gaps or anything.
We use a 24" x 36" self healing Omnigrid Cutting Mat and a 45mm Omnigrid Rotary Cutter (these are available at Amazon and we have included our affiliate links.)
We’re using a cutting mat and rotary cutter here, but you can use scissors. Mesh ravels regardless of what you cut it with. We are going to spray the mesh with an adhesive later in the tutorial to help reduce the raveling.
We made this wreath using the “curly” technique. Each 10″ x 10″ piece of mesh was rolled up with the selvage edges to the outside. Pinch the curl in the middle and make a cluster of three curls, laying them down with the cut side down. You can angle the position of the curl. Secure a cluster of three curls in one of the twist on the outer ring of the Pencil Work Wreath.
We used a 24″ Skyblue Pencil Work Wreath. The 24″ wreaths measure 15″ across the largest ring, but with the addition of mesh, ribbons etc. you wind up with a finished wreath that may measure 24″ to 30″ or so. It just all depends on what you add to your wreath and the technique you use.
To make the curl, just flip the mesh to it where to tend to start rolling up. Having the selvage (uncut) edges to the outside, roll the mesh up into a curl with a diameter of about 1 to 1.5″ inches. You may can hold the curls in your hand until you get three done or use a clip or clothespin to hold them. Pinch in the center and secure the cluster into a twist.
Start on the outer ring of the Pencil Wreath and secure a cluster of three in each twist.
Once you have completed the outer ring, move to the inner ring and add a cluster of three curls to each twist.
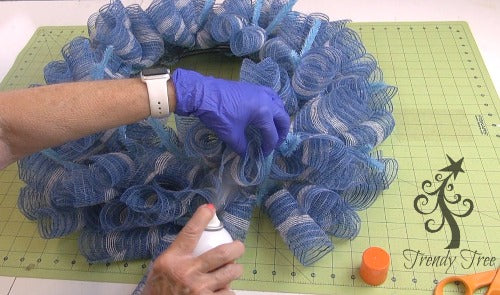
This next step is completely optional. We have been experimenting with different products that might help reduce raveling and Elmer’s Craft Bond Spray Adhesive has been the best product so far that we have used.
It is a little messy and you might want to do this step outside. Lift out and separate the curls a bit and spray each cut side with the adhesive. They will be tacky pretty quickly.
When you have sprayed the entire wreath, go back and lift and separate the curls to keep them from sticking together. You might have to re-roll a curl. Set the wreath aside and let dry. It can take a few minutes to a couple of hours to be dry enough to work with. It just all depends on the weather etc.
You might want to experiment with some scraps before spraying your wreath. Climates are different and some customers have reported that this didn’t work well for them, so we would hate for you to wind up with a sticky mess. We have also tried hair spray, brush on glue and Mod Podge. Here’s a link to our tutorial on our experiment. Can We Stop Paper Mesh from Raveling? Maybe!
These products are well worth a try, since they do help reduce raveling. All mesh ravels. The more you handle it and the more you cut it, ravels. Just clips strings when you done. It’s better to clip than to pull or you’ll get a never ending ravel started.
Next we were ready to attach the pot of daisies. We put three chenille stems together for a length that would go around the neck of the pot and secure from the back. Turn the pot to where the tallest daisies are on the back.
Secure the chenille stems as tight as you can, but if the pot slips up any, they will become loose. You could use a little hot glue to help, but we don't like to do anything permanently to our tutorial wreaths since we usually take them apart and use items for other projects.
We took a piece of the 1.5" denim striped ribbon and secured around the pot and just tied a knot in the back, this went over the chenille stem and helped to hold it in place.
Position the potted daisy on the front of your wreath, whichever side or wherever you wish to place it. Push the ribbon and the chenille stem through to the back of the work wreath and secure the pot to the work wreath frame. It helps if you secure in a place where this is a straight post. We also tied the ribbon to the work wreath frame too.
Once you get the base of the pot secure, take another chenille stem and slip around the tallest daisy stems, secure these as well. This will help keep the pot from tipping forward once you hang your wreath.
It would be best not to hang this wreath on a door that was going to get slammed frequently))
It helps to hang your wreath to check the position. You can also shape your daises at this point, or just wait until you are completely finished.
Next we made a bow using the three ribbons. The ribbons for this wreath were a 4" salmon, 2.5" dragonflies and 1.5" denim/navy stripe. All the ribbons were wire edge.
We used the Bowdabra to make the bow and this can be purchased at Amazon. We also used the ribbon holder from the ProBow. The ProBow we sell on Trendy Tree. Sometimes we just use a combination of items to make our bows and sometime nothing at all but just by holding the ribbon in your hands. Here's a link to the video to make the bow. Or just make your normal wreath bow, whichever is easier.
Secure the bow to the work wreath frame with the chenille stem.
You can leave your wreath with just the potted daisies and bow, or add some ribbon strips. Used some of the remaining ribbon to make some ribbon strips. The ribbon pieces were cut 12" in length and a chevron cut made to finish the ends.
Just stack your ribbons in whatever design you wish, but stack your narrow ribbon on top of your wider ribbon.
We made random clusters of ribbon strips and added these to the wreath. To add the ribbon strips, it's very important that you open a twist, lay the ribbon strip down and then re-secure. This time you can secure your ribbon with 3-4 turns since this is the last thing you're adding to the wreath.
When you're finished, be sure to check the back of your wreath for any sharp edges from your chenille stems or zip ties that might scratch your door or wall. Turn any zip tie edges to the inside. Wrap any ends of the chenille stems around the work wreath frame. You can make a hanger for the wreath by putting two large zip ties together and securing around the top of the wreath form.
The finished wreath measured around 28" in diameter. We crimped the tails of the ribbon a bit. Be sure to subscribe to our YouTube channel so you won't miss our next video coming out!
(This post contains affiliate links)
SaveSaveSaveSaveSaveSaveSaveSaveSaveSaveSaveSave