Easy Happy Fall Y'all swag that Carrie and Rachel did in the shop today. It was a fairly easy project to do and included adding some silk florals, pumpkins and gourds. It's a great swag that would take you from Sept through Thanksgiving.
SuppliesXX759940 Metallic Chocolate Pencil Rail
XB98510-19 10" Plaid Fabric Mesh
RE130048 10" Two Tone Gold Deco Poly Mesh
HA4007 Happy Fall Y'all Banner (available in kit only) Right now there is another fall banner in stock that would work equally as well: HA4008
260374 Pumpkin Pick - 2 (available only in kit)
260373 Autumn Gourd Pick - 2
SP780955-085 Maple Leaf Spray - 2
RE366120 Orange Jute Flex Tubing
RG01013H7 2.5" Bronze Copper Ribbon
A limited number of kits will be available containing the supplies. Once these kits have sold out and/or the individual items, we will still leave the tutorial up since the basic instructions can be followed and different products chosen.
Note: Kit with supplies have sold out and no more will be available. But some of the individual products may still be.
You could use any number of different products to make this swag. You could change up the rail color, mesh color and style (just stick to 10" width), flex tubing or ribbon.
Summary:The metallic chocolate pencil rail measures about 22" in length and 4" wide. It has the pencil style twist (11) staggered around the frame. To even out your swag, you will need to add an additional twist on each corner. If you prefer you can add a chenille stem before you start or just attach your materials later as we did in the video.
You could always use other colors of pencil rails, there are several to choose from. You will also need to add a hanger for your swag and you can do this by using a chenille stem to the top of the rail. If you go ahead and add your hanger now, it may be easier to keep up with what is your top and what is your bottom.
Mesh: Carrie and Rachel chose two different styles of mesh products for this project. One was a new style "fabric" mesh in an autumn plaid. This mesh was a combination of orange, natural and moss green - all perfect colors for fall. It's made of 52% Polyester, 22% Polypropylene and 22% jute. The combination of threads really gives this product a nice feel and it's a little heavier than just plain poly mesh.
They also use a two tone gold Deco poly mesh, that is very plain, just adds a little more gold to the project and reduces the cost since it's a less expensive item. All mesh ravels, whether it be a combination product, paper, or all poly.
It does seem to me that the fabric mesh products ravel a little less, but just know that you will have to clip strings.
It's better to clip versus pull or you may create a never-ending bunch of strings.
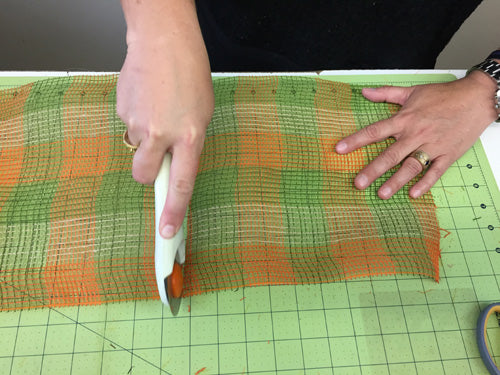
The ruffle technique was used and to do this, the mesh was cut into 10" lengths. We used a self-healing cutting mat that has measurements on it (and it's reversible) and a 60 mm rotary stick cutter.
These two tools are really very time saving devices. The rotary cutter's blade can be changed when they become dull. We've been using the same mat for several years now and it still works very well. Saves the surface of your craft table too))) We'll give our Amazon affiliate links for these items since we don't carry them in stock any longer......just can't compete with Amazon!
Omnigrid Self-Healing Cutting MatFiskars 60mm Rotary CutterFiskars 60mm Blades
You can cut both layers of mesh at the same time too.
Cut the mesh in 10" lengths. The rail has 11 twists around it and we typically put three ruffles in each twist. and you need to add two more twists to the rail so you will need 39 pieces total. The pattern Carrie and Rachel did for their ruffle cluster was plaid-gold-plaid. But you could do any combination, if you wanted more gold - use more of the gold Deco poly mesh ruffles etc.
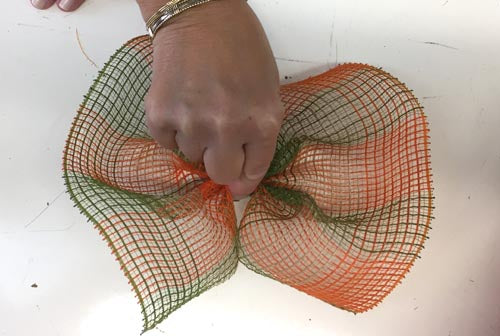
Let the roll of mesh just curl up naturally.
Then flatten it out with selvage edges to the sides. Scrunch up or gather up through the middle starting at the cut edge.
Hold the ruffle pinched, and make three ruffles.
When stacking your cluster of three ruffles, angle them a bit and don't stack them right on top of each other.
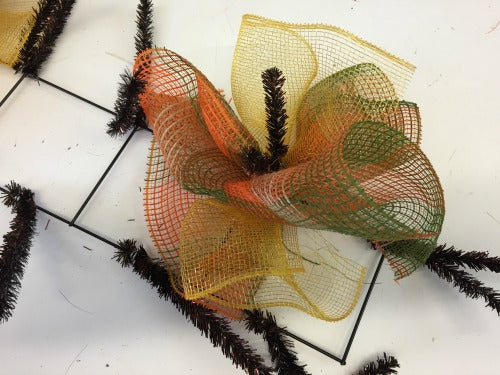
Start at any twist on the rail and secure the ruffle cluster with a couple of twist. Work all the way around the rail placing a cluster of three ruffles in each twist.
When you get to the corners where you need to add a cluster, take the ribbon cluster in your hand, cut a chenille stem in half and lay the piece of chenille stem where you have the ruffle pinched. Grasp the chenille stem from the back and twist it a couple of times. You have made a ruffle cluster pick. Place the cluster in the spot that needs to be evened out and secure the tips of the chenille stem to the back of the rail.
Ribbon Strips: Next ribbon strips were added to each twist around the rail. The ribbon strips were cut 8" in length and ends were cut at an angle. You can finish off the ends of your ribbon any way desired. The ribbon was a 2.5" metallic bronze copper color with wire edge.
The reason for choosing the shorter length for these ribbon strips was because florals were going to be added, and they didn't want the ends of the ribbons to be sticking out beyond the maple leaves.
To secure the ribbon strips, just pinch the ribbon strip in the center, open up a twist and lay the ribbon strip down, re-secure the twist tie.
For the two areas where you had to make the "ruffle cluster pick" secure the ribbon in the same manner. Cut a chenille stem in half, place it over the ribbon strip and secure from the back of the rail.
Jute Flex Tubing: We used orange jute flex tubing. This product is made of jute and comes in a bag of 30 yards, typically three 10 yard pieces. It is stretchy and contains no wire. Pieces were cut about 25" in length. Take care not to stretch it as you cut it.
A simple shoestring type bow was made with the pieces and one was attached to each twist. Open up the twist, making sure the ruffles and ribbon strip stays in place, lay down the jute bow and re-close. Add the two extras on the ends in the same manner using half a chenille stem.
There is no reason you can't add the ruffle, ribbon and jute bow all at the same time if you wish. Sometimes just going around the rail in layers makes it a little easier for a new crafter.
Florals: Next Rachel introduced the silk maple leaves. She used two maple leave sprays and snipped the leaves off (clusters of three leaves). The leaves were secured into the twist by opening the twist, making sure everything else stayed in place and re-securing. Also, she secured a little extra by wrapping the twist around the end of the floral stem. You could also use hot glue, but for this project they decided not to use any hot glue, in case there might be a time where you wanted to change the materials up and reuse products for later. A wreath hanger was made using a chenille stem and leaves were placed in an upward position at the top and downward at the bottom.
Pumpkins and Gourds: Two sprays of pumpkins and two sprays of gourds were cut. The pumpkins and gourds were cut away from the sprays leaving a stem of three inches or so. First the banner was just laid down on front of the swag and pumpkins and gourds placed around to get an idea of placement. Mainly they were just alternated a bit.
If a pumpkin was placed on one side of the banner, a gourd was used on the opposite side either a little lower or higher.
Just experiment with your placement and once you've decided, untwist a twist, keep everything in place, secure the pumpkin or gourd and re-secure your twist with 3-4 turns.
Add a little security to the pieces by twisting an end of the twist tie around the stem of the pieces.
Banner: The banner is made of canvas, has a burlap string hanger and a wooden dowel at the bottom. To attach to the swag, Rachel tied a small not in the burlap string hanger to shorten it a bit and secured with the twist from the pencil rail.
If you would like to secure it at the bottom, you can run a piece of floral wire through the bottom and secure it also to a twist. If you try to secure the banner down to the pencil rail frame, it may pull the banner inward to far, but you can experiment with this and your placement.
Bow: Rachel made a simple loop bow (six loops) from about 90" of ribbon. Next she made a simple loop bow out of about 60" of the orange jute flex tubing and secured the two bows together. End of the bronze ribbon was cut in a chevron or dove tail. The bow was secured to the top of the swag with a chenille stem.
Once your swag is complete, hang it on the wall to make any adjustments as needed. Remember you can always use hot glue for the addition of the florals, pumpkins and gourds if you like.
Check the back of your swag for anything sharp that might scratch your door and cover those areas as needed with a piece of tape, or tuck ends toward the inside. Fluff your ribbons and clip your strings!


 The pumpkins and gourds were cut away from the sprays leaving a stem of three inches or so. First the banner was just laid down on front of the swag and pumpkins and gourds placed around to get an idea of placement. Mainly they were just alternated a bit.
If a pumpkin was placed on one side of the banner, a gourd was used on the opposite side either a little lower or higher.
Just
The pumpkins and gourds were cut away from the sprays leaving a stem of three inches or so. First the banner was just laid down on front of the swag and pumpkins and gourds placed around to get an idea of placement. Mainly they were just alternated a bit.
If a pumpkin was placed on one side of the banner, a gourd was used on the opposite side either a little lower or higher.
Just 
 at the bottom. To attach to the swag, Rachel tied a small not in the burlap string hanger to shorten it a bit and secured with the twist from the pencil rail.
If you would like to secure it at the bottom, you can run a piece of floral wire through the bottom and secure it also to a twist. If you try to secure the banner down to the pencil rail frame, it may pull the banner inward to far, but you can experiment with this and your placement.
at the bottom. To attach to the swag, Rachel tied a small not in the burlap string hanger to shorten it a bit and secured with the twist from the pencil rail.
If you would like to secure it at the bottom, you can run a piece of floral wire through the bottom and secure it also to a twist. If you try to secure the banner down to the pencil rail frame, it may pull the banner inward to far, but you can experiment with this and your placement.

