Green Bunny Head & Legs Wreath Tutorial Facebook Live
1/27/17
Hi everybody! This Bunny Wreath tutorial is what we made our very first Facebook Live video about. Sad to say though, our video quality was just the pits! We live in a small town, and our internet/wifi upload speed just wasn't sufficient. Our poor viewers hung in there and watched though and we appreciate that so much. We had an awesome number of viewers for our first attempt at Facebook Live))) We tried a second short video and still had problems.....had better quality video, but our connection was dropped! So, we're back to the drawing board on working out our video problems. Please don't give up on us! We'll get it worked out and be back Live before you know it)))
We wanted to take the bunny wreath that we did on Facebook and give it a little twist. So we created a new video (not live, just our basic in house filming) and uploaded it to YouTube. You can watch it and we'll also give you a little summary of the steps.
Supplies:XX750439 24" Cream Pencil Wreath
XB97410-18 10" Ivory Burlap Mesh - 2 rolls
9721160-9730350 Bunny Head & Legs - Green
RG0132907 2.5" Fuchsia White Vertical Stripe Ribbon
Q732040-21 2.5" Ivory Black White Dot Center Canvas Ribbon
Q712809-08 1.5" Green Bunnies Soft Canvas Ribbon
XB99010-28 10" Fuchsia White Plaid Fabric Mesh
Please note that you can follow these basic directions and change up the products - choose different mesh color or style, different color wreath, and different ribbons. As items sell out, the links may no longer work as products will have been removed from the website....just pick out a substitute))
We started with a 24" Cream Pencil Wreath. The ivory burlap mesh works well with a cream wreath, or you could use white. We re-use our wreaths over and over, so the one you saw in the video looked sort of knotty....it's been used several times))
The pencil wreath is this image is a nice new one)) Our 24" pencil wreaths measure 15" across the wire frame. With the addition of mesh, burlap, ribbons and other products, you wind up with a wreath that measures 24" or larger.
The basic wreath was created using the ruffle technique. We used the 10" Ivory Burlap Mesh. This mesh has a nice texture. It's made of a combination of Polypropylene and jute. We use a 24" x 36" self healing Omnigrid Cutting Mat and a 45mm Omnigrid Rotary Cutter (these are available at Amazon and we have included our affiliate links.)
Mesh is 10" wide and 10 yards in length. We cut strips for ruffles 10" in length. Our initial plan (as we did in the live video) was two use three layers of ivory ruffles in each twist.
You can cut two ruffles at a time like the image above. A 24" wreath has 18 twist so it takes 54 ruffles to allow for three ruffles in each twist. So, it takes more than one roll of Ivory. You have a little left over.
The mesh will tend to curl up once it's cut.
To make the ruffle, lay the mesh out with edges curling under. Start on the cut side of the mesh (selvage edges to the outside) and gather up through the center, making a ruffle.
Hold the ruffle pinched in the center.
If you're working alone, you can go ahead and put the ruffle in a twist to hold it, or use a clip.
Make three ruffles and hold them pinched.
Attach the cluster of ruffles into a twist. It doesn't matter if you start on the inside ring of the pencil wreath or the outside, because all the clusters are going to be the same.
This image is just one ruffle being added, and if you're working alone you can add one at a time if you like. I like to use a clip to hold all three and then secure the cluster of three at one time. It's very helpful when you have a side kick to make ruffles and hand to you)))
The basic wreath once all the ruffles are attached measures about 24" or so.
For this tutorial, we took the basic ivory ruffle wreath and added some additional ruffles with some color.
We chose a new Fuchsia and White Plaid Mesh Roll. This mesh has a wonderful texture to it. We have it in 10" width 10 yard rolls and also some 21" It's made with 51% Polyester; 35% Jute; 14% Polypropylene which gives it more of a fabric feel, but also the properties of Polypropylene. I think it ravels less....now that's just me. All mesh ravels and you have to clip strings....but I do think this ravels less.
We did the same size cut, made the ruffles 10" in length.
We placed two fuchsia/white ruffles right on top of the ivory ruffles. Just open up the twist and lay the two fuchsia ruffles down. Re-secure the twist with a couple of turns.
This made our wreath have FIVE layers of ruffles. It was very full))) You would not have to make your wreath with five layers. You could use one roll of ivory mesh and make one layer of ivory ruffles, and then use one roll of fuchsia mesh and make two layers of ruffles. You would then have a wreath with three layers of ruffles which is how we typically make a ruffle wreath.
But, we were sort of re-doing this wreath and did not bother to remove any ivory ruffle, we just added to them. We went all around the wreath adding two fuchsia ruffles in each twist.
Next we added some ribbon strips.
These are the ribbons use had used in the Facebook Live video. We just removed them from the ivory wreath, and once the fuchsia ruffles were in place, we re-added them.
These ribbon strips were cut in 12" lengths and the ends finished off with a chevron or fish-mouth cut. It's always a good idea to measure your ribbon strips before starting before you cut up all your ribbon. You can add ribbon in many different way, doing ribbon strips is just one of the easiest and your wreath comes out uniform.
Place the ribbons pinched in the center and spread them out in your hand. Open up a twist, make sure your ruffles stay in place and lay the ribbon cluster down in the twist. This time you can give your twist three or fours turns since this is the last layers we will be adding to the twist.
Smooth your ribbons out. You'll have to fluff and smooth your ribbons more than once as you work with your wreath.
You'll also have to clip some strings. Sometimes you can wait until the end, and sometimes things will get tangled up and you'll have to clip along the way. Hold your wreath up and push ruffles that have turned inward, out to the outside. When using a wreath like we did that has been used many time, sometimes the twist will become loose and slip around on the wreath. This might make a ruffle bundle want to roll into the inside. Julie Siomacco with Southern Charm Wreaths did a Live Facebook tutorial a week or so ago and gave out a great tip. Once your ribbons are on, if you have a cluster that want to roll to the inside, or an outside one that wants to roll outward, just take the twist from the inner ring and outer ring and twist them together. This will help the clusters to stay in place.
Julie has a great E-book on wreath making. It's called Learn Deco Mesh Wreath Design. You can purchase it right off our website. To read more about it just click Learn Deco Mesh Wreath Design. It's very much worth the money and she is continually giving new tips and new ideas. We know....we purchased the E-book years ago)))
Next, it's time to add the head and legs. The Burton & Burton bunny head and legs is new for this year. Well, the head has been around for a couple of years, but the legs are new))) They are made of a Styrofoam covered with grassy sisal. There is a wire exiting from the legs so you can attach to your wreath and the head has a burlap string.
You may want to place your wreath on the wall to get your placement of the head and legs. We placed our head at the top of the wreath and wrapped the burlap string around the work wreath frame, then secure the burlap string with a zip tie. We placed the legs up under the back of the wreath and secured them to the work wreath frame with the wire.
You can just experiment with how you want to place the head and legs. Just remember to secure them to the work wreath frame and not the mesh or just a twist. The head is available in green, pink or blue. We also added this RAZ Burlap Carrot just to see how it looked too))
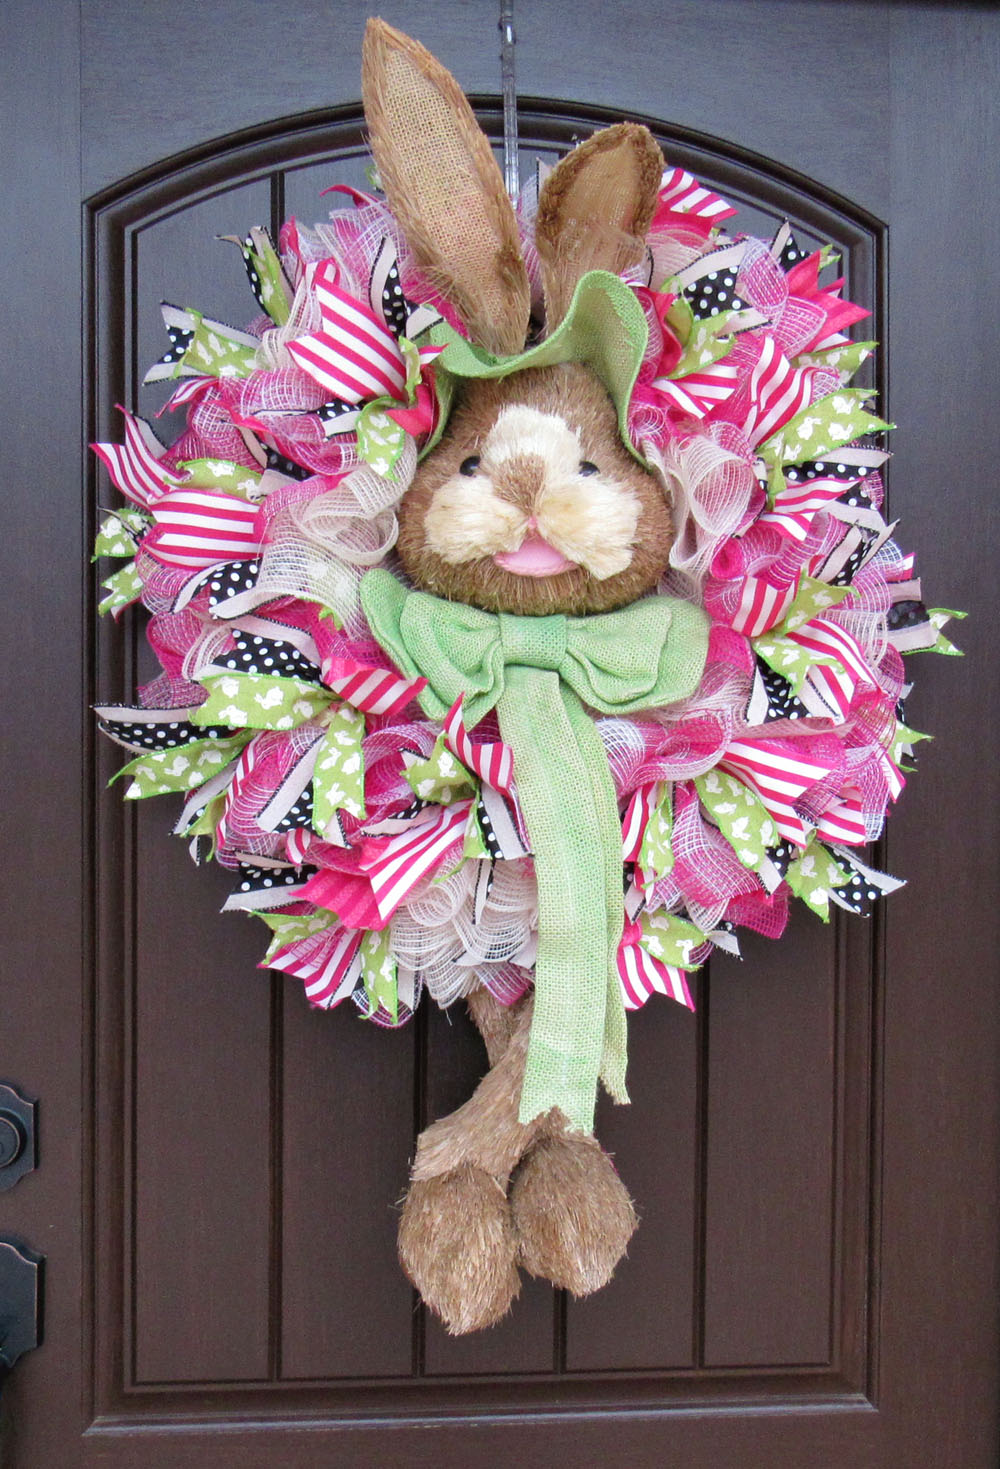
Here's our wreath on Carrie's front door.
You can tell more about the depth of the wreath in this side view.
Once we were finished, the width of the wreath was about 27" and the height 34-36"
All the supplies we used of course came from Trendy Tree and we'll leave this tutorial up even after some of the supplies may be sold out, since you can follow the basic instructions and choose other products.
Hoppy Easter!!
SaveSaveSaveSaveSaveSaveSaveSaveSave