This tutorial is for a Deco Paper Mesh Flower. We chose Fuchsia Deco Paper Mesh but you could use yellow or orange for an autumn look, or red or burgundy for a Christmas look. The green leaves and tails are made from Lime Green Deco Paper Mesh.
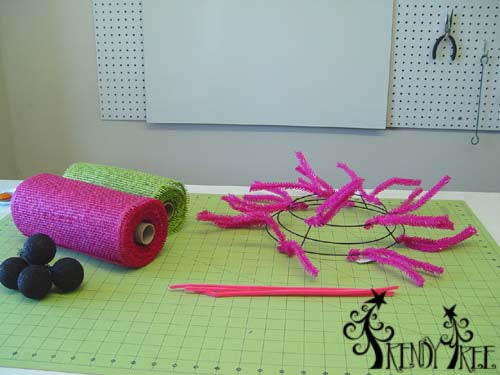
Supplies:
10"
Hot Pink Non-Metallic Pencil Wreath XX167811 (other colors can be used)
10"
Fuchsia Deco Paper Mesh RR800107 (other colors can be used)
10"
Lime Green Deco Paper Mesh RR800133 (other colors can be used)
6"
Black Ball Twist Ties XX085502 - SOLD OUT - other colors may be available
1.5" Black Sequin Ball Pick - SOLD OUT NO MORE AVAILABLE
Pink Chenille Stems
I don't have images of every step as I typically do, but we have a video of this tutorial also that we're working on.
The Deco Paper Mesh, is made of paper of course. And although it does have a coating sprayed on it to make it more resistant to moisture, it is still made of paper and recommended for indoor use or use in an area that is well protected from the elements.
This Deco Paper Mesh is 10" in width and 10" yards in length. The Lime Green Deco Paper Mesh in the photo looks smaller because it was the remnant of a project that we worked on last week. The Fuchsia Deco Paper Mesh was enough for this project with a little left over.
The first step was to take the 10" Pencil Wreath, smooth out the twists and take one of the chenille stems and cross the center of the wreath, attaching the stem to both side of the center ring. Then take a second chenille stem and attached it to the opposite sides.....having a cross-hair in the center. This project will need to be filled in the center with petals and we need a place to attach our petals later. It's just easier to place the chenille stems now in a cross-hair fashion before we start applying the mesh.
We started with the Lime Green Deco Paper Mesh first to go around the outer ring. The paper strips were cut in 14" length pieces. We cut 7 since there is 7 twist around the outer ring.
We use a 24" x 36" self healing Omnigrid Cutting Mat and a 45mm Omnigrid Rotary Cutter (these are available at Amazon and we have included our affiliate links.)
We also cut 28 pieces of the Fuchsia Paper Mesh and those strips were cut in 10" length. We wanted the green petals on the outside to extend a little farther than the fuchsia.

To make the petals, the fuchsia paper is shown above and you can see the natural curl of the paper. And you want to go with that natural curl with the petals so that they turn under just a bit.

Bring the diagonal corners to the center, then scrunch up the paper and pinch it in the center.

I'm holding this petal so you can see how I have it pinched up, but I'll turn it over so the ends tend to curve under when I attach it to the wreath.

This image shows the correct position of the petals.

Since the green strips were cut at 14" they are not square of course, but that's fine.
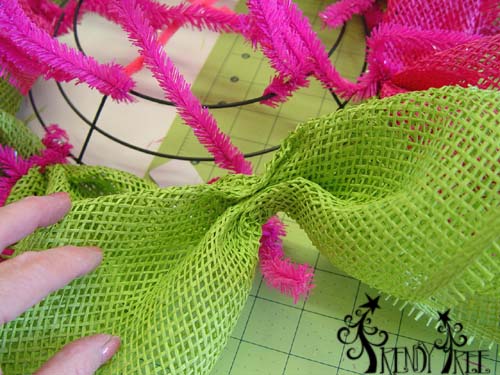
Attach your green petal to the outside ring of the wreath. Just pick a twist to start in, it doesn't matter where, but stay on the outside ring.

Once your petal is attached, push both ends of the petal to the outside. Just close the twist with 1-2 turns for now, because you're going to add more layers as we go.
Work all the way around the wreath using the green paper. We're applying one layer of petals using the green.
Once you've gone all the way around with outer ring with the green, start a layer of fuchsia right on top of the green. Just make your petal, open the twist and place the fuchsia right on top of the green and re-secure. For this project we're doing two layers of fuchsia. So you can either work all the around around the outer ring using one layer of fuchsia, or do two layers of fuchsia as you go.
Once the outer ring has two layers of fuchsia. Add two layers of fuchsia to the inner ring. Once your second layer of fuchsia is added, you can close your twist tie with 3-4 turns and the tips of the twists to the inside of the wreath, out of the way.
Once the inner ring has been completed, you should have about 4 petals left and these go in the center where you applied the chenille stems across the center.
Just cut a chenille stem in half, make your petal and slip the chenille stem around the center of the petal, and secure to the cross-hair chenille stem. Push the petals to the outside just like you did on the inner and outer ring.
The Black Ball Twist ties could probably used to secure these last four petals, but we really were using them for decoration to make the center of our flower. Take the ball ties and push the balls up through the center of the wreath from the back side and just twist one ball around the other. Take the second Ball Twist tie and do likewise, and then twists the balls around each other to make them nice and snug.

The Black Glitter balls are messy and you'll get some glitter everywhere.

It's always good to hang your wreath, stand back and take a look at it. You may need to adjust here and there. There will be some strings to clip.
Next we cut two lengths from our Lime Green Paper Mesh.....one was cut about 24" or so and the other about 30" to 36"
The ends were folded and a cut at an angle to finish the ends off with a chevron cut. Then both strips were laid together, the shorter one on top, pinched together in the center and a zip tie used to secure them to the bottom of the wreath. The zip tie was trimmed off and turned toward the center of the wreath. You always want to look at the back of your wreath and make sure you don't have any sharp edges that might scratch your door or wall.

Sorry I didn't take more photos along the way, but we'll get the video up shortly and maybe between the two, it will be easier to follow.
The finished wreath measured about 26-27" in width and 10-12" in depth.
Be sure to subscribe to Trendy Tree Video Channel. Just click on the button below!
Another question we get quite frequently is can the flower be made with regular Deco Poly Mesh. Yes it can! Deco Poly Mesh is a little stiffer to work with and you may have to add an extra layer for good coverage, but it works)))