Deco Mesh Pumpkin Tutorial
Pumpkin Supply List
12" Work Creations Ball (most any color would do)
RE104320 21" Orange Vertical Line Deco Poly Mesh (any color orange will do)
Assorted pieces of 21" and/or 10" green mesh and burlap for leaves - scraps from other projects
RD106132 Lime Green Wired Jute Roping
RD1058FF Chocolate Velvet Wired Roping
Let's get started!
12" Work Ball - First thing to do is set up your work ball. It will be shipped to you flat. Stand it up and spread the ribs evenly. Attach one of the metal caps that come with the ball to the top, fitting the ribs between the scallops on the cap, press the scalloped tab under to secure the ribs in place. Place the second cap on the bottom. The top of the Work Ball has a round opening on top for hanging the ball. Most any color work ball will do for this project since you really don't see the twists on the finished product. We used an old white ball that we had in the shop that has been used many times before))
The 12" Work Ball has twists along the ribs which are staggered in placement. So when looking down at the work ball from the top, you will see that with about every other twist, one is close to the center top of the ball and the other is a couple inches down the rib.

XX758238 Copper 12" Work Ball - but you can use any color
For this project we need twists at the very top of each rib. So we made our own attaching a chenille stem. The extra twists along the rib that you aren't going to use, can just be pushed to the inside out of the way. Don't cut them off....you might want to use this ball for something else later.
Chenille stems will slip and slide down the rib so if you can secure them in a manner where they won't slip and slide that will be best. If not, when you're done attaching all your mesh, you can go back and take the tips of your chenille stems and twist them together with a stem from the opposite side, snugging them up all around the top or bottom cap on the work ball.
Cut Mesh Strips - We used Orange Vertical Line Deco Poly Mesh for this pumpkin but you can use any sort of mesh that will give good coverage. The heavier the mesh, the better the coverage you will have. The Vertical Line mesh has no foil, but has an almost nubby like texture and provides good coverage. Wide foil mesh would be an excellent choice also but you do need something with a 21" width.

RE104320 Orange Vertical Line - but you can use other orange mesh
Cut mesh strips 20" in length. The 12" Work Ball has 8 ribs and we planned to place two strips of mesh along each rib, we we needed 16 strips of 20" mesh. One roll of 21" mesh x 10 yards should yield 18 strips, so you should have enough with just a tiny bit left over from one roll.
Place the mesh strips on the table and pull slightly at two opposing corners. The Deco Poly Mesh has a natural recoil tendency so pull on the diagonal and let the roll start to curl naturally. Roll the two edges that you are not pulling gently to the inside, be sure to roll from each edge to the middle, You want the two rolled edges to meet in the middle. Hold the rolled mesh at each end. Your smooth side should be to the outside and your inner will be where the two rolled sides meet.

Rolling two opposing corners to inside
Roll another strip in the same manner and hold both strips in your hand to attach two rolls at a time. You can attach one at a time if it's easier for sure.

Holding two strips - rolled edges are facing to the inside.
Attaching Mesh to Work Ball - To attach the rolled mesh, you are going to work at it a little backward as compared to normally attaching mesh. Lay the strip or strips if you do attach two at a time on top of the ball with the finished side laying directly on top of a rib. Attach the mesh about 3-4 inches from the end with the twists, then bring the opposite end of the strip down toward the bottom of the rib, covering up the rib as you go.

Mesh rolls are laying with the face side next to the ball - rolled inner side is facing outward, after being attached, will be flipped over the rib and secure to the bottom.
The mesh should just fit along the rib and not pouf out an extra amount. You may have to tighten up your rolls to keep them symmetrical and a little tight. Now, the finished side of the rolls should be showing and your rolled sides that met in the middle should be to the inside.

Rolls attached at top, ready to attach at the bottom.
Take the end of the strip and tuck it to the inside of the work ball and secure with the bottom twist of that rib, securing from the inside.

Bottom of ball, raw edges tucked inside ball and secured with twist from the inside of the ball.
If the mesh roll/rolls are secured properly you won't have end of twists sticking up on either end and your rolls are covering up the rib. Attaching the mesh in this manner will allow the pumpkin to sit flat when you're done. At first you may feel like it isn't going to cover the rib, but keep them snug and as you continue to work around the ball, the coverage will get better.

Mesh rolls fit along the rib, the raw ends are tucked to the inside.
After you're done, you may have to go back and adjust any that got too loose or too tight. Reach your hands around the strips and make adjustments to cover the ribs if necessary.

First two rolls secured at top and bottom along first rib.
Attaching Leaves - To make leaves we used scraps of green mesh and a bit of burlap that we had in the shop. You can use 10" or 21" pieces of mesh, just cut strips in lengths anywhere from 12" to 16" to 20" and roll them diagonally and pinch in the center. It seemed to work best to create your top and have it all ready to attach in one piece instead of attaching one leave piece at a time.
If you need green mesh for leaves, any of the lime, moss, apple green combinations will do.
We made the stem by just folding a piece of jute/poly burlap that was a scrap, rolling it around a wire and hot gluing the edges. A darker brown would have been better, but we didn't want to open a new roll just to get a different color))
The cluster of leaves was made around the stem and inserted at the top of the pumpkin and secured to the work ball in one attachment. We had a couple of little gaps that called for a leaf so we just took another strip of mesh, secured it in the center with a chenille stem and tucked it in the gap.
Wired Roping - The Chocolate Velvet Roping and Lime Jute Roping was used to add some extra texture and dimension to the pumpkin.
RD1058FF Chocolate Velvet Wired Roping

RD106032 Lime Green Wired Jute Roping
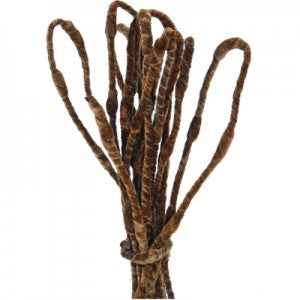
Just cut into assorted lengths using wire cutters. Ends were rolled up tightly to cover up the cut end and then the strip was just wrapped around a mesh cardboard core to get a curl. They were just stuck down in the top of the pumpkin. These ends can be secured by reaching gently between the ribs and securing directly to the Work Ball Frame.

The finished pumpkin measured about 17" in width and 19" in ht to the top of the stem. It will sit nice and flat. If you were going to leave it outside, you might want to slip a weight inside it to keep it place. (A zip lock bag filled with kitty litter or sand makes an excellent weight. We don't have a cat, but we keep kitty litter for projects just like this. It's great for those sack luminaries with the votive candles too.)
You could change the looks of this pumpkin by removing the green top, adding some Halloween ribbons and spooky sprays, add a face and made a Jack O'Lantern of out of him!
We also have a 12" Half Work Ball that is flat on the back which makes it perfect for wall or door hanging. We have a tutorial coming up on how to make a Jack O'Lantern wall hanging using the half ball.

Click the pink button to subscribe to our videos!