
New video tutorial available showing you how easy it is to make this Burlap Bumblebee Deco Paper Mesh Wreath.
Supplies
XX7488W4 24" Burlap Work Wreath

RR800127 White Deco Paper Mesh

RR800102 Black Deco Paper Mesh

RR800245 Yellow/Cream Check Deco Paper Mesh

981840-21 Black/White Polka Dot Ribbon

BR40017 Gold Banana Weave

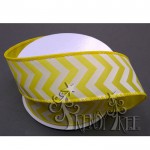
982509-22 Daffodil Chevron
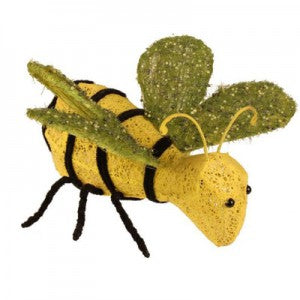
P5272 Burlap Bee

Note: Since this tutorial was done, we've sold out of the Burlap Bumblebee but here are a couple of alternatives you could use:
KG2922 Wire Mesh Bumblebee

P5807 Burlap Bee Welcome Sign
Lets get started!
Ruffles
First step is to cut the Deco Paper Mesh. Lay all three colors down flat and cut through all three layers at one time.
We use a 24" x 36" self healing
Omnigrid Cutting Mat and a
45mm Omnigrid Rotary Cutter (these are available at Amazon and we have included our affiliate links.)
The 24" Burlap Work Wreath has 18 twists, and we did two layers of ruffles, so we cut 36 pieces of paper mesh in 10" lengths.
Smooth out the twists on the work wreath and begin on the outer ring.
Lay the 10" square of paper mesh down on the table with curled edges downward. Scrunch or gather up through the middle of the paper (selvage edges to sides) and pinch in a bow manner.
Open a twist (doesn't matter where you start) on the outer ring and lay the pinched up paper or "ruffle" in the twist and secure with only a couple of turns.
Continue around the outer ring, then repeat. To place the second layer of ruffles on the outer ring, open a twist and lay the second ruffle down on top of the first (offsetting it a little where it won't be lined up laying exactly on to of the first ruffle) and close the twist again with only a couple of turns.
Continue around the outer ring until you have a double layer of ruffles. Then move to the inner ring and apply two layers of ruffles.
You will have some raveling. The more you handle the mesh (paper, poly, burlap) or any product, it will result in some raveling. You can clip these strings at the end.
Ribbon Strips
Ribbon strips for this wreath were cut at 14" Our first cut at 15" was just a little too long. It's always good to measure your ribbon before cutting all your strips. Measure the depth of your wreath for an estimate.
Ribbons can be applied in many ways. Some choose not to cut ribbons, but to secure in the twists and layer the ribbon all around. Some cut loops or bows. Experiment with the style you like best and it also depends on the look you are going for.
For this wreath, we chose three different styles of ribbon. The Banana Weave adds a different texture to the wreath. It's airy, but stiff. Ends were trimmed with a chevron or fish-mouth cut, but you can finish with just an angle.
The Banana weave was cut in 14" strips, pinched in the middle and secured in every other twist around the wreath. The secure ribbon strips, open the twist, and lay the ribbon strip down on top of the ruffle, secure now with 3-4 turns (if this is your last layer of product).
The Daffodil Chevron ribbon is 1.5" in width, so it was layered on top of the 2.5" Black/White Polka Dot ribbon and both strips secured at the same time. These double layers of ribbon were placed in the opposing twists that did not have the Banana Weave in them.
Jute Roping
The Black Jute Roping was added last and also secured in the twists by opening the twist, placing on top of the ribbon strips and re-securing with 3-4 turns. The jute roping is wired so we just started by attaching in one twist, curling the roping around the hand and securing maybe in every other twist. It was not attached to each twist and just allowed the meander around the wreath. This roping is easing to experiment with since it holds it shape however you twist or curl it. Cut with wire cutters when finished. It probably took only half the package to do this wreath.
Burlap Bee
Next we attached the Burlap Bee. A floral wire was inserted from the back side and then secured to the Work Wreath frame. You could probably also use fishing line around the wings. Attaching any item will just depend on the item, size and weight of it. But you generally do need to secure it to the work wreath frame using chenille stems, wire, or zip ties. Smaller, light weight items sometimes do well with just hot glue. But keep in mind, hot glue does not always hold up well in some climates.
Finishing Up
Clip all your strings, fluff your ribbons and make them stand up. Turn the wreath over, look at the back for any sharp edges that need turning to the center or covering up.
If you need to attach a hanger to your wreath, zip ties are a good choice or a couple of chenille stems. Be sure to attach the hanger around the frame where there is a straight support so that your hanger doesn't slip and slide all over the place.


Be sure to click on the pink button to subscribe to our Trendy Tree Video Channel!
Save


