New Bumblebee wreath tutorial for 2016! Perfect wreath for spring and summer and the best part, it was easy to make.
Supplies: There will be a limited number of Bumblebee Wreath Kits while supplies last. Individual supplies are listed below.
1/26/16 Update - Sorry, the kits are sold out and no more will be available.XX750302 Black Pencil Wreath 24"
RE130102 Black with Black Foil Deco Poly Mesh 10" (2 Rolls)
KG2922 Bumblebee
RG01075L6 Honeycomb Black/White 1.5"
RG1780E9 Green/White Stripe 1.5"
RG1633 Bumblebee 2.5"
FN155129 Yellow Daisy Mum Bush
Note: This wreath can be created using different colors of wreaths, mesh and ribbons. Some items may be sold out, but basic instructions will be left up since you can substitute items and achieve a similar look.
We started with a 24" black pencil wreath. This wreath can be made using a number of different colors of wreaths. The 24" pencil wreath measures 15" across the metal frame, but with the addition of mesh, ribbons and trims, your completed wreath will measure 24" or greater.
We chose 10" black foil mesh. Other styles of mesh also can be used. We do recommend that to do the ruffle technique you stay with a 10" wide mesh since ruffle pieces are cut 10" x 10". It is not recommend that you split a roll of 21" mesh down the middle to make your ruffles because the more cuts you have in the mesh, the more raveling.
We know of no magic tricks to stop mesh from raveling. The more cuts you make and the more you handle, the more it will ravel. Just know that you will have to clip strings at the end. Some cheaper, looser weave meshes may ravel more than others, but it all ravels whether it be poly mesh, paper mesh, poly burlap, jute/poly mesh.
Cut strips of mesh in 10" lengths. It will take two rolls of 10" x 10 yard mesh for this project, but you will have a little mesh left over.
We use a 24" x 36" self healing Omnigrid Cutting Mat and a 45mm Omnigrid Rotary Cutter (these are available at Amazon and we have included our affiliate links.)
If you choose, you can always add in extra ruffles to use up the mesh, or save the scrap for another project. Sometimes when you've finished your wreath, you might see a gap that needs filling somewhere and you can always make a ruffle and fill that space in.
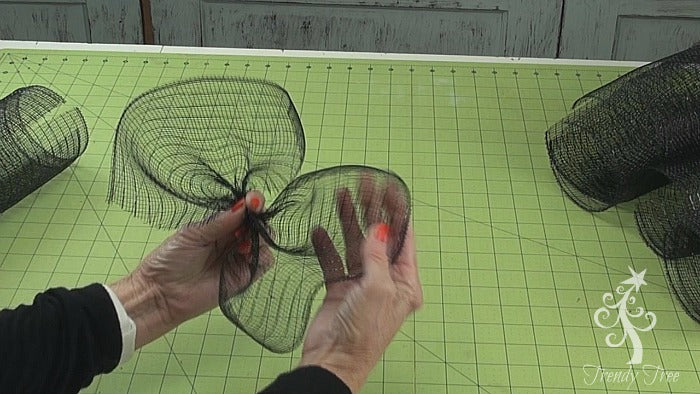
To make your ruffle, place the mesh curled edges down, be sure to have the selvage or uncut edges to the sides and start scrunching up through the center of the mesh at the cut edge.
If you are working along and have difficulty holding the ruffles while you make three, you can use a clip to hold them.
Make a cluster of three ruffles, taking care not to stack them right on top of each other, turn them a little and attach the cluster into a twist on the wreath.
It doesn't matter if you start on the inner ring or outer ring. Working all the way around the outer and inner rings adding a cluster of three ruffles. You can always add one layer of ruffles at a time if you wish. But if you choose to do that, be sure when you add another ruffle, to open the twist up completely and lay the ruffle down on top of the last one, then re-secure the twist around both ruffles.
After the ruffles have been completed, it time to layer in some ribbon. We chose the 2.5" bumbleebee ribbon as our primary ribbon and some striped and patterned ribbon for accents.
It's always good to experiment with the placement of your ribbon strips before you start cutting up your ribbon. We used a scrap of a ribbon just to get the measurement we wanted. This ribbon was cut 24" in length. Since we really wanted our bumblebee ribbon to show up more, we chose the longer length so we could attach the ribbon at both ends and have a good loop.
The contrasting ribbon pieces were cut in 12" lengths. All the ends of the ribbons were finished off with a chevron cut.
The ribbon was pinched about 6" from the end and secure into one of the twist on the inner ring.
The other end of the ribbon was pinched about 6" from the end and secured in the next twist. This gives a nice loop of bow.
The green/white stripe and black/white honeycomb ribbons were pinched in the center and attached to the next twist. We just alternated this pattern around the inner and outer rings. It won't work out perfectly and you'll have to add a short loop of the bumblebee ribbon to even it out.
Once we had applied ribbons to each twist, it just need more ribbon!
To add more contrasting ribbon, we made more strips with the narrow ribbons, cut chenille stem and used a half of the chenille stem to make a pick with the ribbons. These ribbon picks were added to the wreath in spots that needed more ribbon and attached directly to the work wreath frame. These ribbons picks will slip and slide, but that's okay unless you attach them to the outer ring and if you do that, they will slide to the back of the wreath. So avoid attaching to the outer ring. It also helps them stay in place if you attach at the point of a straight post on the wreath frame.
All in all, we added about 16 narrow ribbon clusters. You can add more or less. Or you can add your ribbon strips in another pattern.
We thought the addition of some yellow would be nice on this wreath and we chose this daisy mum bush. It has 5 large blooms on it and they were each cut away from the bush. We settled on a cluster of three blooms for the front side of our wreath, and added the two remainders at the top of the wreath close to the bumblebee.
The cluster of three blooms was secured together with zip ties in two places and a large bow using the remainder of the ribbon was tied around the blooms and secured to the wreath frame with a chenille stem. A loop bow was made with the remainder of the ribbons left over. Here's a short video on how we made the bow:
The bee was placed in the upper left area of the wreath and secured to the work wreath frame with chenille stems. You could also use zip ties or floral wire. The bee is made of wire and you can manipulate it a little, but do so very gently with the wings. A chenille stem was used around the leg and secure to the wreath frame.
The finished wreath measured about 26-27" in width.
We will have a limited number of wreath kits for this project, but even after they have sold out, you can still take these basic directions and change up the wreath color, mesh, ribbons etc and create a similar project.
Save