2017 Scarecrow Head Wreath Tutorial. We just can't get enough of scarecrows this year! Seems they get more popular year after year. And, you can put them out in late August or early September and leave all the way through Thanksgiving if you like.
Supplies:
XX7488w4 24" Burlap Work Wreath
9728439 Burton & Burton Scarecrow Head
RE130104 10" Brown/Copper Foil Mesh
RE1301N8 10" Chocolate Foil Mesh
X712340-38 2.5" Arygle Chocolate Plaid Ribbon
SB780152-005 Sunflower Bush
EG2599H8 or EG2598H8 Moss Ribbon
10/29/17 Update: Kit containing supplies has sold out, but some of the individual products may still be in stock. Note: A limited number of kits will be available that contain the above supplies. On the moss ribbon, the kit may contain a 1" or a 2" since the ribbons are assorted.
Once the kits have sold out, the tutorial will be left up since you could follow the basic directions to make a similar wreath using other materials.Summary:Burlap Wreath: A 24" burlap wreath was used for this project. You will notice that in the kit of supplies, there will be a 24" Work Wreath, but we used a 24" Pencil wreath in the video. Many times we take apart wreaths that we have made for tutorials and use the items again so that's why the pencil wreath in the video looks a little used))
A 24" wreath measures 15" across the outer ring, but with the addition of mesh and other materials you finish with a wreath that measures 24" or greater.
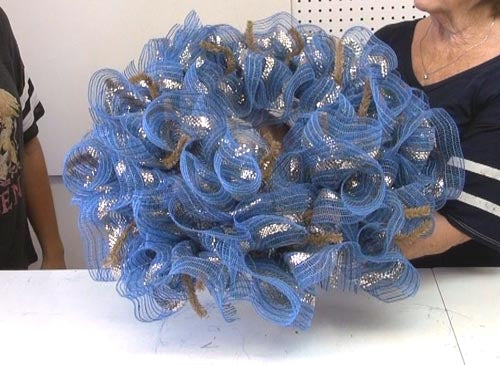
Mesh: Two styles of 10" mesh were chosen for this project.
One was a brown with copper foil and the other a chocolate with chocolate foil. The ruffle technique was used, but we made the ruffles a little differently by cutting the mesh into 20" lengths.
To cut the mesh we used our self-healing, reversible cutting mat. This is a great tool for wreath making. It's an Omnigrid 24" x 36" mat. The mat has measurements on it and it's a great surface to use to cut your mesh.
(This isn't the mesh used on this project, but you can see the mat and cutting tool)
We used to sell these tools on Trendy Tree, but we just can't complete with Amazon, so we'll add our Amazon affiliate links if you are interested in purchasing. They really are time savers.
The cutting tool is a Fiskars Rotary Stick Cutter. It's great for cutting single or multiple layers of mesh at one time. All mesh does ravel, but cutting the mesh into longer lengths does help.
You can also buy replaceable blades for the cutter which is nice. We've used ours for several years and only changed the blade once, but we're not making wreaths everyday like some folks too.
Typically, we would have cut three 10" pieces and made three ruffles, but for this wreath we cut a 20" piece of chocolate and 20" piece of brown/copper. Each ruffle was individually made by letting the mesh roll upon the table naturally, spread it out, and then scrunch up through the middle (selvage edges to the outside).
Hold the pinched ruffle and make one of the other color. Then hold the two ruffles together, not stacked right on top of each other, but angle them a bit. Secure the cluster of two ruffles into a twist giving it a couple of turns.
We alternated the colors; chocolate on the bottom one time, then on the top next.
We just just worked our way around the outer ring, and then moved to the inner ring with the same alternating pattern.
Outer layer of ruffles finished.
You can add the mesh randomly, or all chocolate on the bottom and brown/copper on top, just whichever you like the best.
You will have to clip strings and it's better to clip versus pulling the strings. All mesh products ravel and the more cuts you have and the more handling does make it ravel worse.
In the image above, a cluster of two 20" ruffles have been secured in the outer and inner rings. The ruffles can have a tendency to roll to the inside or outside, and you may have to push them out of the center from the back to open the center up. Same with the outside, just make sure when you hang it on the door or wall, that you don't have ruffles rolled to the back that get trapped back there.
Scarecrow Head: The Burton & Burton Scarecrow Head was chosen for this project. It's made of Styrofoam and a paper mache like material. It's very lightweight.
It does have a burlap string hanger, but we didn't use this to attach the head to the wreath. The first thing Rachel did was wrap a straight piece of floral wire with floral tape. This sticky floral tape just helps the wire make a more secure connection with the piece.
Sometimes when you use wire to attach things you can't get it tight enough to keep it from slipping around and the floral tape around the wire helps this. You could also just use floral wire or a chenille stem. She placed the wire around the upper brim of the hat and twisted it together in the back. Find you placement for the head by hanging it up so you can see it better or get someone to hold it.
The wire that she had placed around the hat brim was used to secure the head to a twist. Typically we will say, always secure pieces to the work wreath frame, but sometimes you need to item to lay out on front of the wreath and not be pulled down into the ruffles.
For extra security if you feel you need it, you could also add a piece of wire around the corn husks at the bottom of the scarecrow head, up under the color.
Hang the scarecrow up and re-position the head as needed. You might want to off to one side etc.
Ribbon: The ribbon chosen for this project was a very pretty argyle print in fall colors. It was 2.5" in width and 10 yards in length. We debated on doing ribbon strips but thought that the ribbon was so pretty, we wanted it to show up more. So we made simple shoestring bows.
The ribbon was cut in 36" pieces, and about a 6" loop made on either side with 6" tails. The bows were first secured to the twists on the outer ring. To secure the bows, the twists were opened, making sure the ruffles stayed in place, then the bow laid down and the twist closed with three or four turns.
We had about 9-10 bows. We used all the ribbon. You can use your ribbon in other ways of course. You can make simple strips, or make a couple of larger bows, or one big bow, just whatever you prefer.
Sunflower Bush: The stems from the sunflower bush were snippped off leaving them as long as possible. The wreath was placed on our workboard so Rachel could get an idea of where she wanted to place the sunflowers.
The sunflowers were placed around the center of the head. She used about two one side, four on the other and one sort of at the bottom. Since the items (bows) at the bottom really didn't show up much, we moved a couple of them up toward the center of the wreath. Think we moved about three.
But the sunflowers were placed into the mesh making sure to keep them sort of level with the surface of the mesh and not pulling them down into the mesh to crumple them. Reaching from the back of the wreath, the stems were secured to the work wreath frame with zip ties and the ends of the sunflowers bent around the work wreath frame.
Then end of the zip tie was snipped off with wire cutters, but you can see in this image that the floral stem was just wrapped around the wire. It's helpful if you can secure your sunflowers around the straight post of the work wreath frame. That will help keep them from sliding around.
You can also use hot glue to help secure your flowers. At Trendy Tree, we take things apart and use again)))
Just practice with placement of your sunflowers before you start securing them. You might want a cluster on one side and a big bow on the other, etc.
Moss Ribbon: The moss ribbon comes in two widths: about 1" and 1.5" If you purchase a kit, it will contain one or the other since they are assorted in the box. Either size will have the same effect.
Rachel attached the piece of ribbon to the work wreath frame with floral wire, and just sort of looped the ribbon around the wreath, all in one piece, securing it here and there with the twist. The ribbon is wired so you can shape it.
Finish: Always check the back of your wreath for anything sharp that might scratch your wall or door. Ends of stems, zip ties or twists. If necessary, you can take needle nose pliers and push ends toward the center of the wreath. Longer pieces can be clipped off.
Fluff your ribbons and clip your strings!


 One was a brown with copper
  foil and the other a chocolate with chocolate foil. The ruffle technique was used, but we made the ruffles a little differently by cutting the mesh into 20" lengths.
To cut the mesh we used our self-healing, reversible cutting mat. This is a great tool for wreath making. It's an
foil and the other a chocolate with chocolate foil. The ruffle technique was used, but we made the ruffles a little differently by cutting the mesh into 20" lengths.
To cut the mesh we used our self-healing, reversible cutting mat. This is a great tool for wreath making. It's an 


 the same effect.
Rachel attached the piece of ribbon to the work wreath frame with floral wire, and just sort of looped the ribbon around the wreath, all in one piece, securing it here and there with the twist. The ribbon is wired so you can shape it.
the same effect.
Rachel attached the piece of ribbon to the work wreath frame with floral wire, and just sort of looped the ribbon around the wreath, all in one piece, securing it here and there with the twist. The ribbon is wired so you can shape it.


