Last year we did a full size snowman wreath tutorial that has been wildly popular but it was rather large. This time we thought we would try making one a little smaller that would be easier to manage. This is what we came up with and it's a perfect size!
Supplies:
XX167950 Iridescent White 10" Pencil Wreath (2)
RE1301R1 White/White Foil 10" Deco Poly Mesh (3)
X7820 Large Snowball Snowman Head (1)
XFM512-SI-BK Silver/Black Twig (2) Sold OutMTX46481 Sparkle Red/Emerald Garland (1)
MTX31831 Black Stemball Cluster of 6 (1)
Purchase Kit here - While Supplies Last! ( 1/2/16 Sorry this kit has sold out, no more will be available)12/7/15 Update: Some of the individual supplies for this project are sold out, but we do have 10" Snowball Mesh in stock as of today: XB94610-01
Other items needed, that are not included in kit:
Scissors, wire cutters, chenille stems, zip ties, tape measure, hot glue, floral picks or dowels.
The supplies will be sold in a kit, but once the kits are sold out, you could still make this project using other items. On the white mesh, just stick to 10" width poly mesh for the curls. It didn't take completely all three rolls of the mesh, but we probably used more than half of the third roll.
The first step is to cut the mesh. The 10" wide Deco Poly Mesh was cut in strips 10" in length.
We use a 24" x 36" self healing Omnigrid Cutting Mat and a 45mm Omnigrid Rotary Cutter (these are available at Amazon and we have included our affiliate links.)
The 10" Pencil Wreaths have 12 twists around them and we used a cluster of three curls in each twist. So, it should take at least 36 curls to go around one wreath. One roll of 10" x 10 yard mesh should yield 36 pieces more or less. But the centers of the wreaths have to be filled in, so there is the need for the third roll.
We are asked quite frequently, how to keep mesh from raveling. There is no secrete answer I'm afraid. All mesh products ravel. Some may ravel worse than others, especially those with wider, more open weaves. The only thing that we have found to help, is make as few cuts in the mesh as possible, and handle as little as possible. Other than that, be prepared to clip strings at the end.
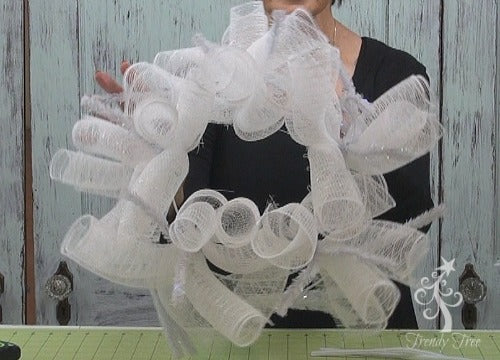
To make a curl, start rolling up the mesh from the cut end, having the selvage or uncut edges to the sides.
Pinch the rolled up curl in the center, and keep the cut end of the mesh to the underneath side as much as possible. If you have trouble holding the curl in your hand while you're working on the next curl, you can use a small clip to hold the curl. Cluster three curls together in a clump.
Start on the inner ring of the 10" Pencil Wreath and secure the cluster of three curls in a twist. This is the only thing we are using on this wreath, so close the twist about three times. Continue to work around the inner ring adding clusters of three curls to each twist.
Once you've added curl clusters to each twist, you can see that our center still is quite open and we want this to be filled. We need something across the center of the wreath to attach some curls to. There is a couple of different ways of doing this.
I learned from one our customers, that you can take the twists from the inner ring and pull them toward the center of the wreath. Flip the wreath over to the back, and take the twist from each side and twist the ends together. You won't have much left of the twist to work with, but just bring each twist to the center and connect to a twist from the other side.
The other way to fill your center is to take two chenille stems and place them across the center of the wreath like a crosshair and attach to the sides of the wreath.
If you decide to fill your center in with this method, you might want to fill the center in first with clusters of three curls, then start on the inner ring, then the outer ring.
To make your cluster to fill in the center, make three curls. Take a chenille stem and cut it in half with wire cutters. Take the piece of chenille stem and place it over your cluster of curls where you have it pinched in the center and bend the ends down, much like slipping a staple over the cluster. Twist the chenille stem from the underneath side a couple of times. Now you have a cluster of curls on sort of a pick. Take the ends of the chenille stem and place your cluster over your center crosshair, or the twists that you used to fill in the center. Flip the wreath over and secure that cluster from the back side.
Fill in the center with three clusters of curls.
You have extra mesh still left over after all your clusters are made. If you need to fill a gap anywhere, just make a curl, slip a piece of chenille stem over it and secure it two the wreath from the back side.
The wreaths are very full after you have filled in the center. Make both 10" Pencil wreaths the same way.
Next we attached the head. The head is made of styrofoam and we punched two holes in the bottom of the head about 2" apart using a 5" floral pick. We didn't insert the 5" all the way in completely, only a couple of inches.
Once the holes were made, we applied some hot glue to the floral pick and inserted into the holes we had created. The wire that is already attached to the floral pick was removed. Be careful if you try to use the wire to secure the head to the work wreath because the wires will slip off. We just removed the wires.
If you don't have floral picks, you can use a small wooden dowel or wood skewer.
To secure the head to the Work Wreath, push some of the curls out of the way.
The head will need to sit sort of on the front of the wreath and not square on top. The head is probably 6" or so thick and if you just set it on top of the work wreath, the wreath won't hang properly. With the head in the correct position, the back of the head should just about be flush with the back of the wreath.
Position the head and secure the two floral picks to the inner ring of the work wreath. Just put it into position and secure from the back using zip ties. The zip ties should go around the floral pick and the wire. Use more than one if you need too. The head will be easier to attach with zip ties that are about 8" or so. Once the two floral picks were attached, we added one more floral pick closer to the outer edge of the head and secured it to the outer ring of the work wreath. This pick was inserted with hot glue, just like the two previous ones.
Once you have the head secure, refluff your curls that you had pushed out of the way.
Next we prepared our stemballs. These stemballs are plastic ball on a wire, in a cluster of 6. The wires are just twisted together and covered in floral wrap. Once the floral wrap is removed, you can take out a single ball with wire. Three balls were positioned on the wreath and just wired into the work wreath from the back. Snip off any excess wire and make sure you have all wire ends tucked to the inside so you want scratch up your door or wall.
Next we attached the two Pencil Wreaths together using large zip ties. You could also use chenille stems. Don't connect them so close to each other that you lose the roundness of each wreath. Mine really could have been attached a little looser than they were.
Next comes the silver twig arms. These twig sprays are flexible, but they won't hold a position. They're made of molded plastic and they will bend some, but pretty much spring right back into their original shape. Practice your placement by attaching with chenille stems to the pencil wreath. Once you get them into position, then you can go back and secure well with zip ties and remove the chenille stems. Zip ties just hold better. Chenille stems seem to start out tight, but will get loose and slip and slide.
Depending on the width of your door, the twig arms can always be pushed in a little more to the center of the pencil wreath so they don't stick out too far.
The scarf was made from a Sparkle Red and Emerald Green Garland. It measures about 2.5" in width and 9 feet in length. You could also use a real scarf, ribbon or other fabric. This garland is wired and we doubled it and secured around the snowman head at the neck.
That finished our snowman! He measures about 38" in ht and 30" in width, measured at the arms.
The snowman can be embellished with ribbons if you like, or you can hang something a strand of battery lights, small garland etc.
Here's the snowman hold a strand of RAZ Frosted Ball Garland. They are battery operated and the battery pack can be tucked into the back of the wreath without showing.
The snowman is holding a RAZ Blue Glittered Snowflake Garland in this photo. The foam snowflakes are very light weight which is a plus.
Hope you find this tutorial useful and remember, the basic instructions can be applied even if and when we run out of some of the supplies. Have fun!
Save