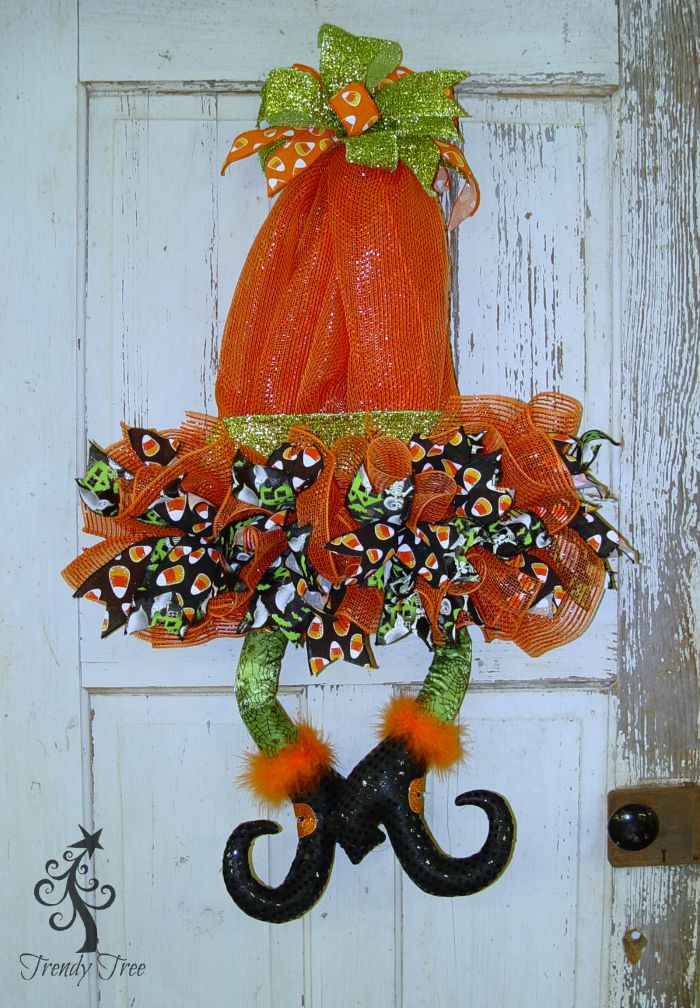
This is a new version of our Witch Hat with Legs tutorial. The last couple we did were make using the Straight Ribbon Rail and this season, it seems the rails are in short supply, so we used another product - the Pencil Open Wall Tree and it worked out just great))
SuppliesXX765408 Gold Open Wall Tree
RE134120 10" Wide Foil Orange Mesh
RN5356Y7 Ghost/Skeleton Ribbon 2.5"
R3504215 Lime Green Metallic Ribbon 4"
X414940-21 Black Candy Corn Ribbon 2.5"
H3416021 RAZ Green Spider Web Witch Legs
Note: Invariably, we usually sell out of items that we make the tutorials with, but you can follow these basic directions and substitute other colors of the wall tree, mesh, ribbons or witch legs.
This is the Pencil Open Wall Tree Form. It measures about 20" in ht and comes in different colors. You could use most any color since the twists do not show at the end of the project.
We used 10" x 10 yards Orange Wide Foil Mesh RE134120. The wide foil mesh products yield better coverage than just regular metallic mesh. It only took one roll to make the project.
Start by attaching the mesh to one corner of the wall tree and pull the mesh up to the top of the tree. There is a twist right in the top of the tree. Pull the mesh without having it poufed up, but don't stretch it tightly.
The cutting mat in the image is a 24" x 36" self healing Omnigrid Cutting Mat (available at Amazon and we have included our affiliate link.)
Secure the mesh at the top of the tree with just a couple of turns. Then pull the mesh back down to the bottom (not what would be the stump of the tree).
Once you have attached at the bottom, take the mesh back up to the top again and re-open the top secure and secure. All the top strips will need to be secure in this same twist. Take care when opening the twist that you don't lose your previous mesh attachment.
Continue working up and down the top and bottom with the mesh until you have the frame covered. You may need to attach at the bottom where there are no twists to attach with. For these spots, just cut a chenille stem in half and fashion it like a staple over the mesh, slip down over the wire frame and secure it from the back.
You will have twists along the sides of the form that you will not use and you can tuck these to the inside. If you like, you can snip these twists off with wire cutters and use them to secure the mesh where you have no twists.
When you have covered the top of the tree form, there will be "gaps" at the bottom, but don't worry, when you apply the ruffles along the bottom edge, these areas will be covered.
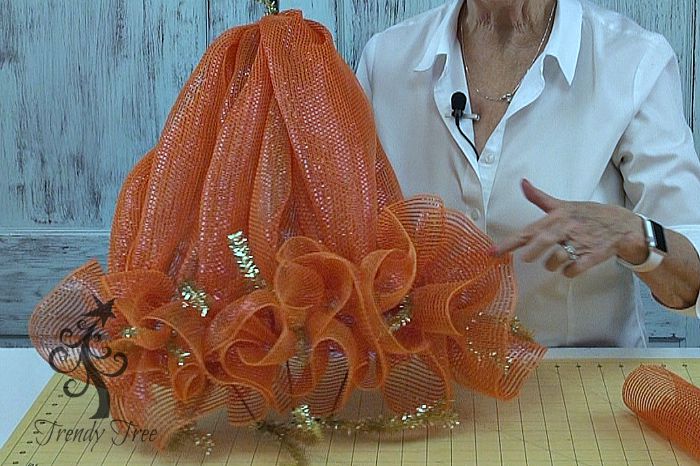
With the remaining mesh, cut strips 10" in length for your ruffles.
To make your ruffle, just scrunch up through the middle of the 10" piece starting with your cut edges. Your uncut edges should be to the sides. Pinch the ruffle and attach along the bottom of the tree (the widest portion). Open the twist and secure the ruffles with a couple of turns, because we are going to add two layers of ruffles.
In the areas where you attached the mesh covering the top and had to use makeshift twists, just use a chenille stem to secure your ruffle to the frame the same way. Slip the chenille stem over the center of the ruffle like a staple and slip over the metal part of the form, twist from the underneath side.
We started at the left corner and just added ruffles all the way across. The stump portion will be covered up by the time you get your ruffles added.
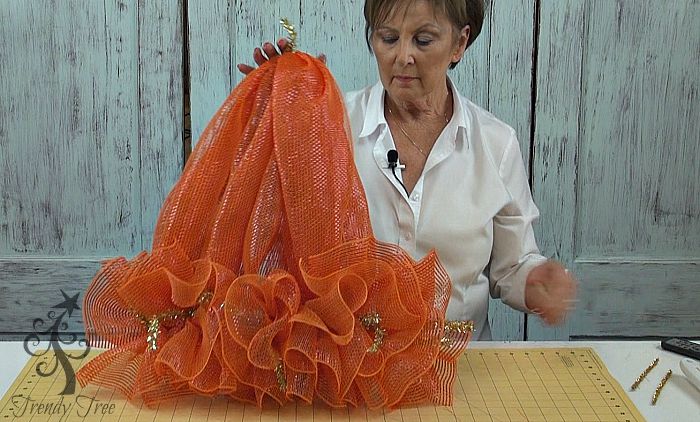
This image has one layer of ruffles across the bottom. We added our second layer right on top of that. In areas where the ruffle had been attached to the frame using chenille stems, we just pushed that ruffle over to the side a little and squeezed in another ruffle the same way.
This is the hat after the second layer of ruffles had been applied.
Our witch legs from RAZ are green spiderweb.
Next we used this 4" lime green metallic ribbon to make a hat band. We just cut a piece long enough to fashion around the hat, snuggly right behind the ruffle layer. We tied the ribbon in a knot on the back of the wreath.
You could make this much neater I'm sure rather than just tying a knot, but this works)) We could have trimmed off the excess to....guess I got lazy...
Also, to keep the 4" ribbon from slipping up, we secure the bottom of the ribbon with a tiny zip tie to the metal frame. You could use any sort of ribbon for this band, a nice way to use up scrap ribbon, but I think it needs to be 4" in width in order to show up enough behind the ruffles. And we wanted to pull in green since our RAZ witch legs were green.
Next we cut some ribbon strips 12" in length. The ribbons we used were 2.5" in width, but you could use 2.5" or 1.5" and any assortment or combination or 3-4 styles. We just did a chevron cut to finish the edges of the ribbon and pinched them in the center, hold both ribbons together and spreading them out where they wouldn't be right on top of each other.
Secure them in the ruffles, by opening the twists, down to the last layer of ruffles and place the ribbon cluster on top, re-secure now with 3-4 turns since this is the last layer. Since the tree form was gold, we tucked the ends of the twists to the inside so they wouldn't know.
In areas where you need to add ribbon clusters an there was no twist, just use the chenille stems and secure from the underneath side.
Here's the hat, after the ribbon clusters were added. In a couple of places we added in a couple of extra ribbon strips. It's always helpful to step back and take a look, you may see some gaps that need touching up.
The witch legs were "threaded" up through the back of the frame under the wire and secure with zip ties. The legs contain wire so you can shape them as desired. It helps to secure the legs in two places.
After the legs were attached and shaped, we made a small bow to put on the top. The first bow was made using the ribbons that we had in the ruffles, but it just seemed to overpower the hat and looked top heavy. So we took it off and took some of the 4" metallic ribbon, split it down the center, and added in some 1.5" orange candy corn ribbon that had been left over from another project. I never recommend splitting ribbon, but this worked pretty well. It didn't ravel and each edge had a wire, so it worked out.
When you have finished your hat, check the back for any sharp edges and tuck those to the inside or cover with tape if it's on the tree frame. Fluff and straighten out your ribbons so they are standing out like you want the. You can fashion a hanger for the hat out of zip ties if you wish.
The overall measurements were about 26" in width and 36" - 37" in ht.
This method would work great for an elf hat....or Mrs. Santa hat....lots of possibilities!
Happy Halloween!
Save