
Spring wreath created with a new two tone Turquoise and Gold Deco Poly Mesh® that we have in stock now. Sometimes the colors of the Deco Poly Mesh® are really difficult to see well with just one image.

Supplies used for this wreath were a
Orange Work Wreath. Most of the time my preference is really a Pencil Wreath, but this orange one was handy and I thought the orange twists would add a bit of color to the pale colored mesh.
The
Retro Butterfly Plaque is new for this season and comes in two styles, sold as a set. The signs are 10" x 10" and about 14-15" if you measure to the top of the wire. The wire hangers have little clear beads. One of the plaques as "Born to Fly" written on it. It's not readily noticeable in the photo, but the little butterfly's body is raised and it has wire feelers.

The mesh is
Turquoise and Gold Two Tone Mesh, 21" in width and 10 yards in length.

You can see already by the stock image that it's really difficult to visualize what the actual finished project would look like exactly. Also, depending on how you look at it and the lighting...sometimes it looks more blue....sometimes more greenish blue......guess that's why they call it two tone)))
We more several more new styles of two mesh coming in this summer and they have delicious names like Strawberry Cream, Pink Lemonade, Raspberry Lemonade, Yellow Wire, and more. In an ideal setting it would be nice to have an unadorned wreath created from each roll of mesh. That's a huge project to undertake...someday.
The larger paper flowers are
RAZ Summer Asters. They have about a 9" width and 20" stem. They're made of paper and right out of the box, look pretty messy and crunched up. But they lend themselves to shaping up a bit and look fine once placed on the wreath.

To get started on the wreath, the first thing I did was to position the sign in the center of the wreath to check the fit. I decided to go ahead and fasten it now before ever starting around the wreath with the mesh.

The plaque was secured with a couple of chenille stems. Please note that if we were making this wreath to sell we would fasten the plaque more securely and clean up the back of the wreath afterwards to make it look neater. But this creation is just for demonstration purposes only.

Next just unroll the mesh and grasp about 4" or so from the end. Pinch the width of the mesh between your fingers and pick out one of the pairs of twists on the work wreath. Lay the mesh in the center of the twist and twist the tips together a couple of times.

I usually tuck the raw edges of the mesh to the inside of the wreath, and deal with that later.

Now you're ready for your second pouf. I usually make mine about 12-14", I don't usually measure, but on this wreath I decided to try to keep the poufs at about 12" because it's fairly translucent mesh.
Sometimes we get calls from customers who are creating a wreath and they say....."I have my mesh on there, but you can see through it." This can occur for a number of factors. First, it may be the quality of the mesh. 99% of the mesh we sell comes from Craig Bachman Imports and their quality is top notch and colors are consistent throughout their styles. If you buy 21" pink.....the 10" 2.5" and 4" pink....will all be the same color pink.
If the poufs are made too tight, you will see with metal rings between your poufs for sure. Also if the poufs are too large, it makes them less dense and more translucent. The most translucent mesh would probably the colors that are combined with clear poly. Colors like white/clear; yellow/clear; blue/clear etc. The most dense mesh styles will be poly burlap, paper mesh, then wide foils. The more the foil and the wider the foil strips, the more dense the mesh.
I usually tell customers to check the size of their poufs and continue on with the wreath. Depending on the quality and type of mesh, a second layer of the same mesh might be needed, or a layer of 10" Also wreaths can look a little bear until you start layering in the embellishments too.

Here's the wreath with the mesh continued all the way around and cut off. Ends were tucked to the inside. This wreath looks nice and thick....the work wreath isn't readily visible through it, except the orange twists which we want to show.....and I didn't quite use all the roll this time. There is probably 2-3 feet left on this roll. See how the two two mesh looks........it appear more blue on the table, but more green on the wall....and lighting isn't great in my craft room either.
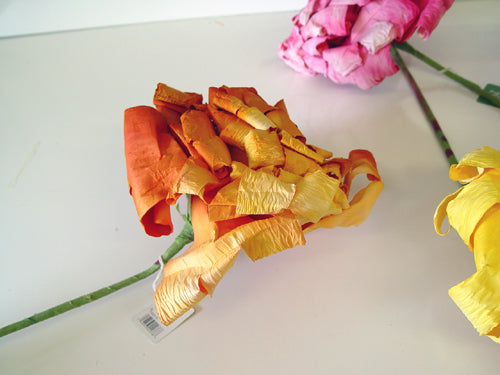
Next we worked on the paper flowers. As you can see they look pretty misshapen. We also decided to just two two out of the four.....so we have two left for another project))

I like the addition of this texture to the wreath....and I really like the center of the flowers. We experimented with placement of the flowers and decided on a corner approach.
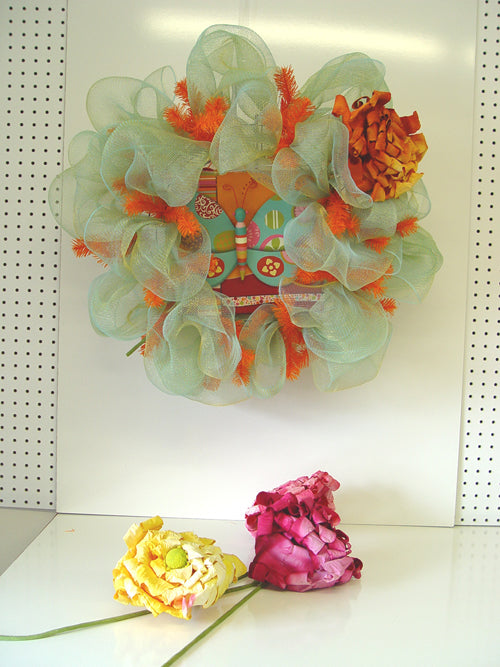
The flowers were tucked down deep into the mesh and the long stems secured to the back of the Work Wreath.
If you noticed in the first photos of the supplies used, there was a melon or light orange wire edge ribbon that was our intent to use. When we were pulling supplies it seemed like a good fit, but once the project was started, the color just didn't work out. So we switched to a natural Fuchsia Jute that is wired and has great texture.
 Okay...okay......if you've been following the blog you'll notice that we used it on a previous project! That's the great thing about SAVING everything. There was enough left on this roll to create just the right amount of dark pink contrast needed against the turquoise/gold Deco Poly Mesh®. Strips of ribbon about 10" were cut and just added to the mesh. Each twist was opened and burlap ribbon placed on to of the mesh pouf and re-twisted back together.

Addendum:
We decided to change the wreath up a little bit and see how the new RAZ Butterfly set would look on the wreath. So we removed the Butterfly Plaque and Flowers.


Since we removed the large flowers from the wreath, we added in a few twists of this new pink ribbon with bright multicolor polka dots. Same wreath, just a little different look))

