Reposted: 7/12/2014

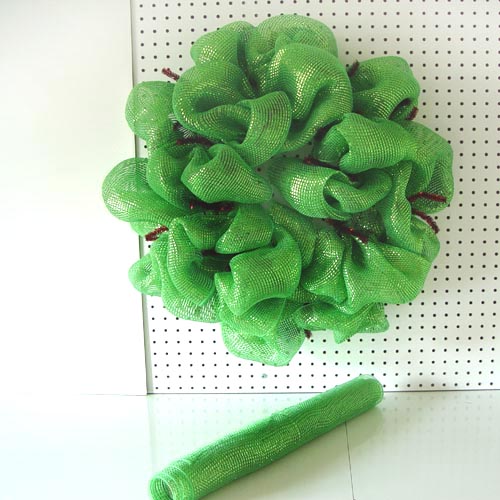
Basic Deco Poly Mesh wreath using the pouf technique on a metallic Pencil Work Wreath. Mesh used was Lime Green Wide Foil Deco Poly Mesh -
RE104150.
.

XX751124 Red Metallic Pencil Work Wreath

We started the mesh on the outer ring and went completely around. Then did the inner ring. But it's simply a matter of preference. There is no right or wrong way....some folks do an outer pouf, then an inner and just continue around in that fashion. Mine seem to be smoother or they just lay better when I go around the outside first. Grasp the entire width of the mesh in your hand about 3 inches from the end and secure it in the a pair of twists. Twist the ties a couple of times nice and secure.

For the second pouf, grab the mesh about 12" -16" (depending on the size you wish, and the material you have- generally we use about 14") and grasp it in your hand, secure it in the next set of twists. It helps to actually measure until you get the hang of making your poufs all about the same size.

Continue the same process and go all the way around the outside of the wreath. Don't cut your mesh when the outside is finished, you're going to leave it intact and start on the inner ring.

When you have inserted mesh in the last pair of tinsel twists and you're back to the beginning, re-open your first twist and secure a pouf there being careful not to displace your starting point of mesh. This helps to cover up the raw edges of your starting point.
Place your next pouf in the closest inner twist and proceed around the inner portion of the wreath.

When you've finished the inner ring you're ready to cut your mesh and secure the end. Generally it takes about one roll of 21" x 10' mesh to complete a wreath. And the 24" work wreath actually measures 15" from side to side, but once you've added your mesh you come out with a wreath that is 24" to 30" in width, depending on the sort of material you've used and the size of your poufs.
On this wreath, I had about 5-6 feet left of mesh. I cut the mesh leaving about a 3-4" tag that was pushed to the inside of the wreath.
Turn the wreath over to the back and secure the raw edge with a zip tie or pipe cleaner.

You can work the cut edge in and out through the frame also.

Once you've finished your edges, turn the wreath over and see if any of your poufs need adjusting. Also notice them as you go along. If they need any major adjusting in size it's better to do it before you get several more poufs made.

Hang your wreath up so you can tell more about whether it needs adjusting or not and this is also a good time to figure out where you're going to place your ornaments, picks or other embellishments.
The tinsel twists of the Pencil Wreath can be seen in place and these twists can also be used to work extra ribbon, Glamour Rope or garland through the wreath. Just gently untwist them without losing your hold on the mesh and insert the ribbon or other decoration, then secure them back nice and snug.
If you prefer the twists not to show, just tuck the edges toward the inside.
The Deco Poly Mesh Wide Foils are so glossy and shiny and they result in almost a solid fabric versus the more open weave of regular mesh and regular metallic mesh.
The mesh used on this wreath was
Lime Green Wide Foil. We just added several more new colors to our selection of wide foils so we now have a nice variety to choose from, plus we have all the same colors in the 10" width.
Click here to see the
Deluxe, Laser and Wide Foils Category