8/13/13 Update - Video Added!

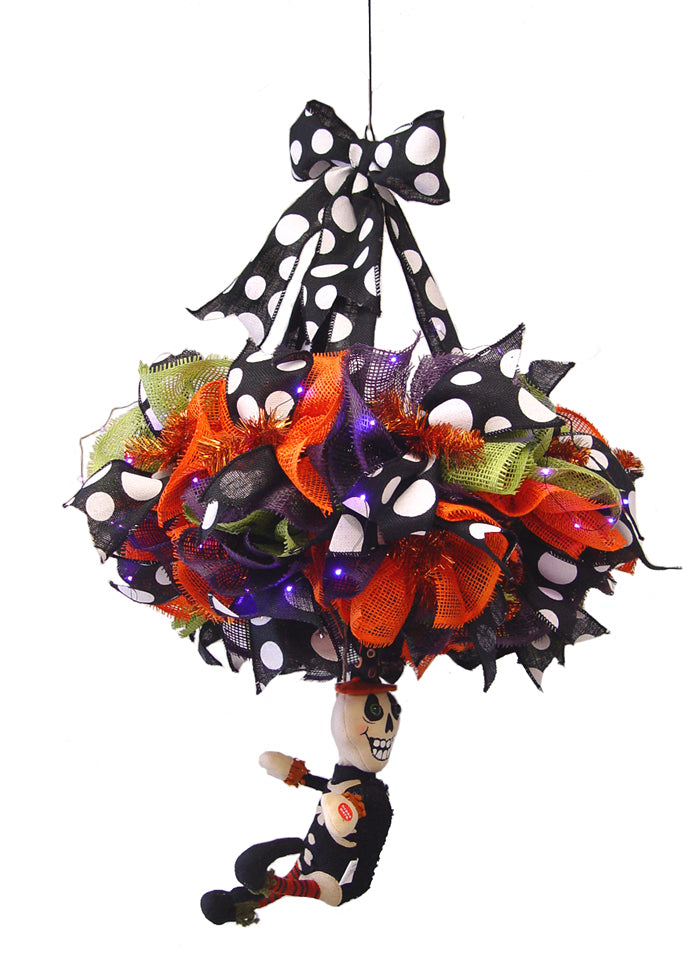
This is a Halloween Chandelier tutorial using a Copper Work Wreath, Deco Paper Mesh and a RAZ Halloween animated musical decoration. These little Halloween musicals are so cute! And the animation is very lively....we needed a way to be able to display them in a way that gives them plenty of room to move. So we have him suspended from this Halloween Chandelier. Lets get started)))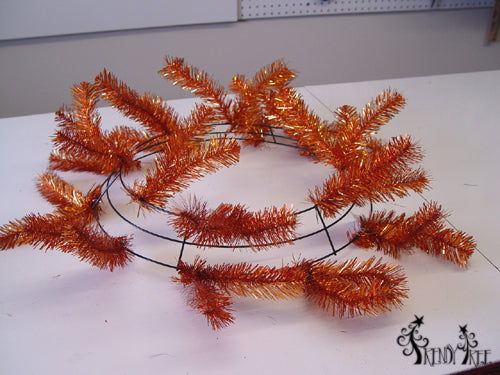
A
Copper Work Creations Wreath (XX749538) was chosen. This is the 24" size. The largest of the metal rings actually measures 15" in width, but with the ties and the material used for the wreath, the finished result is usually 24-30" in width.

Our plan was to hang the wreath wagon wheel style so we wanted to go ahead and find our places to secure the ribbon that we planned to suspend the wreath with. We planned to hang the wreath with three strips of ribbon, so we found our "thirds" place and marked the places with blue chenille stems. It actually turned out to be every other support piece between the rings. But with the blue stems, it will be easier to find our places once the ruffles have been added.

We chose Deco Paper Mesh in the 10" in Lime Green-
RR800133, Purple-
RR800123 and Orange-
RR800120. This paper mesh has 10 yards on a roll.
Our finished project will be hung in the living or dining area so the Deco Paper is a great choice for this project. It has nice texture.....you will have some loose strings....but it doesn't ravel that bad.
We planned to use two layers of ruffles on this project. Each Work Wreath has 18 twists....so we needed 36 strips to make the ruffles.....and we had three colors....so we cut 12 strips of each color.

The Deco Paper Mesh was laid out on our handy dandy cutting mat and all three colors cut at one time. The strips were cut 15" in length. Click
here if you would like to read more about the cutting mat and rotary cutter....that we absolutely love!
We use a 24" x 36" self healing
Omnigrid Cutting Mat and a
45mm Omnigrid Rotary Cutter (these are available at Amazon and we have included our affiliate links.)
Using these measurements, we should have enough left over to create another chandelier if we chose to.

The Paper Mesh has a little natural curl to it, nothing like the Deco Poly Mesh and if you lay it out flat, it will eventually stay flat if you want it too.

Our leftovers.


Scrunch, gather or pleat right down the middle of the 15" length of Deco Paper Mesh.
First ruffle made!


Turn the wreath over to it's back and start on the outer ring. Secure your ruffle in the twist and position the ruffle where it stands up more so than lying flat. Remember you'll be hanging the wreath form wagon wheel style.
Continue working around the wreath, alternating the colors.
Once we had gone completely around the outer ring with one layer, we went back and added a second layer, continuing to alternate the colors. Just open the twist, leave the first ruffle in place, and position the second ruffle, secure the twist with a couple of turns.

Now you have two layers of ruffles secured in the twist.
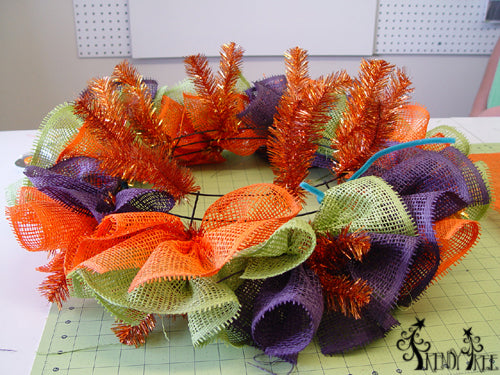
Once you've gone all the way around the outer ring with the second layer, turn it over (now will be right side up) and add your ruffles to the inner ring.

Here's our wreath with two layers of ruffles on both rings. Now we're ready to flip.

Once you've completed the two layers of ruffles on the inner ring, flip it back over (upside down) wagon wheel style. Fluff your ruffles and make them stand up or just untangle them a bit if needed. This little stand was helpful to keep the project at eye level while we fluffed and got ready for the next step. We just fashioned some temporary ties in the center to hang it by because we were not quite sure what we were going to hang it with at this point. We just used some zip ties and "S" hooks.
The Deco Paper Mesh has very rich colors, no foil. So we decided to go with some bold polka dot burlap ribbon that is 4" in width and wired. It really makes a statement)))

This
Black and White Polka Dot Burlap Ribbon-860562 is very nicely textured with a good bit of stiffness about it. The polka dots are painted on one side and it has wire edges. We cut one strip 13" in length as a test strip. You want your ribbon strips to be long enough to stick out a bit and show, but not too long and not too short.....just right so to speak))) So TEST it on your project before you cut up all your ribbon))) This roll of ribbon has 10 yards and we used it all for this project.

The ribbon strip was folded in half and the end snipped off at an angle to finish off the ribbon ends with a chevron or fishtail look.

You don't have to do this....but it just gives a nice look to your ribbon. If you're not putting in a lot of ribbon strips in your project, it also looks nice to just roll up the bottom edge a few rolls. But we're adding a ribbon strip to each twist on our project.
To secure the ribbon strips, just open the twist making sure the two layers of ruffles don't slip out (they won't) and pinch the ribbon strip in the center, lay on top of the last ruffle and secure the twist this time with 3-4 turns. This is the last layer we're adding and now you want to make sure your twist is nice and secure.
Just place a ribbon strip in each twist.....you should have 18.

Next we cut a strip of ribbon 38" in length and attached one end to the work wreath frame where our marker was. We were running pretty close on having enough ribbon so instead of just tying the ribbon on, in order to save as many inches as we could, we folded the ribbon around the rung of the work wreath and secured it with a zip tie. The other end of the ribbon was secured the same way in one of the other previously marked sections. Then we cut another length of ribbon, folded it in half and secured the end to the last of the markers.
And you can probably come up with a better way to do this......but we wanted it to be hanging from single loop without knots getting in the way. A zip tie was passed through the loop at the top and this was to be our hanger.
We fashioned a simple bow out of the remaining ribbon and secured it with wire to the top.
At this point, the chandelier was essentially finished.....but we have these adorable animated musical creatures from RAZ that we wanted to add.
The creatures are pretty lively, so we inserted a small 1/4" or smaller wooden dowel across the center of the work wreath frame. The ends of the dowel stick out into the ruffles so we didn't even secure it with anything. But, if you were making this wreath to sell, you would want to secure the dowels with zip ties on each end.
An "S" was used to slip over the dowel and hold the animated creature. You can use more than one "S" hook to hang him at the right length. It needs to clear the paper mesh as it turns and hang down far enough to be seen well.
This the
Skeleton-H3312311 close up. These cuties are made of cloth and have a vintage look to them. They require three AA batteries and have an off/on box in the back. The back unzips for access. The legs are wired, but they move, so they're not really wired for you to manipulate. The arms are wired and you can adjust them as long as they don't get in the way of the head turning.
The musical is similar to the Munsters theme song and there is cackling and other sounds. We're working on a video of the action, but you can see it here on the RAZ
youtube channel.

The little RAZ
Witch-H3312311.
 RAZ Frankenstein-H3312311
. The music and animation is the same on all three styles and there is a start/stop button on the hand.
Oh, I almost forgot! We added a battery powered string of purple LED lights to the wreath. This light strand also operates off 3 AA batteries. The LED lights are bright and the wire is practically invisible. We wove the light strand around the front of the wreath only since the back was going to be toward the wall. This was a 9' strand with 36 purple LED lights. The lights have a setting of phasing, flashing, or stead on and a repeating timer. I love using these lights....and already planning more projects to include them)))
Save