
Ghost Wreath Tutorial
Supplies: (
Click here to order supplies all from one page)
XX759926 22" Work Creations Metallic Silver Straight Ribbon Pencil Rail (could also use white or any light color)
XX742926 Silver Glitter Twig Garland (gold or red is okay)
XB94610-01 10" White Iridescent Metallic Snowball Poly Mesh - 4 rolls (any white 10" mesh would work)
F3402583 RAZ Glittered Bat Spray - 2
Black Craft Foam Paper - purchased at WalMart
First Step
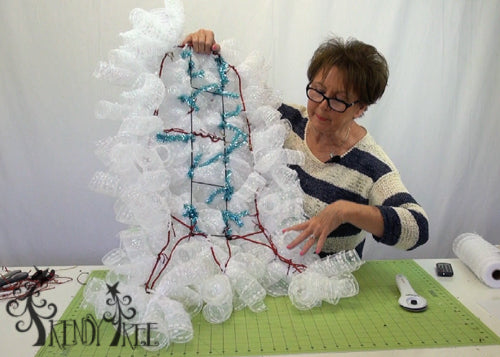
Smooth out the Glitter Garland and snip a piece off about 24" to use for side supports.

We chose the Glitter Twig Garland for this project because it is quite still, but bendable. We are using it to make a ghost shape around the Straight Pencil Rail to give it shape and extra length. We want the bottom of the ghost to be jagged or irregular.

Attach one end of garland to the top of the Ribbon Rail on one side, the the other end of the garland to the top of the rail on the opposite side.

This makes a big loop at the bottom that you can shape into a jagged bottom. The top needs to have a rounded shape.

Shape the Glitter Twig Garland along the sides placing it about 3" from the sides of the Ribbon Rail. You will need to place a couple of supports between the garland and the rail to keep it in shape, to keep it from collapsing in on the sides.

Use a piece of Glitter Twig Garland from the 24" that you initially cut off. We attached a support at the lower end of the Ribbon Rail and two more supports about midway to the top (not shown in this photo). If you don't have enough from the 24" piece that you cut, just use chenille stems or any sort of stiff wire that you have.

Next we cut our mesh strips 10" in length. We use a 24" x 36" self healing Omnigrid Cutting Mat and a 45mm Omnigrid Rotary Cutter (these are available at Amazon and we have included our affiliate links.)
We started out with three rolls of mesh and cut the first roll completely. We were not sure how many it would take, but it wound up taking 4 rolls. We only used a small bit from the 4th roll, so you might could might it a little smaller overall and just use 3.

The cut mesh will roll up naturally, but we made the rolls just a little tighter, maybe with diameter of 1-1/2".

Hold the curl in your hand with the cut side down. Hold three curls, pinch in the center and attach a clump of three at one time.

Place the curls in a twist at the top of the frame and secure with 3-4 turns.

Tuck the twists to the inside of the frame so they won't show.

The twists on the garland or frame won't work out to be where you need them. So just use a chenille stem (cut in half), floral wire etc to attach a clump of curls where you need them.

Hold the three curls, place the chenille stem on top of the curls, twist it tightly from the underneath side. Then slip the ends of the chenille stem down over the wire frame and twists again from the bottom to secure.
Continue making clumps of curls and attaching. If you come to a twist that is not needed and just in the way, snip it off. You can use this to attach curls in places that you don't have a twist. The twists on the Glitter Twig Garland are long enough that one side of the twist easily attaching a clump of curls. It's helpful to have the extras out of the way anyway. If you don't cut them off and use them, just push them to the inside out of the way.

We had used one complete roll at this point and was about 1/3 the way down the frame.

By the time we had worked down the frame, we went ahead and snipped off the twists from the Glitter Twig Garland and just placed our clumps of curls where we needed to fill in. Using those cut off twists to secure.
This is the ghost from the back after we had used 3 complete rolls of mesh and a little bit from a 4th roll. The lower edges of the Glitter Twig Garland where sort of squeezed together and we only added clumps down one side of the garland instead of going up and down the jagged edge, because it would have been too full and the irregularity around the bottom would have been lost.
To make the edge extended down a little further on one side, we added an additional length with a chenille stem to add about one more clump of curls to make it longer on one side.

Next we found a ghost face on Google, like a coloring page. Printed this off to use as a guide to cut out eyes and a mouth on black craft foam. The cut out pieces can be hot glued to the ghost. You could do any sort of face or use something else for eyes and mouth.
We placed the ghost on the door (where we take our images) to evaluate the shape, look for gaps or twists that were showing. The Turquoise Ribbon Rail and Red Glitter Twig Garland really did not show up much at all. But we did fill in a hole here and there.

To make a curl to fill in any holes or gaps, just use a single curl, pinch in the center, lay a chenille stem on top and twist from the bottom. Make a sort of a"curl pick." Insert these anywhere you see a gap and secure to the frame.

RAZ Bat Sprays were attached to the Ribbon Rail frame using zip ties. The overall length of this ghost was 36" or more. It's large.
In Hindsight - Things I would do different next time:
Might just try making the ghost just using a 22" Straight Ribbon Rail, adding some extra clumps around the top to "round" it out and lengthen the rail along the bottom with some pieces of the Glitter Twig Garland for the hanging irregular portion.
When using the Glitter Twig Garland to shape something like this, I would go ahead and snip off all the twists and get them out of the way. Most of the time on a project like this, you're going to need twists in areas where you don't have them.
Don't wear a loose weave knit shirt when working with mesh))))
Start out with a light color rail and garland just to make it easier and less chance of any colored twists peaking through.
Happy Ghosting!
 Subscribe to our You Tube Channel!
Save


