Wreath tutorial using
Orange and Black Faux Burlap and a straw wreath form. As we say in the South.....there is more than one way to skin a cat)))) This wreath tutorial is one way to create a burlap wreath, there are lots of options to yield different results.
This wreath tutorial is an experiment for us, but it turned out great we think so we wanted to go ahead and share with you. This is the first burlap, or in this case Faux Burlap wreath that we have tried.
Pure burlap material would probably made the poufs a little rounder or puffier as 100% jute is much coarser and has more body. The
Faux Burlap that we used is nice and smooth, almost like a stiff flannel. So you can experiment with different materials for this wreath and have different looks. We also started to try with a paper mesh and a poly burlap, but the
Faux Burlap seemed to yield the prettiest result on this particular wreath.

We started with a 14" straw wreath form. We were first going to use a Styrofoam wreath form, but it was bout $4.00 higher than the straw form. This straw wreath came fro Wal Mart. We used one roll of
Orange and Black Check Faux Burlap that is 9.5" in width and 10 yards in length and had between 1-2 yards left over.
If you need to add a hanger to the back of the wreath, do it before you get started.

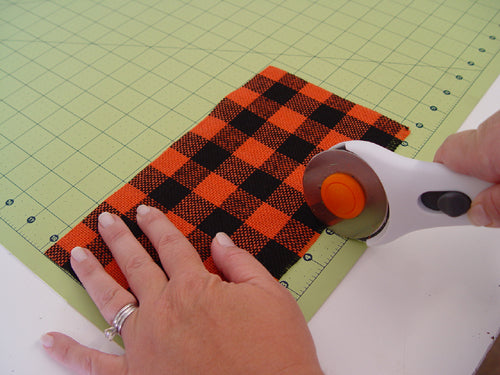
The first thing you do....is a lot of cutting! We cut 5" lengths of the Faux Burlap, then cut them in half. Since the Faux Burlap is about 9.5" in width, our squares were not perfectly square but they were workable.
We use a 24" x 36" self healing
Omnigrid Cutting Mat and a
45mm Fiskars Rotary Cutter (these are available at Amazon and we have included our affiliate links.)
You will see some folks use 4" x 4" squares and maybe even larger than 5" There is also a technique to making a burlap wreath where you don't cut your material and just bunch it up and pin or pull through a box wire wreath form.....we'll show you one of those later.
If you're going to do one of these wreaths, save yourself some time and work by using a rotary cutter and a cutting mat. This is really a time saver. It's not shown here, but you can cut through several layers at a time with this cutter. To see a post a did earlier on these cutting tools click
here.

The first step after cutting the squares is making the Faux Burlap poufs. Fold the square into a triangle and hold between your fingers.
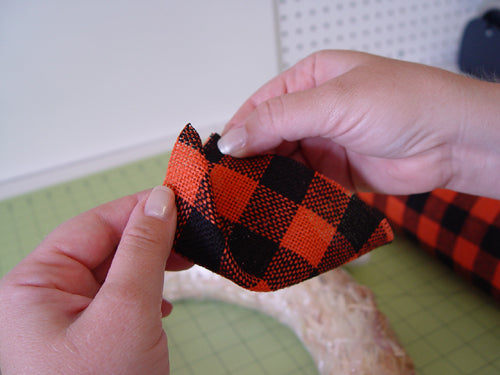
For the second step, take the left corner and bring it to the middle, holding at the point. This step brings the corner across the front.
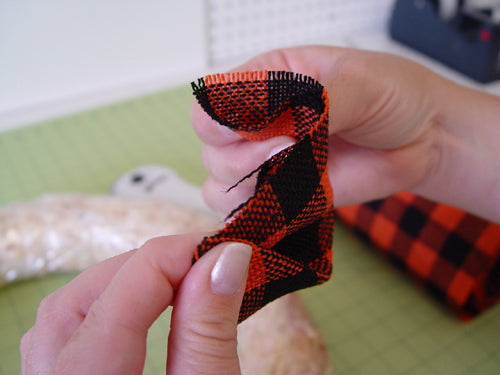
For the third step, take the right corner and fold to the
back, holding the points in the center.

Now you just have a neatly folded little piece that is ready to be pinned.
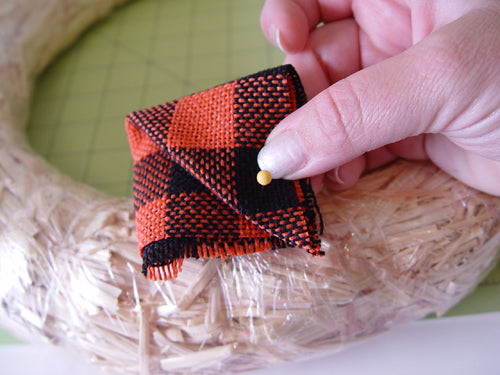
Pick a starting point somewhere on the straw wreath form, it doesn't matter where. And we left the plastic wrapping on the wreath form. Use a dressmaker pin (about 1 1/4 in length) with a head and inserted about 1/2" away from the edge. Take a quick look to the back once you put your pin through and make sure you caught all the edges. Push the pin snugly into the straw wreath.

Gently tug on the pouf to fluff it out a bit making sure you don't pull you pin out. At this point, if we were making wreaths to sell, we would probable dip the pin in hot glue to make it more secure. But for our purposes....we're just pushing the pins into the wreath snugly. Plus, this was a first time wreath for us and we knew we might have to adjust later on before we finished......which we did)))
Some wreath tutorials just tell you to pinch up all four corners and pin. Again, there are several ways of doing these wreaths just like in doing one with Deco Poly Mesh.....you just have to experiment and play with it and decide which style works for you.

Make a couple more poufs and stagger each one right over the last one. Close enough to cover up the pin from the last one, but not so tightly that you don't have room to pouf them out. Lay the next pouf down and pin keeping your point going in the same direction until you work all the way around the wreath.
Again, you might rather have your poufs in a more random pattern, but we decided to do ours in rows for this project.
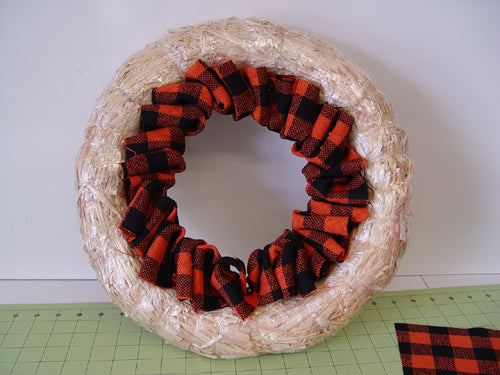
This was our first round and admittedly it doesn't look so great at this point. But we continued and when we finished, we actually came back, pulled this round off and re-did it. It was a little tight in a few places and we wound up leaving some poufs out. But we did have to take them all off, and put them back on, one at a time.
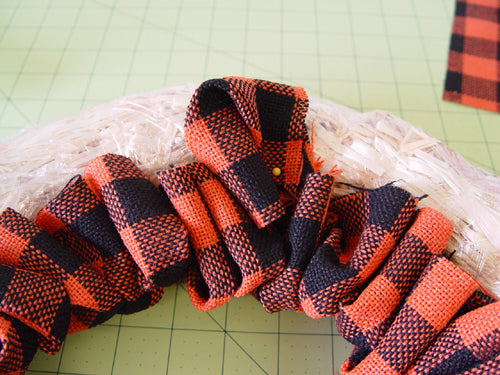
We started the second row with the point laying in the opposite direction. Continue around the wreath in the same manner.

Each time we started a new row, we turned the points in the opposite direction of the previous row. We also lined up the next row close enough to cover up the straw wreath form but tried not to get it too tightly.
You could always cover your wreath form with some ribbon or something if the wreath form showed too much. It didn't show on our finished wreath on this project.
You'll have to make a lot of squares and a lot of poufs! This is one project where you might do all your cutting and sit down in front of the TV to make the poufs)))
But, it's also sort of like trying to iron while sitting down.....you just can't do it! So....most of this wreath was done while we were standing at the craft table. But the good news for us is....we had two people working on it.....one poufing and one pinning))) You have to be careful how you say that...lol
And you will have some strings......just don't fret about and cut them off when you're done.
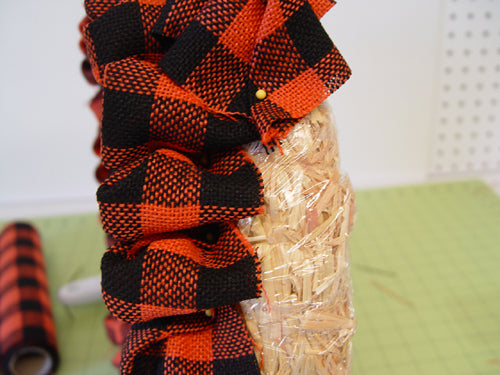
When we got close to the outer edge, it was easier to turn it up on it's side and pin.....course this flattens you poufs so you'll do a lot re-poufing.
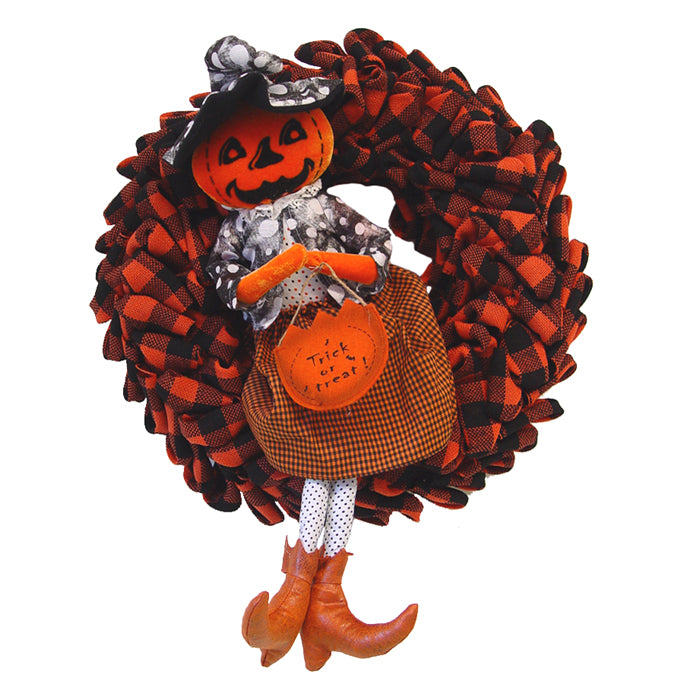
Once we were all done, we chose this little shelf sitter
Pumpkin Girl and secured her to the center. You could also just put a simple bow on the side, top or bottom. This wreath has such a homey look and the grandchildren loved the little
Pumpkin Girl. We have the
Pumpkin Boy too of course)))
As I said earlier, once we were all done, we went back and removed that first row which turned out to be a little tight. We just pulled all the poufs out, left a few out and realigned them. And you might see an area where a pin shows or maybe you have a little gap where you didn't get the poufs close enough. It's easy to just add in an extra one here and there.
Once you're all done pinning, you can fluff the poufs out a bit. We have some real burlap on 6" rolls that we may try next and see what sort of result it yields too, but this gives you an idea of what you can do with the Faux Burlaps. We have many colors and styles in stock. I really like using the 9.5" and 10" products especially on project like this because it reduces the cutting work. On our last visit to the Craig Bachman showroom we talked about the possibility of having burlap pre-cut squares available and they were very receptive to this....don't you think that would be a good idea? Please drop us a note if you think so))) Just use the "contact us" link at the top of the website.
This completes our Halloween Faux Burlap tutorial. Hope you enjoyed it and please drop by our
Trendy Tree Facebook page and “like” us if you haven’t already…..follow our
Tweets…..and check out our
Pinterest Boards.
Save