Here's another version of a scarecrow wreath. We call this one the Pot Head Scarecrow))) The Scarecrow head is actually a pot holder. There is a space in the top of the hat where you could add a little potted plant. Thought I would look for a small pot of Gerbera daisies.....going for the artificial myself. But wouldn't some flowers in the hat look cute. You could also just make a small arrangement which is probably what I will do and add in later. Or you could just leave it alone, or fill in with some raffia.
This tutorial will partly be the same as a previous one, but we change course after the basic natural mesh has been applied.
Supplies:
XX765118 Jute 24″ Work Wreath (no longer available, but you can use a burlap work wreath)
XB97010-15 Dark Natural Frayed Edge Burlap Mesh 10″ x 10 yards
XB96410-05 Denim Striped Mesh
XB96910-12 All Red Burlap Mesh
RG17805T Talisman Dark Cream Stripe Ribbon 1.5″ x 10 yards (no longer available)
X514540-19 Canvas Candy Corn 2.5" (no longer available, but other candy corn ribbon may be)
RG121152 Moss Cross Royal 1.5" (sold out)
RG121174 Rust Cross Royal 1.5" (sold out)
9725715 Pot Cover Scarecrow Head (sold out - other scarecrow heads available)
80100Hanging Scarecrow Legs (sold out - other legs available)
*Note: In case some items may sold out, you can substitute your choice of ribbon colors, mesh color, wreath color and right now we even have more than a couple styles of Scarecrow heads and legs. The basic instructions can be applied and the wreath decorated in many different ways.
Here is one more style of Scarecrow Legs:
80101 Scarecrow Legs on a Stick
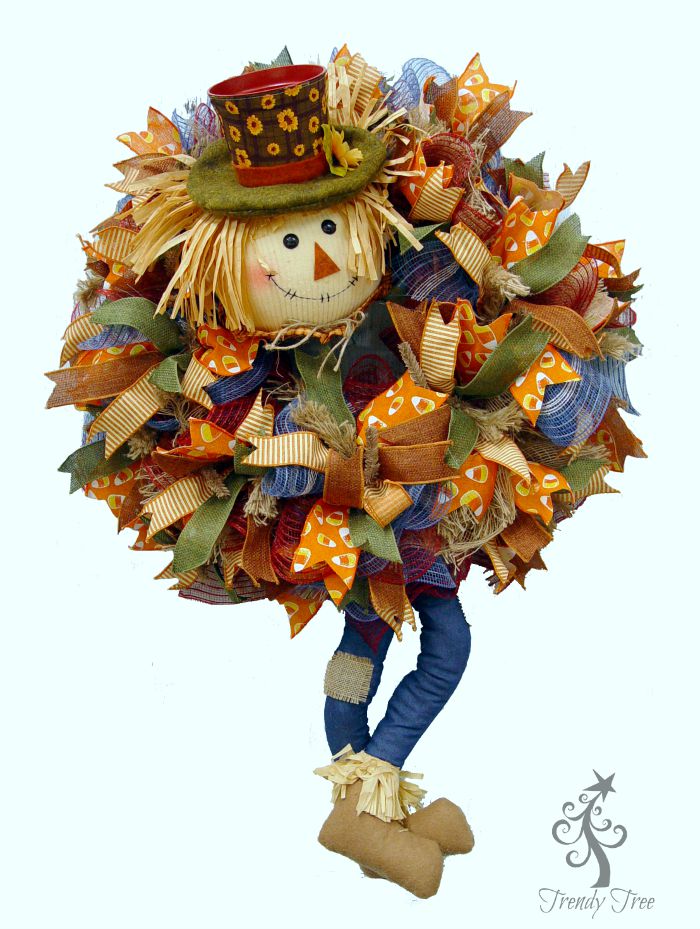
The wreath is a 24″ Jute Work Wreath. Our 24″ wreaths actually measure 15″ across the largest wire ring. But with the additional of materials, you finished wreath is usually 24″ or larger.
The Jute wreath is similar to the pencil wreath, but one side of the twist is actually made of jute, otherwise it is the same as a Burlap Work Wreath or Burlap Pencil Wreath.
The Dark Natural Frayed Edge Burlap mesh is a new product for this season. It has a wider weave that regular poly mesh. It has a poly mesh base and jute thread, both edges are frayed. This also comes in a 21″ width and a few other colors. The roll is 10″ in width; 10 yards in length.
The Jute Work Wreath has 18 twists normally, and we plan to put two ruffles in each twist using the frayed edge burlap. One roll should be sufficient for adding two layers of ruffles into each twist. Some rolls may not be exactly the same length, but being short a ruffle or two will not be noticeable. If I have any extra, I usually add that in too.
We use a 24" x 36" self healing Omnigrid Cutting Mat and a 45mm Omnigrid Rotary Cutter (these are available at Amazon and we have included our affiliate links.)
Cut your mesh strips in 10″ pieces.
Scrunch up through the middle (starting at your cut edge with frayed edges to the sides) and gather into a ruffle. Open up a twist on the wreath and secure the ruffle with just a twist or two. It doesn’t matter if you start on the inside or outside ring, just wherever you prefer.
You can make two ruffles and secure them both at the same time. Better yet…have someone make the ruffle and hand them to you to secure in the wreath)))
If you add one ruffle on top of another, be sure to open up your twist and lay the ruffle directly down on top of the first ruffle. Re-secure the twist with only a couple of turns.
Continue around your wreath until you have two ruffles in each twist. You should need about 36.
I like the new frayed edge burlap….shabby chic)))
Next step was to add the All Red Burlap Mesh. This is a new product for 2015 and is a combination of poly and burlap. The base is a red poly and the woven threads are dyed jute. The result is a deep berry, almost burgundy red. We chose the 10" x 10 yard roll and cut 10" lengths to make ruffles. One ruffle was applied to each twist by opening the twist and placing the red ruffle on top of the last two natural frayed edge burlap ruffles. Close the twist with just one or two turns, since we'll be adding more layers.
Here's the wreath once a red ruffle was added to each twist.
Next we chose to bring in a little blue to match the Scarecrow legs which are denim color. You could add denim ribbon strips to achieve this also. We chose another new product for 2015, the Denim and Ivory Striped Burlap Mesh. It also is a base of poly, with dyed jute threads in shades of blue with an ivory strip.
Ruffles were made the same way, 10" in length but they were placed only in every other twist.
After the blue had been added in for color, we chose four assorted ribbons. Some 2.5" and some 1.5" Ribbons were cute 12" in length and the ends finished with a chevron cut. Once all the ribbons were cut, we gathered one style of each ribbon and pinched it in the center. We added to this ribbon by choosing one of each style, making a cluster, holding them where they face different directions.
Add the whole cluster of ribbons at one time, by opening up a twist and securing the ribbon cluster on top of the last ruffle. At this point, we were through with adding anything else and the twists were secured with three or four turns.
A ribbon cluster was added to each twist all around the wreath.
Next we added the Pot Cover Scarecrow Head. Any large item that you attach like this may have to be added in a different way. There is just no "one way" of adding large items. We generally try not to cause any damage to any products just to add them, since we just do the wreaths for tutorials, but on this head I did have to punch a hole in the back.
I took a screwdriver and push a hole through the fabric and through the Styrofoam or whatever the head was made of. While the screwdriver was still in place, I threaded a zip tie starting at the tip end of the screwdriver and threaded it back to it's insertion point. Once the zip tie had been inserted, it wasn't long enough to attach the head to the Work Wreath frame, so we had to add another zip tie to make it longer. Then it was secured to the Work Wreath frame. We also tied a piece of twine underneath the brim of the hat to help position to head. Use extra zip ties as needed to keep the head in the position you want.
Next the legs were attached to the Work Wreath frame from the back side. We just used some clips and attached them to the frame, but you could also run some floral wire or zip ties through the fabric portion and attach. The legs dangle freely, but are wired and you can shape them.
The overall wreath measured about 27" in width. Fluff all your ribbon strips and make sure they are standing up nicely and check the back for any sharp edges and cover if needed. You can make a hanger out of a couple of zip ties.
You could put a little block of Styrofoam in the top of the hat and insert a few silk daisies or sunflowers)))
SaveSave