This is a wreath tutorial to demonstrate how to make a wreath using a Work Wreath, Deco Poly Mesh, Ribbons and RAZ Cookie Christmas Decorations. It really gives you an idea of the size of some of these decorations and helps to put them into perspective. We'll show you some of the cookie decorations that are in stock now so you can get a jump on your holiday creations)))

Basic supplies for this wreath started with a Lime Green Red Ball Pencil Wreath. The red balls on the Pencil wreath just give it a little extra pop of color. The largest metal ring of the form measures 15" but with the twists and addition of materials you have a finished product of 24" or greater wreaths. Thus the reason for calling it the 24" wreath. The
Pencil Ball Wreaths cost a few dollars more than the plain
Pencil Wreath or
Work Wreath and sells for $10.99
We have a new of Work Wreaths coming that will be called a Needle Burst Pencil Wreath and will have a

burst of sparkly tines on the ends of one side of the pencil twists.
They will be available in all the basic color plus some new color combinations of lime green/red/gold; fuchsia/black; emerald green/gold/purple; black/purple/copper; gold/black; lime green/red; red/silver/royal blue; and gold/red.
The Needle Burst Pencil Wreaths will be priced same as the Pencil Ball Wreaths at $10.99 and should be arriving any day now.
The mesh chosen for this wreath is a
Wide Foil Lime Green. The wide foils have the most amount of foil found in mesh. We have it in several solid color styles and many pattern styles. The
Wide Foil Lime Green sells for $11.99 per roll (this include a recent price reduction) and measures 21" in width and 10 yards in length. The bulk of the roll was used on this wreath with maybe just a yard or so left over.

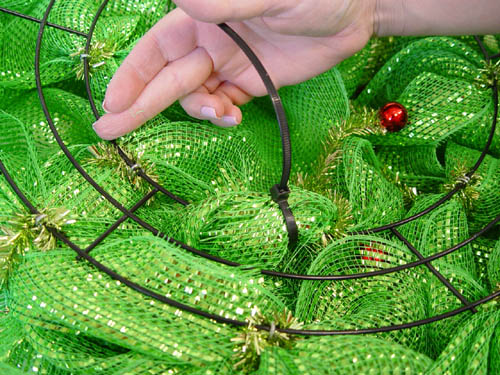
To start, we smoothed out the twists on the Pencil ball Wreath and pushed all the twists on the inner ring to the inside. We chose to start this wreath on out outside ring. It really doesn't matter if you start on the inside or outside.

The mesh was grasped about 3-4" from the end, pinched together and secured in a twist using just a couple of turns. When working with the Pencil Ball Wreaths, remember not to pull on the balls or use them for securing your twist. If one comes off, you can just put it back on the end with a little hot glue.

Using a yardstick or the markings on your cutting pad, measure the mesh about 14" from the twist and gather the mesh in your hand. We use 14" most of the time on this style of mesh. You may use more or less. But 14" has yielded the best results for us.

Place your hand under the mesh to fluff the pouf out before you secure it in the next twist.

Secure the pouf in the next twist giving it a couple of turns. No need to secure it more tightly than a couple of turns at this time because we are going to add more layers to the wreath. Your first pouf has been created, now you just continue to work your way around the wreath attaching mesh to each of the twist on the outer ring.

This is the wreath with the outer ring completed. Now you're ready to finish the inner ring. Don't cut your mesh, just grasp the mesh and pull snugly from the last pouf and move into the closest twist on the inner ring and secure the mesh there. Then measure, grasp and secure the mesh in the next twist and work all the way around the inner ring.

Once you've completed your last pouf, cut your mesh from the roll leaving a tail of 4-6". Work this tail to the inside of the frame and in and out the metal rings.
Secure the cut end with a zip time, then snip the tail of the zip tie off using wire cutters. Save your scissors.
This is a good time to check the back of the wreath for any sharp or rough edges. Where the twist ties are crimped to the metal ring they could be sticking out a bit and you might need to turn them to the inside. If you have a spot you can't move, just cover it up with some tape to keep it from scratching your door or wall.

Hang your wreath or take a step back and look. If it needs to be adjusted or gap filled in you can readjust the poufs as needed.

We decided to add some "ruffles" to this wreath using a
Red White Stripe Wide Foil 10" mesh. This mesh is also available in a 21" and 4" size.

We thought we would try adding ruffles to about half the twists and ribbon strips to the other, so we cut 9 pieces of the
Red White Wide Foil mesh 20" in length. Note the cutting mat and the rotary cutter. These tools are great for wreath making and more information about them can be found
here.


Take each 20" cut of mesh and flatten it out, starting at one end, just scrunch up the center in a gathering motion. Go down the full length of the piece.

Hold the center pinched in your hand and secure it into one of the twists.

Just un-do one of the twists (the mesh will stay in place) and lay the ruffle right on top of the mesh. Re-secure the mesh and the ruffle now with a couple of twists.

If this is your last layer, give the twist 3-4 turns.

To cut our ribbon strips, we measured the depth of the wreath and cut the strips about 15"

We chose this wide 5
" Red Green Chevron ribbon. Most all the ribbon we use is wire edge. We cut 9 strips of this ribbon and 9 more of another ribbon we chose to layer on top of this one.
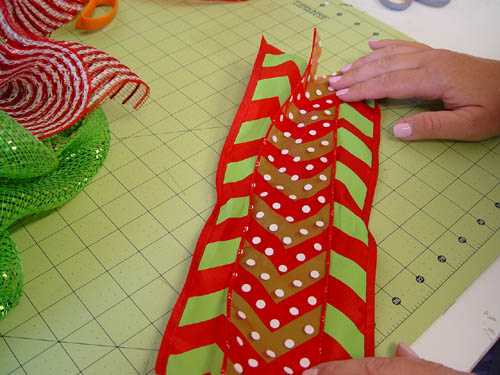
We added a
Sheer Red with White Polka Dot ribbon that is 2.5" in width. This polka dot ribbon roll contains 25" So this is about the third project we've used and still have ribbon left over.

To finish the end of the ribbon for a nicer look, we folded the ribbon in half and cut at an angle from the folded side to create a chevron or fishtail finish to the ribbon. You can also just make a straight angled cut across the end.


It's always good to do a little test before you cut all your ribbon to make sure it's the length you're looking for and not too short or too long.

Just un-do the twist and lay both layers of ribbon down on top of the mesh, re-secure the twist with 3-4 turns if this is the last layer you're adding to the wreath. We alternated between the red/white mesh ruffles and the two styles of ribbon around the wreath.

If you have an area that just looks like it needs an extra ribbon and there is no twist there....just use a chenille stem and attach the ribbon directly to the frame of the Work Wreath.

This was the wreath after the addition of the mesh red/white ruffles. Then the ribbon strips were added.

Wreath with ruffles and ribbon strips. We could stop right here and have a pretty nice wreath))) You could always add some big plastic or Styrofoam ornaments.....sit an elf or Santa in the center with legs dangling out, add some sparkly sprays or large candy canes.
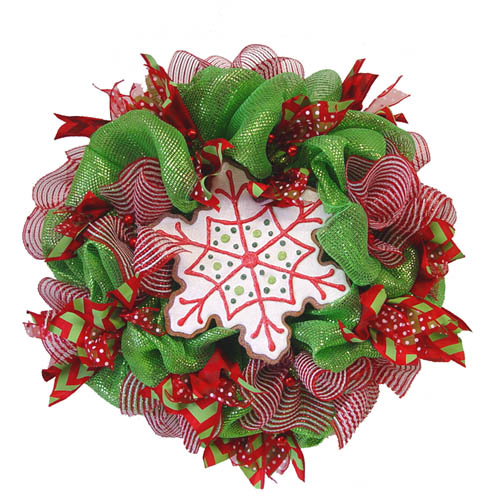
We added a large
RAZ Cookie Snowflake to the center of the wreath just securing with a chenille stem and clear fishing line. You could also use hot glue, but we don't make our wreaths here to be permanent. We make them just for demos and to show you the size of some of our products for ideas. We take things apart and use them again)))
The RAZ Cookie items are great additions to wreath because they are large, lightweight and the larger ones even have easel backs which make securing them simpler. We have a good assortment of
Cookie Snowflakes that are in stock now......so you can get a jump on your Christmas creations.
We decided to make some further adjustments to this wreath and try it without the red/white mesh ruffles and more ribbon.

So we went back and cut more ruffle strips and placed them in the twist where the ruffles had been.

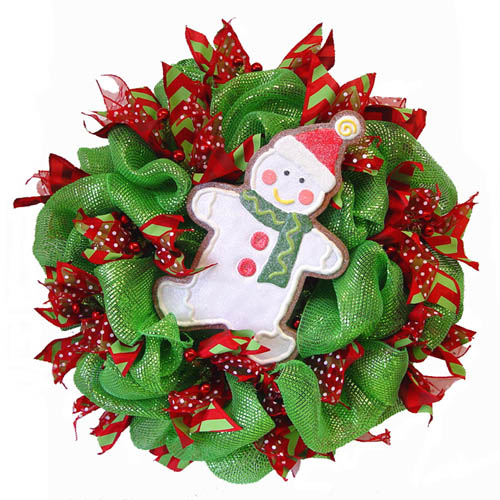
Wreath with one of the large RAZ Snowman Frosted Cookie. This Snowman is sold in a set as a Snowman and Santa cookie. The frosted cookie ornaments measure about 15-16" and these are not easel backed. But they are lightweight .

This
RAZ Frosted Snowman Cookie is a little different style, measure about 16" and is sold in a set that includes a
Snowman and a House.
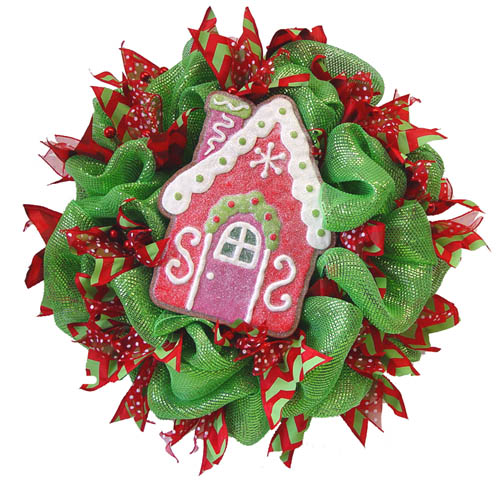
The house has some red and green, but some pinkish color too so it would work well with a multicolor wreath creation.
The Frosted Cookie House measures about 14"

This is one of our largest RAZ Frosted Cookie products. The
Frosted Cookie Tree measures about 19" x 14.5" and has an easel back.
We have a couple more large frosted cookie items from our collection.

17.5" Standing Cookie Snowman - Easel Back

20" Standing Frosted Cookie Santa - Easel Back
These large easel back frosted cookie decorations look great on table tops or on your tree.....so if you tire of them on your wreath....you can easily find another perfect spot for them.
We have a large collection of frosted cookie style of ornaments in all sorts of sizes and shapes - reindeer, elves, houses, stockings, candy canes, snowflakes, gingerbread kids......just do a search on "cookie ornaments" and you'll bring up more than 50 styles, most of which are in stock now. These smaller ornaments would look great added to any of the wreaths above.
Hope you enjoyed this tutorial....we enjoyed making it and just because it's June.....doesn't feel strange to us at all)))) Our youngest grandson (5 years old) goes around the shop singing Christmas carols all day.....think he's going to fit right into the family business))))