Supplies
XX751123 24” Purple Metallic Pencil Wreath
XB97910-15 10" Natural Fabric Mesh Roll – 2
RG121223 2.5” Purple Ribbon - available in kit only
RG114489 2.5” Polka Dot Ribbon - available in kit only
RG0135102 1.5” Black/Natural Ribbon
RG0135120 1.5” Orange/Natural Ribbon - available in kit only
E142317 I Ain’t Afraid of No Ghost Sign - available in kit only
H3512304 RAZ Cat Skeleton Frankenstein Ornaments Set of 3 - available in kit only
Click here to purchase I Ain't Afraid of No Ghost Wreath Kit Note: Sorry, but the kit has sold out, no more will be available.Note: Once the kit has sold out, the tutorial and video will be left up, since the basic directions can be followed and other products chosen to make a wreath of this type.
A 24" metallic pencil wreath was chosen for this wreath tutorial. Other colors could be substituted and it doesn't matter if you use a 24" pencil wreath or 24" work wreath. Our 24" wreaths actually measure 15" across the largest metal ring, but with the addition of mesh, ribbons and other products you wind up with a wreath that measures 24" to 30" just depending on how you finish you wreath.
You can make a hanger for your wreath using a couple of zip ties. It helps to go ahead and make your hanger, so you can keep your wreath centered.
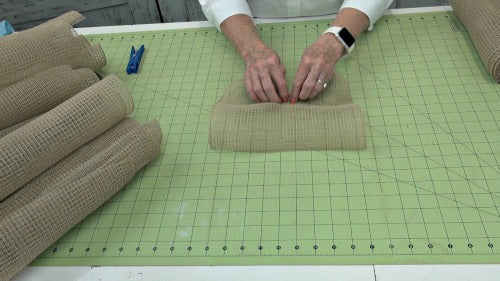
The first step is to cut the 10" wide mesh into 10" lengths. When doing the ruffle technique it is recommended that you use 10" side mesh and not split a 21" product in half. The more cut edges you have, the more raveling. All woven mesh products will ravel and you will need to clip strings at the end or along the way whichever you prefer.
The mesh we chose is a new style for this year. It's a natural color and made of a combination of polypropylene and polyester which gives it a nice fabric feel. It takes less than two full rolls for this project and you should have a little left over of the mesh.
We use a 24" x 36" self healing Omnigrid Cutting Mat and a 45mm Omnigrid Rotary Cutter (these are available at Amazon and we have included our affiliate links.)
The ruffle technique is one of the easiest methods to use on making a wreath. It always comes out symmetrical. It may take a little longer to do, but it always turns out with good results.
To make a ruffle, just position the mesh with the selvage (uncut edges) to the outside, and start scrunching up through the center, hold the ruffle pinched. You can use something like a clothespin to hold it while you work on your next ruffle. Make three ruffles, hold them together and secure in one of the twist. We started on the outer ring. It doesn't matter which ring you start on, just do whatever is comfortable for you.
Secure the cluster of three ruffles by giving the twist a couple of turns. You don't have to secure more than that, because you will be adding more product to the twist later.
Continue working all the way around the outer ring. You wreath should look like this when you have completed the outer ring.
Next you are ready to move up to the inner ring. Attach a cluster of three ruffles in each of the twist.
The basic construction of the wreath is finished now and the wreath measures about 24" in diameter. You can decorate your wreath with ribbon and/or other items. We chose four ribbons, two were 2.5" in width and two were 1.5" in width.
We cut our ribbons 14" in length, and did a chevron or dovetail cut to the ends. It's always a good idea to do a test ribbon strip to see how long you want to cut your ribbons, before cutting up all your ribbon. Only cut what you need.
For this wreath, we cut 18 pieces of each style and made a cluster of all four of the different ribbons, pinching the cluster in the center. Make sure all your ribbons are right side up.
To attach the ribbon cluster, open a twist making sure the ruffles stay in place and secure the ribbon cluster on top of the ruffles. Give the twist 3-4 turns this time since this is the last thing you are adding to the twist.
Attach a cluster of ribbons in each twist all around the wreath. You will have some ribbon left over from each roll.
Next we attached the metal I Ain't Afraid of No Ghost sign. The sign has a chain and we secure the center of the chain to the top center of the wreath using a zip tie. This will be easier to secure working from the back.
You can also see the hanger on the back of the wreath we made from zip ties. Work the sides of the frame into your mesh and if you need to secure it more, on the side where the chain is attached, you could also secure with a zip tie or chenille stem there.
Next we added three RAZ Halloween ornaments and positioned them around the sign. Two on one end and one opposite. These ornaments are soft, plush material so we slipped a safety pin through the back, and slide a chenille stem under the pin. The ornaments were attached to the wreath frame with the chenille stem. Just a half of a chenille stem is long enough for attachment.
The last step to your wreath is to check the back for any sharp edges from any of the twists, chenille stems or zip ties. Clip the strings and smooth out your ribbons. The overall wreath measured about 28-29" when finished.
SaveSaveSaveSaveSaveSaveSaveSaveSaveSave