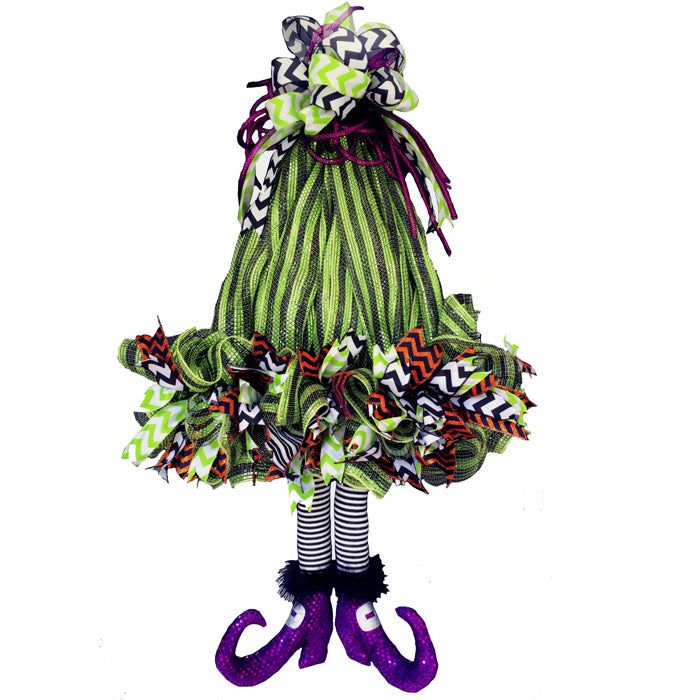
2016 Witch Hat with Legs Wreath Tutorial. This is similar to witch hat wreaths that we have done before using two straight ribbon rails, but today we used an open wall tree wreath form.
SuppliesXX765209 20" Pencil Evergreen Open Wall Tree - 1
RE1363JK 10" Lime Green Black Striped Wide Foil Mesh - 2 (we only used 1 roll, but it was very close, so we would advise purchasing two rolls so that you don't come up short) This mesh is sold out, but other styles of 10" mesh could be used.
X538540-19 2.5” Two Sided Orange/Black Chevron Black/White Striped Ribbon - 1 This ribbon is sold outCL1510YP-black-white-chevron 1.5” Black/White Chevron Ribbon - 1
CL1510YP-lime-white-chevron 1.5” Lime Green/White Chevron Ribbon – 1
17294 26" Witch Legs Black/White Stripe Purple Shoes – 1 set (sold out, but other styles of witch legs available)
RB3004H7 Antique Fuchsia Deco Flex Tubing - 1 (this color is sold out, but other colors of Flex Tubing available)
Note: Will will have a limited number of kits that include these supplies, but the tutorial will be left up even after the kits are sold out, since you can apply this same technique and just choose similar supplies in other colors and styles.
Click here to purchase Kit: 2016 Witch Hat with Legs Kit Update: Sorry kit is now sold out, but you can purchase some of the items and substitute ribbons, legs, etc.
The open wall tree in the evergreen color was used.
Summary:
Evergreen Open Tree Form: Any color could be used since it really doesn't show.
10" x 10 yd Mesh: Attach to the top of the open tree form by grasping the mesh about 3" from the end and secure in the top twist.
Smooth the mesh down and pull down to the first twist on the lower edge of the form (not the trunk portion, you won't be using that part to attach any mesh.
Attach the mesh and then pull back up to the top and secure again in that top twist. Open that top twist each time to secure the next strip making sure the previous ones don't come loose. Just work back and forth going from the top of the tree to the lower edge.
Sometimes when you work from top to the lower edge, you will need to attach your mesh in an area where there is no twist. In this case, just cut a chenille stem in half and slip it over the mesh and secure to the wreath form. Don't worry about small gaps along the lower edge where you have attached your mesh. These gaps won't show once you add in the ruffle clusters.
When you have attached your last strip of mesh, you can cut the mesh away from the roll leaving a tail of 3-4"
This tail can be tucked to the back side of the wreath form and secured with a zip tie. Cut wire cutters to snip off the end of your zip tie so you don't ruin your scissors. The beginning end of your mesh can be secured in the same manner.
Next, take the remainder of your mesh and cut pieces 10" in length for your ruffles. We use a 24" x 36" self healing Omnigrid Cutting Mat and a 45mm Omnigrid Rotary Cutter (these are available at Amazon and we have included our affiliate links.)
We cut of the remainder of the roll and didn't really try to count our pieces or anything. The ruffle was made by scrunching up through the middle starting at the cut edge (selvage edges to the outside)
Make your ruffle and you can hold it in a clothespin in you need to. Make three ruffles and hold them together in a cluster.
Secure the cluster of three ruffles in a twist along the lower edge of your witch hat. Again, we are not using the trunk portion of the wreath form and it will be covered up when we are done. Open a twist, making sure your mesh doesn't slip out and place your cluster of ruffles, re-secure with a couple of twists. In areas where you need to attach a ruffle cluster and have no twist, use a half piece of chenille stem, lay it across your ruffle cluster and twist from behind, making a pick. Then secure the ruffle cluster directly to the wreath form.
In areas where you attached your mesh with chenille stems, just work your fingers down and secure your ruffle cluster right on top of that area, flip the wreath over and twist your chenille stems from the back.
We used one complete roll of mesh for our wreath, but one cluster of ruffles only had two ruffles in it. It wasn't noticeable, but I would advise purchasing two rolls of mesh before starting this project. It would be better to have extra mesh in case you needed more ruffles than we used, or perhaps the top portion of the hat might take up more mesh, etc. Better to have too much than too little)))
Next we cut ribbon strips 12" in length. It's always a good practice to experiment with the length of your ribbon before you start cutting up all your ribbon. We had three styles of ribbon and cut several pieces in 12" lengths. A chevron cut was made in the ends of the ribbon.
The three ribbons were layered with the narrow on top of the wider and pinched in the center. These clusters of ribbons were secured on top of the ruffles. In areas that had twists, the twists were opened making sure everything stayed in place and the ribbon cluster attached. The twists at this point were secured 3-4 times since this was the last thing we were adding to our wreath.
In areas where there was no twist to attach to, we made ribbon cluster picks with half piece of chenille stem and slipped it down over the ruffle attachment area and secured from the back.
Fill in as many ribbon clusters as you like to get the bottom of the witch hat full as you prefer. We probably used 12 or so ribbon clusters at least.
Next we positioned the 26" witch legs underneath the wreath form to see where we wanted to secure them.
The trunk area of the wreath made a perfect place to attach the legs. We secured the twists around the upper stuffed portion of the leg and this was about the length we needed.
These legs are on wooden sticks so they can't be flexed. The upper portion of the witch legs were then secured to the wreath frame with zip ties.
Next step was to make a simple loop bow. We just used two of the 1.5" ribbons and didn't use the 2.5" orange/black. But you can make your bow anyway you like. We also added in some Antique Fuchsia Flex Tubing that was about the same color as the witch shoes. Once we had our bow made of ribbon, we decided that we needed more of the Fuchsia Flex Tubing for color, so we made an additional loop bow out of more flex tubing.
When you make your loop bow, be sure to pull up about a 5-6" loop, twist your ribbon so you right side will be up and continue making loops. Make as many loops as you like with the ribbon, ours had about 12 loops. Secure the loops with a zip tie, but before you pull your zip tie closed, slip a chenille stem under the zip tie so you will have something to attach your bow with.
The bows were attached to the top of the witch hat.
Last step is to check the back of your wreath and take the ends of the chenille stems and wrap around the metal part of the wreath frame. Check your ends where you've cut your zip ties and make sure they are not going to scratch your wall or door. Smooth out your ribbons. If you see any gaps anywhere you can always add in more ribbon or another ruffle if needed.
When completed the witch hat measured about 40-41" in length and 24-26" in width.
SaveSaveSaveSaveSaveSaveSaveSaveSaveSaveSave